
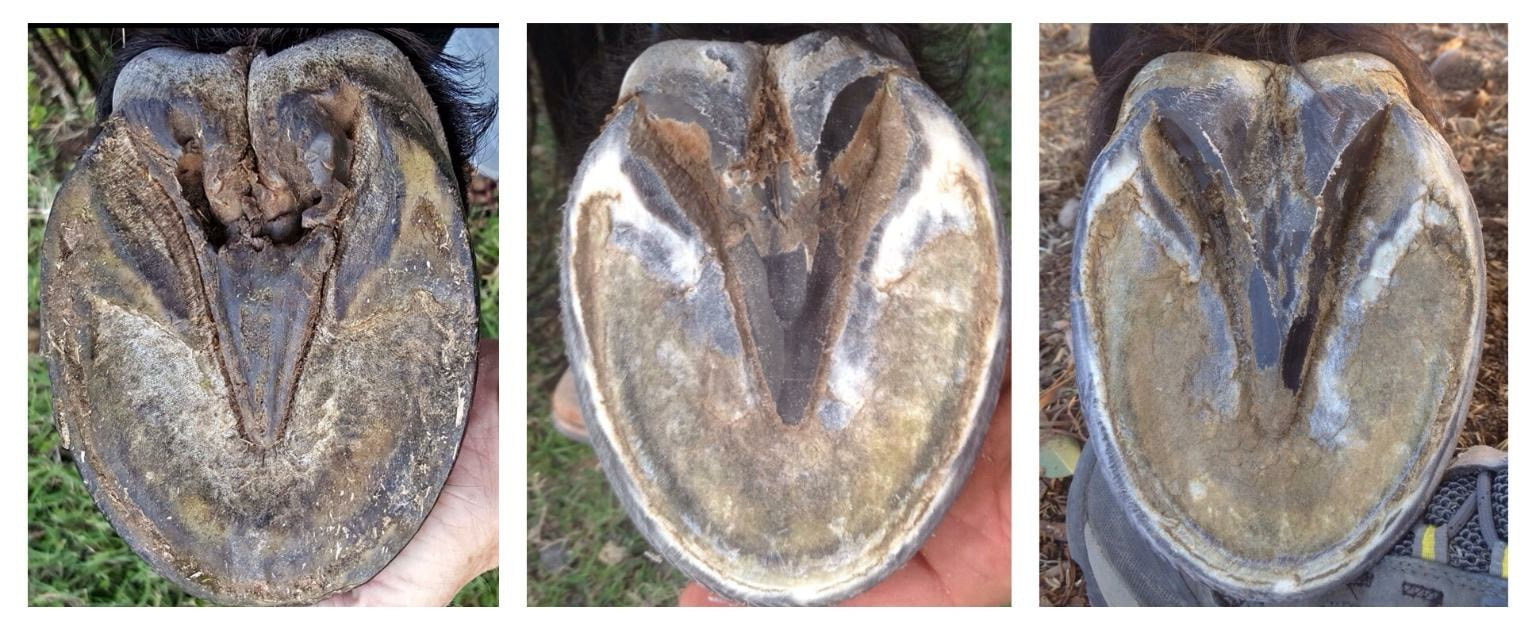
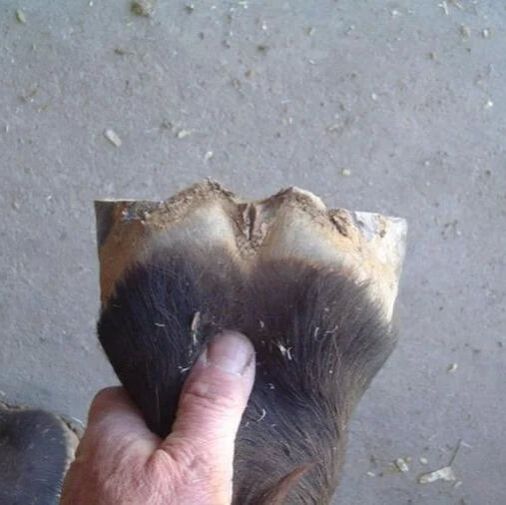
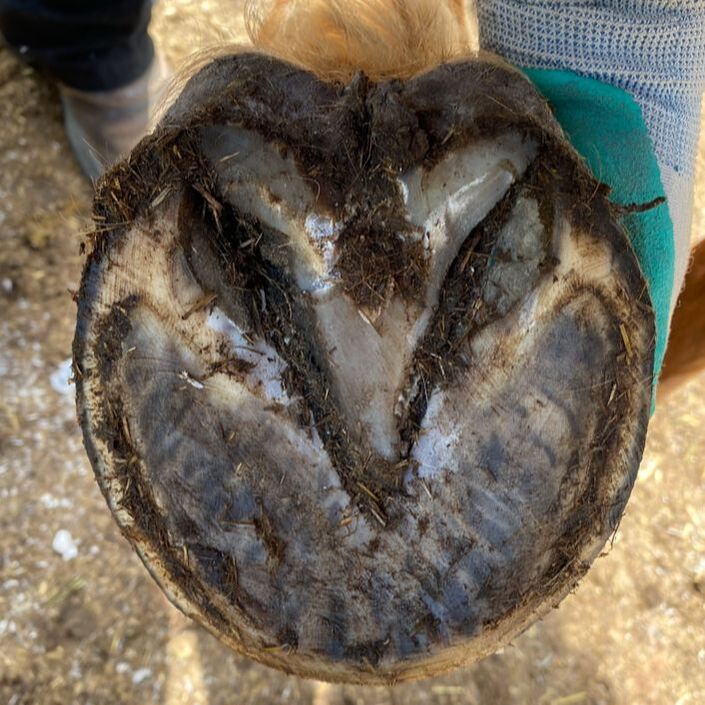
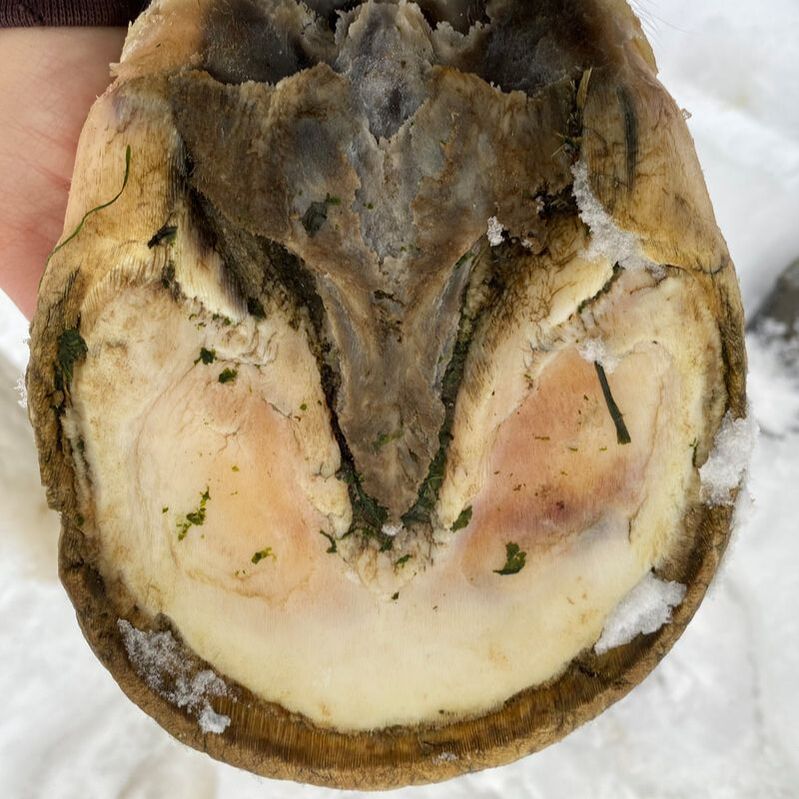
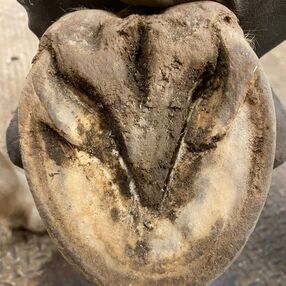
 On the far left a very thrushy frog, the center is healing, the right is strong and the sulcus has closed in. Maintaining a horse's hooves is vital for their overall health and performance. Among the many aspects of hoof care, trimming the frog holds a special significance. The frog, that V-shaped structure in the center of the underside of the hoof, plays a crucial role in shock absorption, traction, and blood circulation. Properly trimming the frog not only ensures the horse's comfort but also prevents potential issues like thrush and caudal hoof pain. In this guide, we'll delve into the essentials of trimming the frog effectively, drawing insights from barefoot experts like Dr. Robert Bowker and Pete Ramey.
In conclusion, trimming the frog is a critical aspect of horse hoof care that requires attention to detail and a thorough understanding of equine anatomy. By following proper trimming techniques you can ensure optimal caudal hoof health for your horse. Consistency and attention to detail are key in maintaining healthy hooves and preventing potential issues down the road.
0 Comments
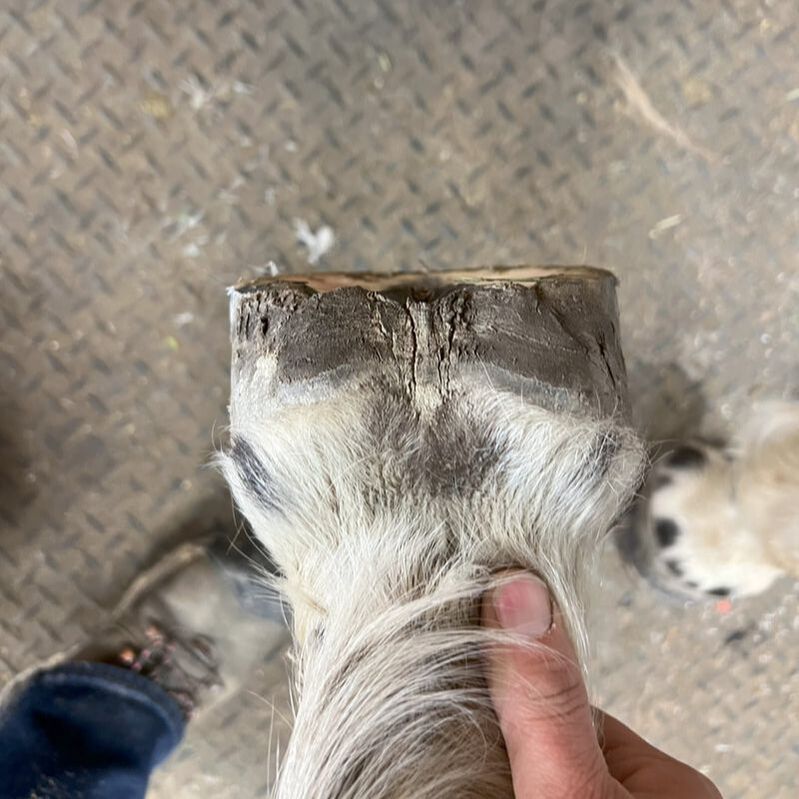
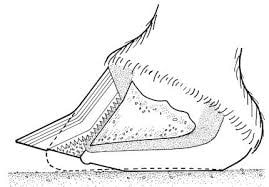
Understanding the Difference between Laminitis and Founder In the horse world, Laminitis and Founder are often used interchangeably, but they actually mean different things. Let's break it down: Laminitis = Inflammation of the Lamina Laminitis happens when the sensitive lamina around the coffin bone gets inflamed. This includes the sensitive lamina on the front and sides of the coffin bone, as well as the solar corium on the bottom of the coffin bone. Founder = Coffin Bone Rotation Founder occurs when the coffin bone rotates or sinks within the hoof capsule. It can be a small or big rotation, but either way, it's considered foundered. Think of it like being pregnant – you either are or you aren't. Once that hoof wall connection is gone, it has to be regrown from the top down, a long process of about 8 -12 months. It's important to know that a horse can have laminitis without getting founder, and a horse can get founder without experiencing laminitis. While they often go together, it's not a strict rule. Some horses with laminitis progress to founder, but not always. Founder can also happen on it's own, over time due to too long in between trims or improper trimming - this is called mechanical founder. These horses might not show laminitis signs but may seem sore, stiff, or unsound. The great news is most cases of laminitis or founder can be healed. It's a challenging journey, but with a knowledgeable trimmer or farrier, along with some changes to the horse's diet and living conditions, recovery is possible! 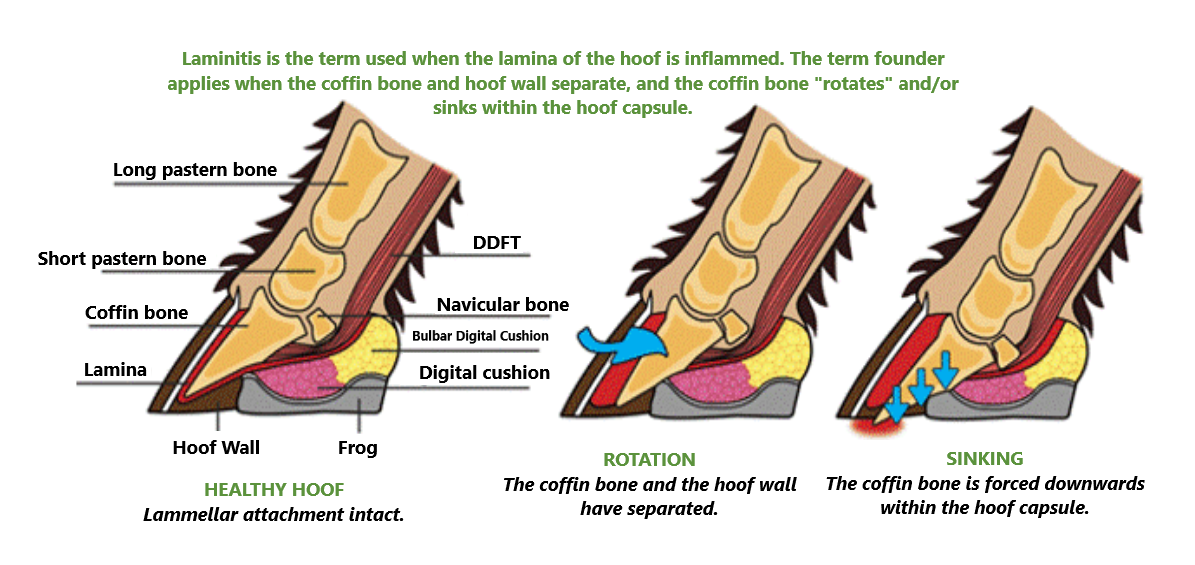 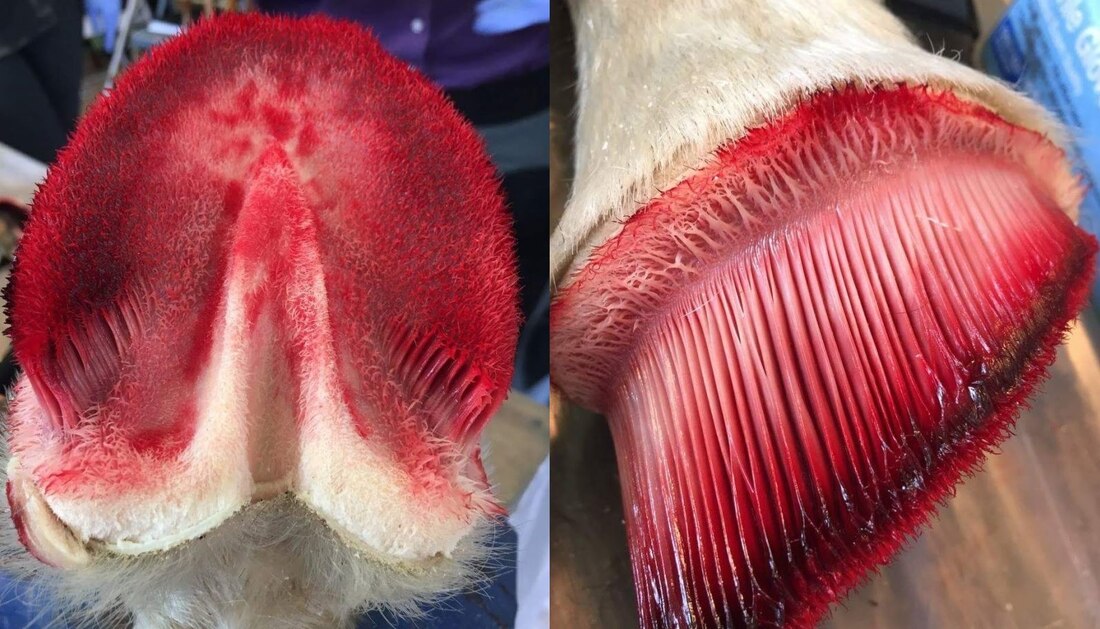 On the left is the solar corium, on the right the sensitive lamina Understanding Founder and Hoof Healing Founder is a serious condition involving the rotation and potential sinking of the coffin bone within the hoof capsule. It can range from a slight rotation to a severe scenario where the coffin bone penetrates the sole and emerges at the bottom of the hoof. Although the goal is to avoid such extremes, the reality is that founder is a common issue observed in trimming practices. In a foundered hoof, the wall at the coronary band initially displays a healthy angle, even if only for a short distance. As it descends, there is a sudden change in angle, and the wall flares forward. Skilled trimmers and farriers can identify founder, but the degree of rotation requires diagnosis through X-rays by a veterinarian. Sometimes, a hoof wall may flare but not be foundered, this is characterized by a less abrupt angle change and often involves multiple deviations in angle. A flare is simply a stretching of the lamina, while founder is actual disconnection of the lamina. While prompt veterinary attention is crucial during a laminitic event, X-rays are equally important for foundered horses. Collaborating closely with your farrier/trimmer is essential to determine the rotation severity and trim the hoof correctly for pain relief and healthy growth. Though serious, founder is often treatable. A knowledgeable trimmer/farrier is vital, understanding the hoof condition and trimming to alleviate rotation, fostering the growth of a healthy, well-connected hoof wall from the coronary band down. Rehabilitation duration varies, spanning 8-12 months depending on severity and individual hoof growth rates. The key to a successful rehabilitation is maintaining a short toe and reducing leverage on the fragile new growth, preventing excess length that could leverage the lamina apart. A short trimming schedule, typically every 2-4 weeks based on severity, is crucial. I routinely employ this approach in rehabilitating foundered horses, and I often use glue on shoes to provide comfort and soundness during the rehabilitation process. 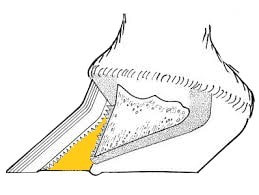 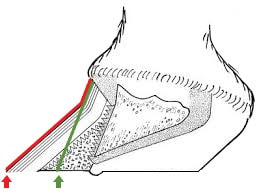 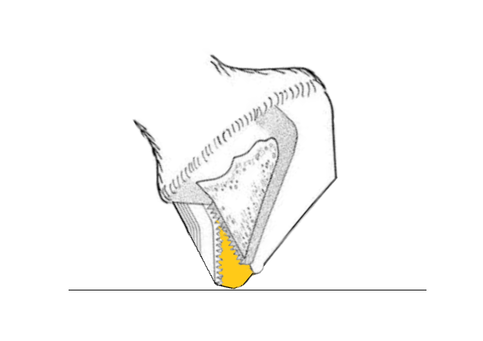 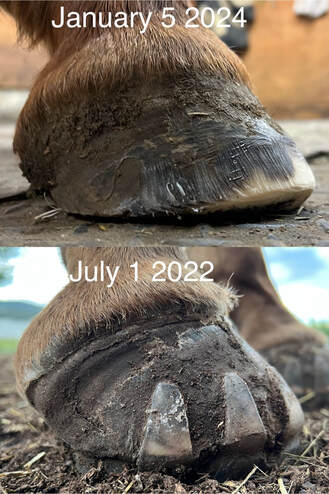 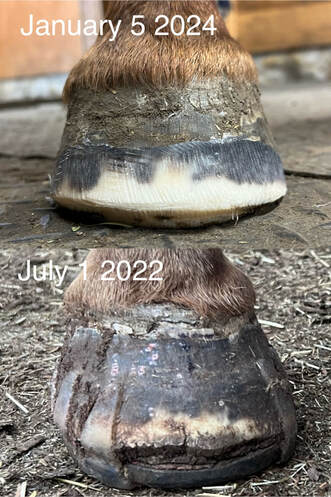 Understanding Laminitis: A Comprehensive Insight into its Impact on Horses Laminitis is a complex condition characterized by inflammation of the sensitive lamina enveloping the coffin bone. This intricate structure involves the sensitive lamina along the front and sides of the coffin bone, as well as the solar corium beneath the bone. The sensitive lamina is a vascular layer covering the coffin bone, equipped with nerves and a blood supply. It intricately intertwines with the insensitive lamina, positioned on the inner side of the hoof wall. Unlike its counterpart, the insensitive lamina lacks a blood supply and nerves, yet its semi-rigid structure provides essential support. The interlocking connection of the sensitive and insensitive lamina acts like Velcro, crucial for maintaining the proper position of the coffin bone within the hoof. When a horse experiences laminitis, the sensitive lamina becomes swollen and inflamed. This inflammation is profoundly painful as there is limited room for expansion between the interlocked insensitive lamina. The severity of laminitis varies; a horse with mild laminitis may exhibit sensitivity when walking on hard surfaces, while severe cases may result in a distinct rocked-back stance as the horse seeks relief from inflamed lamina pressure. Swiftly reducing inflammation and relieving hoof wall pressure through trimming by a knowledgeable trimmer or farrier can often prevent the progression to founder. If left unaddressed in severe cases, the persistent pressure may lead to lamina separation, allowing the coffin bone to rotate and sink within the hoof capsule. It's crucial to emphasize that this progression is not an overnight occurrence but develops gradually, underscoring the urgency of prompt intervention to alleviate inflammation. Laminitis can be triggered by many factors, with carbohydrate overload from lush grass or sudden grain intake being the most common. Other triggers include hormonal imbalances, stress, metabolic issues, systemic conditions, and even improper trimming or repeated concussions on hard surfaces. If you suspect your horse has laminitis, call your vet ASAP, if left untreated it can lead to serious complications. 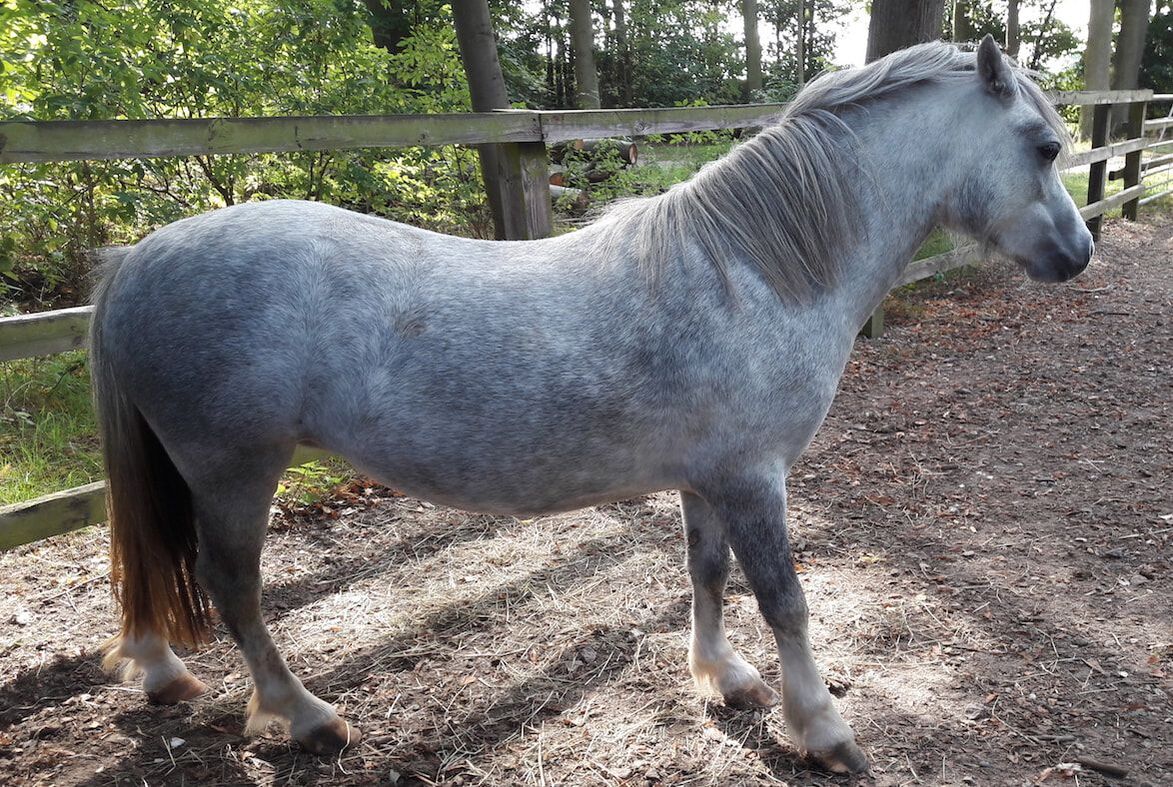 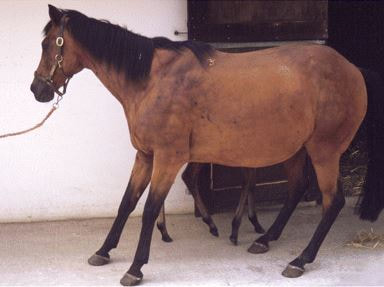 Unraveling Acute Founder: Debunking the Myth In our recent posts about Laminitis and Founder, we've explored the differences and subtleties of these equine hoof conditions. Now, let's delve into the intriguing but incorrect concept of "Acute Founder." Acute Founder, often described as a rapid event - akin to an overnight occurrence, is commonly known (incorrectly) in equestrian circles. However, it's essential to clarify – this phenomenon does not truly exist. In the equestrian world, it's not uncommon for horses to undergo gradual, unnoticed founder over an extended period - this is called mechanical founder. Despite regular hoof inspections, the lack of comprehensive knowledge sometimes leads horse owners, farriers, trimmers, and even veterinarians to overlook the subtle signs of founder. This knowledge gap can be disconcerting, underscoring the need for ongoing education within the professional community. Now, how does this tie in with a scenario where a horse seemingly acutely founders after a grain binge? Let's break it down. In my experience, I've encountered horses where, on the initial visit, I identified signs of founder in their hooves. Surprisingly, these horses were actively performing daily exercises and work, exhibiting no overt signs of soreness or discomfort. Often times the horse owner doesn't understand how anything could be wrong, and chooses to disregard this information. However, dismissing this situation with an "if it ain't broke, don't fix it" mentality is a perilous choice. The consequences of neglecting this metaphorical "ticking time bomb" are substantial. The horse continues its routine, seemingly unaffected, until a day of grain indulgence/hormonal imbalance or some other laminitis trigger, rendering the horse acutely laminitic and unable to walk. When the vet is called, the horse owner, citing the horse's soundness the day before, leads to a common misdiagnosis - Acute Founder. The assumption is that founder occurred overnight due to the laminitis event, when, in reality, it had been quietly progressing for an extended period of time. Similar situations arise, such as a horse progressing well until it develops tenderness in a front hoof. When the vet is consulted, the assumption is that the founder occurred recently. These occurrences, are not rare, and they underscore the importance of understanding the timeline of founder development. While laminitis can, in some cases, lead to founder, the crucial fact is that founder does not transpire overnight. For the lamina to lose its connection and the bone to initiate rotation away from the hoof wall, a gradual process unfolds. As the lamina separate, the cells secrete a liquid form of keratin, creating a lamellar wedge that progressively enlarges over time to fill the growing void between the coffin bone and the hoof wall. As the hoof wall continues to grow, the wedge pushes the wall forward creating the extreme flare we typically associate with foundered hooves. In summary, the notion of a horse acutely foundering overnight is a myth. Founder is a gradual buildup, while laminitis, if promptly addressed, does not necessarily culminate in founder. Continuing to deepen our understanding of these intricate hoof conditions is key to promoting the well-being of our equine friends. 
 For more information check out our
Laminitis and Founder Online Course! I have been trimming for about 15 years now, and my trim has definitely evolved and changed along the way. There are many cases where I don’t trim from the top - if the hoof doesn’t warrant it, but there are a lot of cases that I do trim from the top, and a lot of it, as I specialize in founder rehab. I learned a long time ago, that the best trimmers and farriers (and bodyworkers and trainers and coaches and horsemen), don’t subscribe to a specific method, but stay flexible to adapt to each horse, each hoof, and each moment as needed. I live by the philosophy to never say never or always when it comes to horses, because we are constantly learning and evolving and changing things up. A lot of the argument I get about trimming from the top is that it thins the hoof wall. And yes, I agree that it does that. In fact, thinning the hoof wall is actually part of what I’m aiming for. Not because I want to weaken the hoof or take away protection, but a thinner wall wears faster, and won’t apply as much leverage if it’s wearing as the wall grows down. And that leverage is another reason I rasp from the top. Every 1/2 inch of length is equal to 50lbs of pressure per square inch, and when a long toe applies pressure on the wall it can lead to flare and lamellar detachment. The biggest thing that I think people need to realize also, is that when we thin the hoof wall by rasping, there is stretched white line or lamellar wedge underneath it, which actually acts as an insulator to the wall, so we are in fact thinning the original wall, but the same amount of protection remains. So to me, there is no debate to be had. I will rasp from the top when flare is present, to reduce leverage on the lamina and the new growth that is coming in. If a hoof has no flare or leverage, then it doesn’t require rasping from the top. I would be absolutely thrilled to have someone show me a case study of a foundered horse that had a lamellar wedge, that was trimmed without ever having the wall rasped from the top, that was successfully rehabbed to have complete lamellar reconnection. Rasping from the top is hard work, and if I could find a way to rehab these horses without doing it, I’d love to save the energy. But the bottom line for me is that I’m in this business to fix horses, and this technique works well for me when used appropriately. 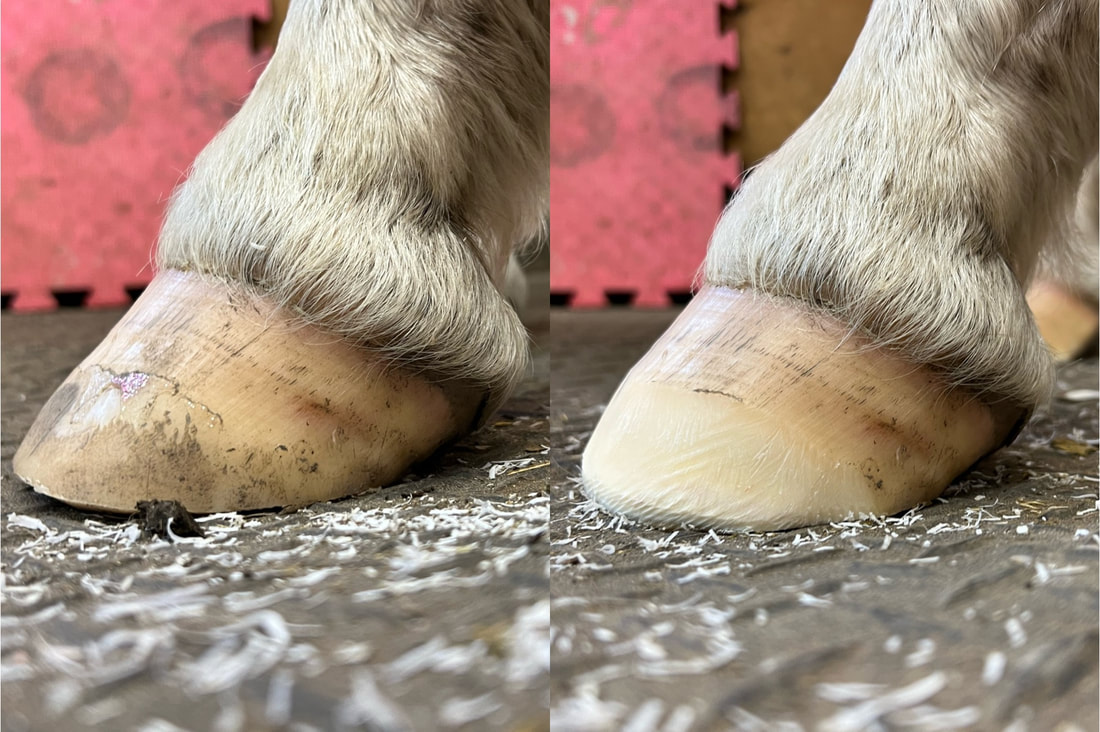 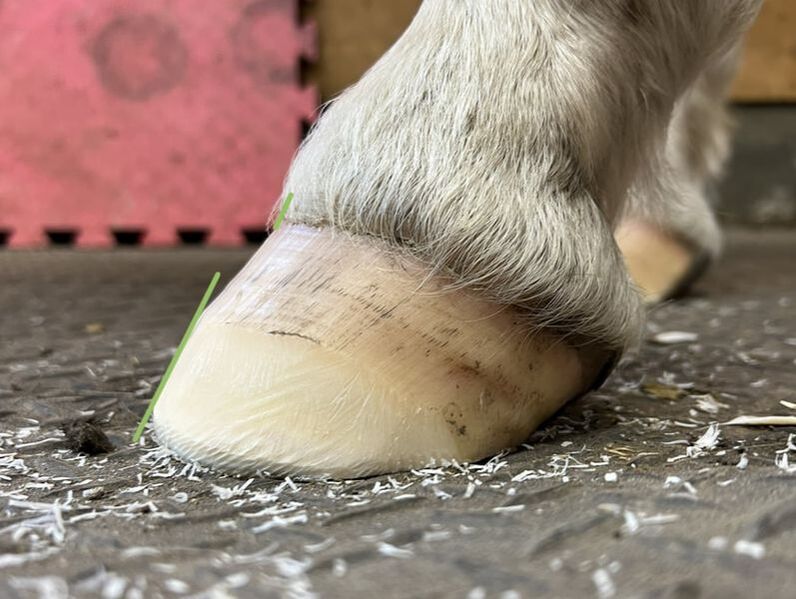 The following video shows a barefoot trim on Mustang, a previously wild horse. He has huge strong frogs and digital cushions, and very thick hoof wall. This video shows the trim on the front hooves only. This first video shows the trimming of a pretty well maintained "vertical" bar. The second video shows bar that is a bit more "overlaid" or "embedded" and how I would trim them differently. I try not to get too hung up on the "type" of bars, but instead just try to trim the bar to match the solar concavity and to allow the bar to function as it should - to help structure the shape of the back of the hoof and the collateral grooves. .
I have been wanting to make a how to video on my application process for composite shoes for a long time, but somehow I just haven't found the time. The video below is over an hour of footage from a recent composite shoe clinic I did, and I just sort of pieced the clips together. For this reason it is kind of choppy and the audio is broken up, but I thought there was still a lot to gain from it.  This is a maintenance trim on Jack, our IR school pony. He is trimmed every 4-6 weeks so there is usually little distortion and just a bit of excess length. Because he is IR, we diligently manage his weight and he rarely if ever gets grazing time (always with a muzzle). He lives out 24/7 on our Paddock Paradise track system. Please excuse the sometimes less then perfect video angles, trimming while filming with my GoPro on my head is a bit of an art lol.   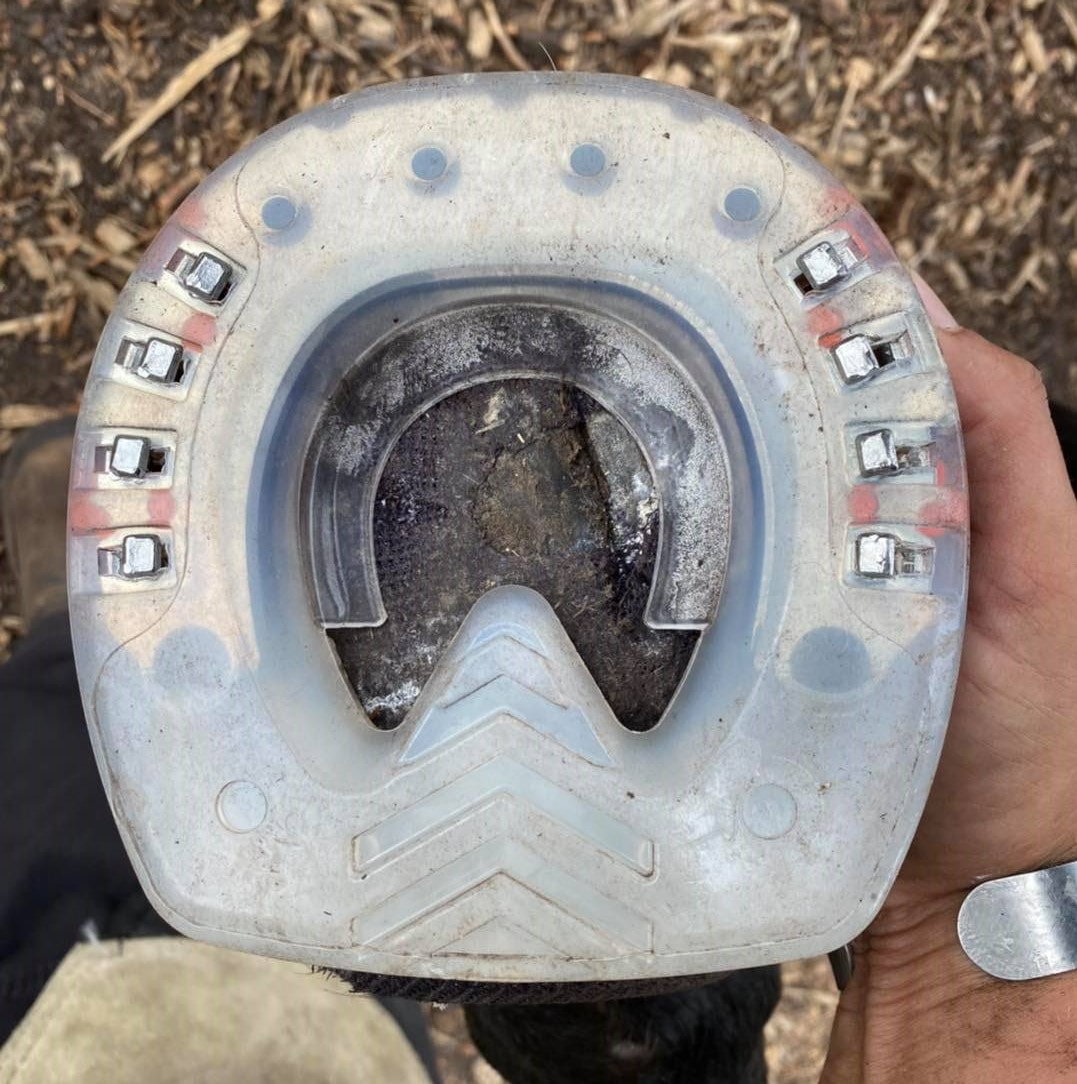 Our world is ever changing and the technology and research in the farrier industry is evolving fast. Composite shoes and pads are flooding the market, being manufactured by many different companies around the world. While I am a huge barefoot advocate, I am also an advocate for keeping horses comfortable and sometimes that means they require hoof protection. I am not in favor of traditional metal shoes because in my opinion they are too rigid and limit hoof flexion as well as increase the impact energy of movement (by negating digital cushion function). This impact must then be absorbed by the horse's joints and musculoskeletal system. Metal shoes also peripherally load the hoof (meaning they only weight the outer hoof wall), causing frog and digital cushion atrophy and lack of sole stimulation. Composite shoes are a good alternative as they can provide protection and comfort while still allowing the hoof to function naturally to absorb impact. This is because of their anatomically minded design that incorporates weighting the frog and therefore the digital cushions as well as the sole, bars and hoof wall collectively. [Weighting the whole bottom of the hoof as nature intended] Like traditional shoes, composites can be used in concert with hoof packing, wedges, anti fungal pastes, and be customized to the individual horses' needs and hoof shape. In order to fully understand the benefits that composite shoes can provide we have to understand when they may be a good option for a horse. I see all shoes, boots, pads, casts and hoof protection sources as a band aid approach. This is not a negative thing, but should be seen as a means to an end. In other words we should use these devices to keep the horse comfortable while we are addressing the root cause of the problem (i.e. weak or damaged hooves) so that we can ultimately return proper hoof form and function so that protection is not needed. Horses that have thin soles, disconnected hoof walls, weak frogs and digital cushions, who are foundered or have navicular disease can all benefit from the use of composite shoes. Below are several examples where I have applied composite shoes for various reasons: The most important part of applying a composite shoe is the trim you apply underneath the shoe. This goes for traditional metal shoeing as well. Setting the shoe back to the optimal breakover point is crucial. Leaving excess hoof wall at the toe will allow the toe to migrate forward, leading to under run or crushed heels and a distorted hoof shape. When does a horse need composite shoes? Horses are not naturally flat footed. Flat soles with a lack of concavity come from disconnected hoof walls. Horses that don't have this connection can benefit from composites because they add immediate "false concavity". This concavity provides relief to the inflamed and over stimulated solar corium on the underside of the coffin bone that is commonly seen in flat footed horses. These are typically the horses that are sold as "needing shoes", and are the ones instantly lame when the shoes are pulled. There is a severe breakdown of the hoof capsule and in my opinion it needs to be corrected, by facilitating a proper hoof function via the trim underneath the composite shoe. The horse can then grow in a well connected hoof wall that will in time re-elevate the coffin bone and create the concavity that is needed for soundness barefoot.
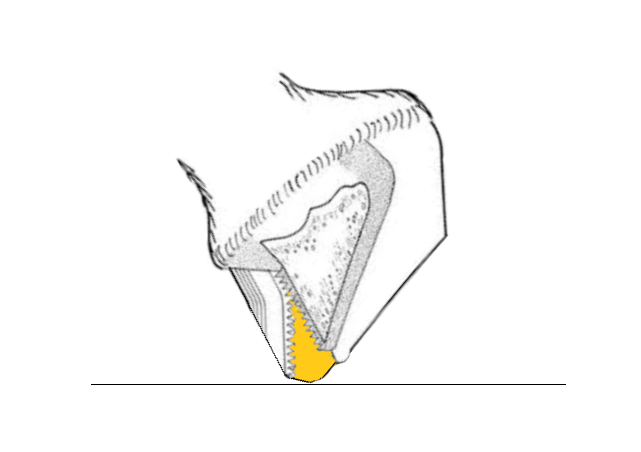
Horses that have thin soles also benefit from composites. They protect the sole and cause it to thicken by decreasing the wear on it. It is common practice for traditional farriers to "clean up" the sole during a trim, or "carve in concavity", thereby thinning the sole and removing the often ugly but helpful protective outer layer. Routine trimming like this leads to thins and weak soles that are unable to bear weight. Giving the sole a reprieve by using composite shoes call allow it to thicken and then we can transition back to barefoot in a way that allows proper hoof function to actually stimulate more sole growth and an overall thicker, healthier sole. Horses with navicular disease or a weak caudal hoof can also benefit from using composite shoes. The design of the composite shoes I use (Easyshoe Versa product line) incorporate frog support and a thick outer rim that also weights the sole of the hoof. Typically the back of the hoof becomes weak from a lack of proper stimulation. Traditional metal shoes only weight the heels and hoof wall, lifting the frog off of the ground. This lift reduces stimulation on the frog and therefore the underlying tissues of the digital cushion. This lack of stimulation over time can lead to atrophy and degeneration. When the soft tissue starts to fail, the horse usually overloads the toe and avoids weighting the heels, further compounding the problem and this can lead to irreversible damage to the navicular region. Using a composite shoe with sole packing and/or heel padding can often create enough of a cushion that these horses can start to comfortably weight the rear of the hoof again and start to regenerate the soft tissues. Over time you can reduce the padding and sole packing and eventually move from composite shoes back to barefoot. Prioritizing heel first landings is key to this rehabilitation process. 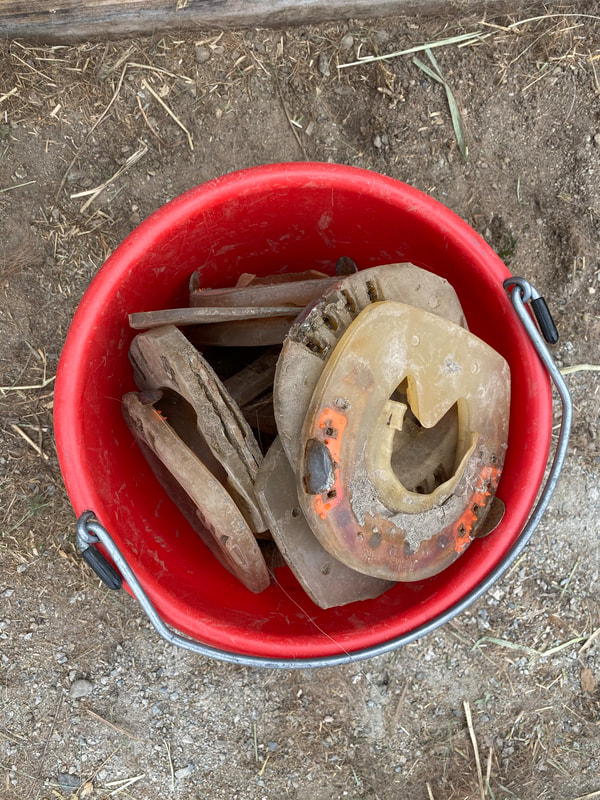 Composite shoes are very durable and often hold up better then metal shoes. I usually get 2-3 resets out of each pair. I love to be able to utilize composite shoes when needed in my practice. They truly have become a game changer for me. For clients who are not interested in using hoof boots, or horses that require 24/7 support in the beginning of their rehab these shoes can be the difference between soundness and pain. My number one goal of using composite shoes is to return the hoof to it's proper form so that doesn't require protection in the long run. In all actuality everything we can do with composite shoes can be done with some variation of hoof casts, boots and pads, but often the use of the composite shoes is far more convenient for the owner. While my primary goal is to help the horses, I can't facilitate that if I don't keep the owners happy :)  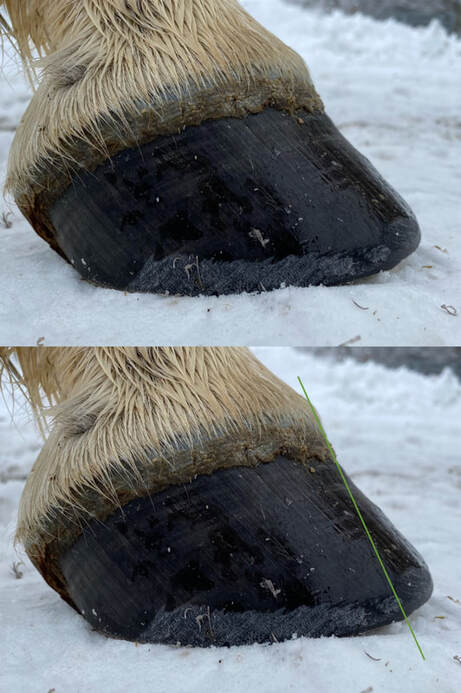 What is breakover when talked about as a trimming landmark? Breakover is trimmed at the forward most part of the hoof at the toe. It is the very last part of the hoof to be touching the ground as the horse breaks over and lifts the leg into the swing phase of the stride. It is usually trimmed as a bevel or roll into the hoof wall, but occasionally is trimmed back farther into the golden line or even the sole if the sole is very stretched forward. How do you know where to set breakover? There are a couple of ways. This picture shows the angle of new growth at the coronary band and if we were to follow it all the way down, breakover should be where the hoof wall would be if it were well connected. Follow the green line down and it shows the beginning of where I trimmed breakover in line with that upper growth. Another way I determine breakover is by reading the sole’s concavity. Solar concavity mimics the coffin bone concavity, so following the concavity out until it plateaus is sometimes also an indicator of where breakover should be, but there are a few exceptions to this method. For instance a foundered horse will have very little to no concavity, and a horse with retained sole may not show the concavity properly. The following video is a good example of setting breakover on a healthy hoof based on solar concavity. This process would be somewhat similar on a foundered hoof or a hoof with a lack of concavity, but we must make sure not to trim too short as generally hooves with less concavity have a thin sole and a lack of hoof wall connection. In those cases I find trimming breakover according to the new growth at the coronary band more accurate. 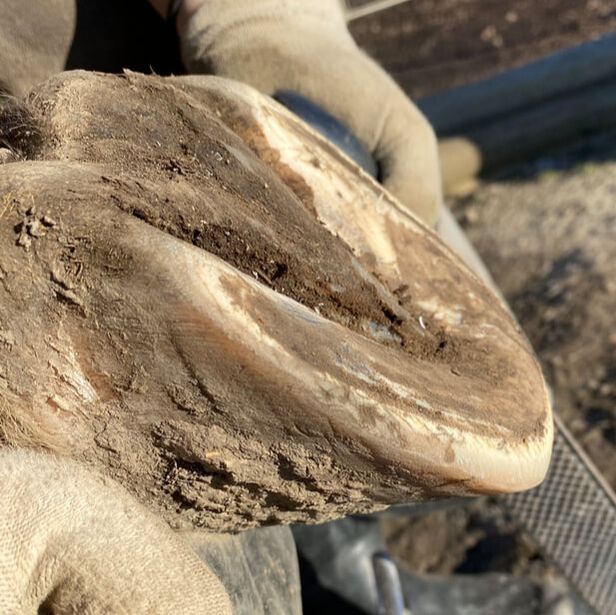 The picture above shows breakover set at the edge of the sole along the top of the ridge of concavity. There is a little bit of excess sole at the tip of the frog, or just behind what we would call the toe callous, but if you could envision the concavity on either side wrapping around and meeting up underneath it, the bevel or breakover would be along that edge. In my opinion setting a proper breakover is probably the single most important part of the trim, and one of the main aspects of trimming that I find a lot of professionals get wrong.  I get asked about pulling shoes a lot and the following video shows two different techniques that I use. I use the same method for pulling composite shoes as well! I usually prefer to use a pair of old nippers or nail cutters and an old rasp.  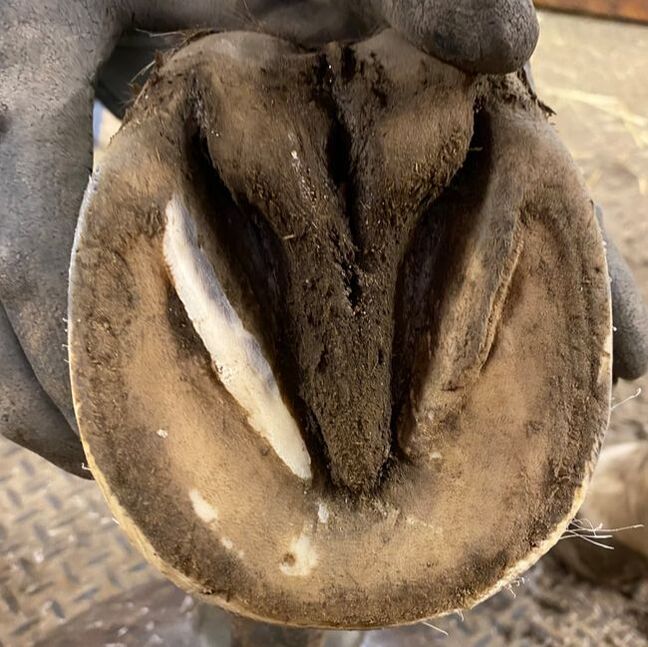 This photo is a great illustration of trimming a tall vertical bar in order to allow downward expansion of the hoof during the peak impact phase of loading. I like to trim the tall vertical bar to ramp downwards from just in front of the heel surface along the natural concavity of the sole. [The natural function of the hoof to dissipate impact energy works like this: First the heels and frog strike the ground. This allows the digital cushion to absorb the brunt of the impact because it is made up of elastic fiber-rich dynamic tissues. These tissues are able to compress and store energy under load. The hoof then rolls over onto the solar surface allowing the digital cushion to further compress and the natural arch of the hoof to expand downward. This includes the expansion of both the heels and the collateral grooves. The hoof then breaks over at the toe, allowing the digital cushion to use this stored energy to drive recoil back to a resting state.] The solar arch on the bottom of the hoof allows this downward expansion to happen without restriction. We also have to consider is the horses willingness to weight the hoof during this phase of the stride. If we leave the bar high and vertical, when the hoof rolls over onto the solar surface the bar can act as a pressure point and cause excess pressure on the DDFT and navicular bone. This can then alter the horse's stride and cause them to land laterally or toe first. Altered landings can cause the impact energy to have to be absorbed by the horse's joints and muscles and lead to further issues. It is important to recognize that over trimming, just like under trimming the bars, can also have negative implications to the hoof. The bar makes up half of the collateral groove and the frog makes up the other half. If we trim the bar too low, the grooves will become shallow and reduce the natural concavity that the hoof needs in order to expand downward. Over trimming the bar can also thin the bar and lead to sensitivity of the bar's corium. Bar trimming is probably one of the most contentious issues between different methods of barefoot trimming. Personally I like to keep it simple: trim where needed, don't where it's not and most importantly, do no harm.
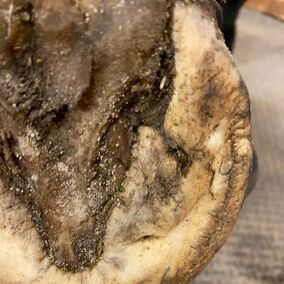
Overlaid or embedded bars grow out laterally over the sole. They often tend to grow over and into the sole creating bruising and sometimes abscessing. The above picture on the left shows vertical bars and the right shows embedded bar. Embedded bars are difficult to deal with and left unchecked can lead to bruising, discomfort and abscessing. Embedded bars show up more as a lump overtop of the sole and need to be trimmed so that they aren't causing a pressure point during peak impact. This is easier said then done as they often become ingrown into the sole and have to be trimmed out little by little in order to avoid over thinning the bar/sole junction and causing sensitivity to the bar's corium. I generally trim embedded bars down to match the natural concavity of the sole, but no lower. I trim frequently and let the sole push them out gradually. Some horse's are more sensitive and the bar tends to fold over more often then others. In these sensitive horses the bar can bruise and cause discomfort so I tend to trim it more often. I have a mare with PPID and no matter what I do her bars fold over and abscess if left for 4 - 6 weeks. I manage her with bi-weekly trimming just to keep the bars in check and she manages well. The following short video shows the difference between trimming vertical and embedded bars.  Published in Saddle Up Magazine in two parts, April 2015 and May 2015 Nature seems to have a way when it comes to getting things right. The mathematical simplicity that exists when you break a hoof down into sections is quite amazing. At the Okanagan School of Natural Hoof Care we teach a trimming method called the Hoof Print Trim. This method was created by Cheryl Henderson, founder of the Oregon School of Natural Hoof Care. The Oregon School was the first of its kind in North America. A center devoted to the practice of Natural Hoof Care and a better life for our equines. Cheryl Henderson has spent many decades developing and researching her method and has proven it again and again with thousands of dissections and case studies. Our program teaches this method and also relies on the ability to “read” the hoof and each horse’s specific conformation to adapt the trim to their needs. This system allows us to teach the fundamentals of trimming in a short time frame. The formula of a healthy hoof is as follows: the width at the fulcrum (widest point on the bottom of the hoof) equals the length heel to toe. This means that the hoof should be a perfect circle, hind hooves abide by this measurement also but the hoof tends to be more spade shaped. The frog should equal 2/3 of the solar view of the hoof from the back to the front, the remaining sole to the dorsal (front) hoof wall is the other 1/3. The hairline should be at a relaxed 30 degree angle to the ground. All hooved animals have a naturally occurring 30 degree hairline that only becomes distorted through genetic defect, altered living environments and lack of movement, or human trimming error. These formulas have been proven again and again through the study of wild horses’ hooves and as well through countless dissections and case studies. Even the most distorted hoof shapes follow these parameters and can often be brought back into balance in just a few trims depending on the severity of the distortion. This does not mean however that we just measure and cut. These guidelines must be paired with our “reading” of the hooves’ clues to help us determine each horses’ needs. For instance some horses have club feet, therefore this physical deformity will impact the heel height and the angle of the hairline. This is where reading the hoof and determining the best approach for each specific horse is extremely important. A deformity like club foot can sometimes be corrected or improved, but many times is just something you have to work with and adapt your trim around. 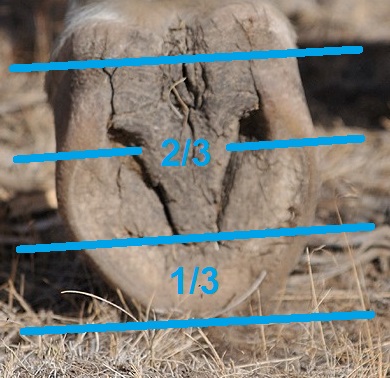 Showing the 2/3 to 1/3 balance of the hoof The Hoof Print Trim is a great starting point for those learning to trim because you can measure and draw where the healthy hoof should be and then train your eyes to “read” the hoof and evaluate using both sets of clues where you should trim. This method starts with evaluating the baseline. The baseline is the rearmost part of the hoof, where we will trim our heel height down to as well as where we take our measurement from heel to toe after establishing the width at the fulcrum. To find our baseline we measure from the back of the heel bulbs at the hairline to the collateral groove exit. On most average sized horses this measurement equals 1 ¼ inches. It varies for ponies or smaller horses and the taller horses and drafts but this is just an average, and again not a measurement we would simply just cut without “reading” into the rest of the hoof first and accounting for and deformities or pathologies etc. After establishing the correct baseline by evaluating the frog health, the periople wear marks, the heel surface, and sole thickness in switchback at the rear of the hoof, we can measure our fulcrum to establish our toe length. 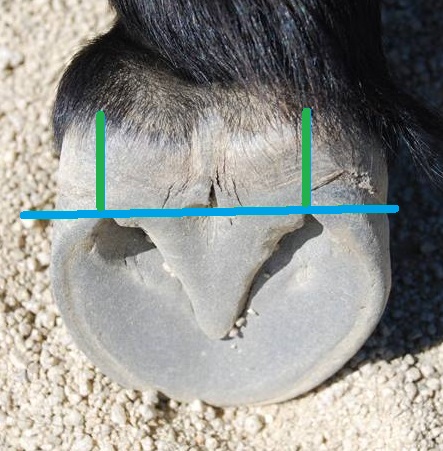 Establishing the baseline The fulcrum is simply the widest part on the bottom of the hoof. It is almost always about ¾ inch behind the apex of the frog occurring at the mid-point of where the coffin bone sits inside the hoof and is not usually distorted by flaring or stretched lamina. We measure the fulcrum from the golden line on one side to the golden line on the other side, not from wall to wall. If the measurement was 4 ½ inches, we would then measure from our baseline forward 4 ½ inches and mark where our golden line should be at the toe. In a balanced hoof that has been trimmed regularly and correctly, this mark will line up with the golden line at the toe. I just want to reiterate that this is also not a cut line, we still have to add our wall thickness to determine where the cut line will be. We also must “read” the hooves’ wear patterns and toe callous before deciding where to cut. Now that we have determined the circumference of the hoof we can establish the 2/3 to 1/3 balance. The baseline to the apex of the frog should be 2/3 of the overall hoof length. Frogs can get stretched forward into the sole’s 1/3 and occasionally need to be trimmed back. This measurement will determine if the frog has migrated forward. However all of our measurements to this point would be inaccurate if we had measured our baseline wrong, so caution must be taken to measure correctly and confirm we are right by reading” the clues and wear marks in the hoof. After establishing the baseline and the heel height we must determine the length of the toe. We do not use the white line as a determining factor as it can stretch and migrate forward giving a false location for the toe length. In order to determine the proper length we measure the fulcrum width from white line to white line on either side of the hoof. A front hoof should be the same width as length. So if the fulcrum is 4 ½ inches from white line to white line then our measurement from the baseline at the rear of the hoof to the toe would be 4 ½ inches. This is not a cut line though, we still have to add the thickness of the hoof wall to this measurement. A lot of times in a run forward hoof the white line can stretch forward and this measurement can seem extreme. However even though the wall flares forward and the white line stretches, the internal structures do not move or migrate. The coffin bone can rotate and sink lower in the hoof capsule in a laminitic or foundered horse, but even in those cases the geometrical mapping will establish the location of the coffin bone before we start to trim and we can work to bring balance back to the hoof. 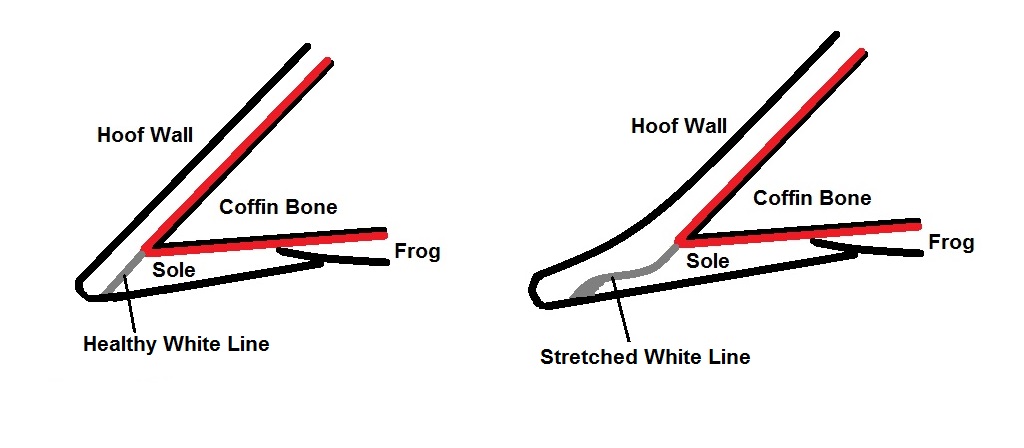 Another factor we have to consider when aligning the bones of the hoof and lower limb is the hairline angle. All hooved animals in nature have a 30 degree hairline in their natural environment (barring rare genetic defects) and the horse is only an exception when trimmed and managed ineffectively. Studies of wild horses in the US Great Basin have shown that when allowed to naturally wear their hooves in their wild environment they almost always have a 30 degree hairline. The few horses with this exception have a genetic defect of a club foot. A club foot is a coffin bone with a steeper dorsal angle and therefore creates a hoof with a steeper dorsal hoof wall angle and a higher heel. Both of these pathologies will affect the hairline angle. After evaluating the baseline, the fulcrum, the toe length and the hairline angle, we finish our trim by defining and trimming the bars and putting the mustang roll on the front of the hoof. The bars function is for support in the rear of the hoof and it is important that they are not over trimmed, however they must also not be left to grow over the sole as they can cause bruising and abscessing. A mustang roll is a rounding of the hoof wall at the toe to remove any leveraging forces on the hoof wall and to create a smoother breakover. The mustang roll is one of the defining differences between a barefoot trim and a traditional farrier trim. 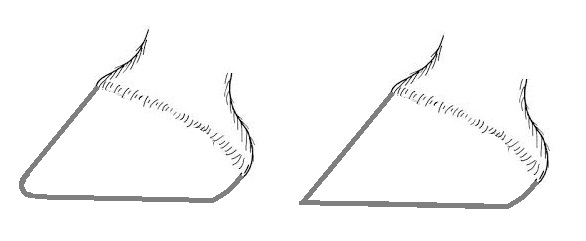 On the left a natural trim with a mustang roll, on the right a traditional pasture trim. Published in Saddle Up Magazine February 2015 For many horse owners, evaluating and trimming their horse’s hooves is a task left up to their farrier/trimmer. But how do you know that the person that you have hired is doing a good job? You have to be able to evaluate your horse’s hooves beyond the scope of how sound the horse moves. While soundness in the present is important, the horse’s long term hoof health is also a major factor owners must consider. I see many cases where long term incorrect hoof shape or function has lead to irreversible damage while the horse appeared sound until it was too late to correct. However I also see a lot of horses that I am able to rehabilitate and return to use after a deformed hoof has broken down. There are 5 key points horse owners can use to evaluate their horses’ hooves: Heel Placement – The heels should be positioned at what we call the baseline. The baseline is an invisible line that runs across the back of the frog and collateral grooves, and in a well-trimmed hoof also aligns with the heels rearmost surface. When heels are allowed to overgrow or migrate forward from this line, the balance of the hoof is distorted and excess stress and tension is placed on the horse’s joints, tendons and ligaments. Long or forward heels can also shorten stride length. Frog Integrity – When a horse moves forward, their natural stride should allow them to land heel first. If the heels are in the correct position as mentioned above, the heels and frog will contact the ground simultaneously. The frog’s primary function is to protect the digital cushion. The digital cushion lies underneath the hard calloused frog and is a large pad of fatty tissue. The digital cushion absorbs impact and dissipates energy. If the frog is infected with thrush or bacteria, or underdeveloped from long heels keeping it elevated and not touching the ground, this portion of the hoof’s function cannot be performed. Without the energy dissipation of a healthy frog and digital cushion excess stress is placed on the horse’s joints. Wall Connection – A well connected hoof wall supports the coffin bone and allows the hoof to function as intended. The hoof wall grows downward from the coronet to the ground and should not flare or deviate in angle as it descends. A hoof wall that changes its angle part way down the hoof will have a poor connection and decreased concavity in the sole. A disconnected wall can lead to the coffin bone sinking down into the hoof capsule causing inflammation in the sole resulting in sensitive hooves. 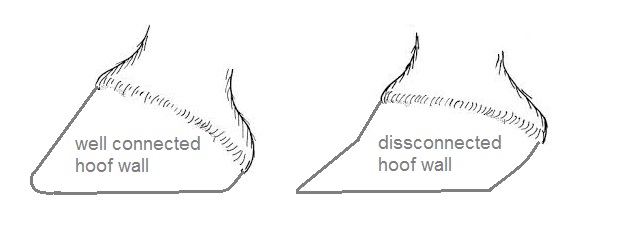 Sole Thickness – Sole thickness is key to soundness and comfort. A thick sole protects the coffin bone and pads the hoof. The sole should be firm and calloused, you should not be able to flex it when pressing with your fingers. It should have a smooth appearance, and it should have a slight concavity. Concavity varies for each individual horse dependent on their coffin bone shape but the bottom of the hoof should not be flat. A flat hoof signals a balance issue, perhaps in the wall connection or a problem with overgrown bars. Bar Definition – The purpose of the bars are to support the back of the hoof upon impact. The bar is an extension of the hoof wall as it wraps around from the heel surface. The bars should run at a downward slope from the heel to the mid-point of the frog. The bar should also be upright and defined, not laid over or blended into the sole. When bars invade the sole it can cause many different issues, the most common are: sensitivity on hard ground and reoccurring abscessing. In rare cases embedded bar can also cause navicular like symptoms. Horse owners must learn to recognize what a healthy hoof looks and functions like. Hoof care is a fundamental component of horse ownership and you must know how to recognize a problem before it causes long term damage. 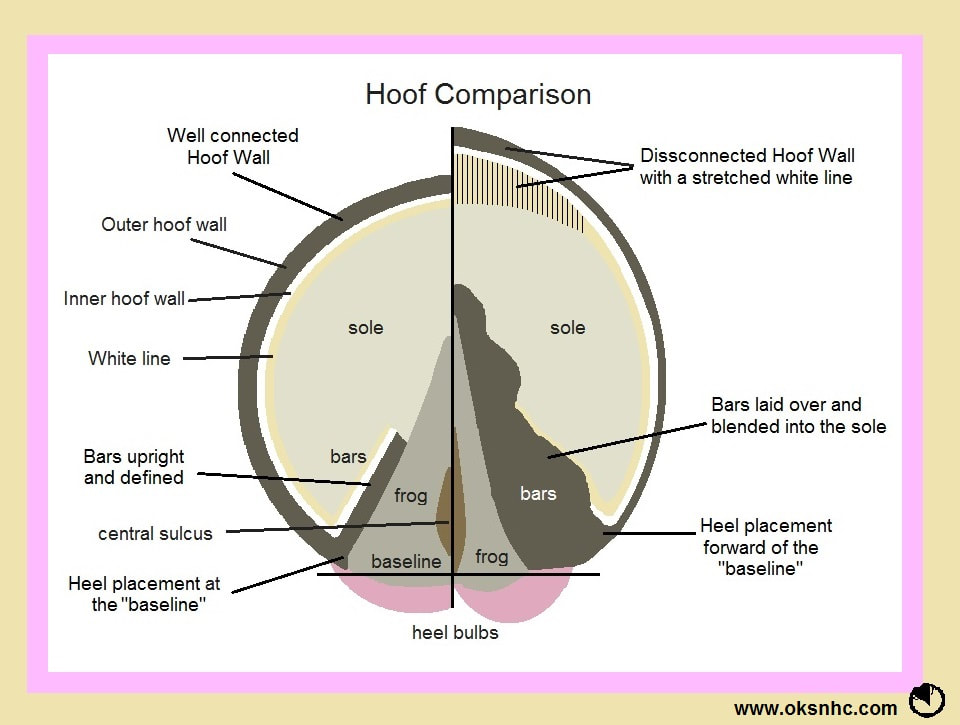 |
AuthorKristi Luehr is a barefoot trimmer/farrier, author, and founder of the Okanagan School of Natural Hoof Care. She is certified by the Canadian Farrier School as well as the Oregon School of Natural Hoof Care, and also has certification in equine massage and dentistry. Her focus is to educate owners about hoof anatomy, function and proper barefoot trimming that supports and grows healthy and functional hooves specific to each horse's individual needs. She is the author of three online courses specific to hoof care and is always striving to create more educational content for students to learn from. Archives
May 2024
|

 RSS Feed
© COPYRIGHT OKSNHC 2024. ALL RIGHTS RESERVED.