
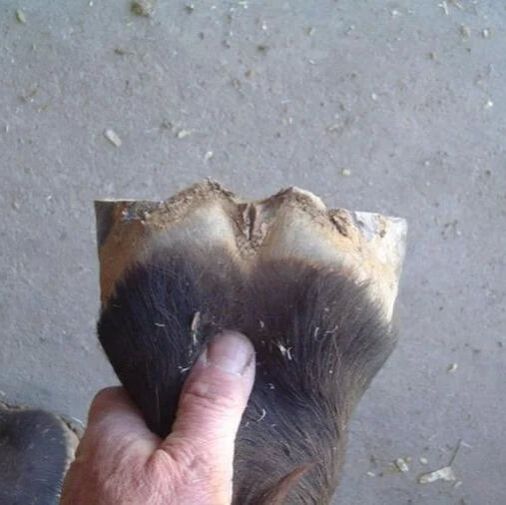
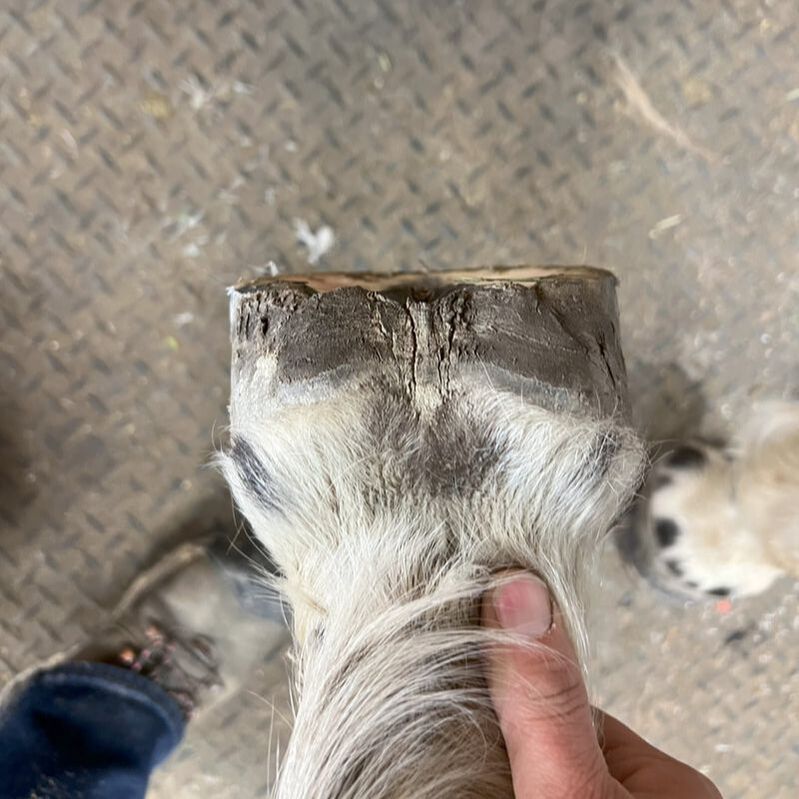
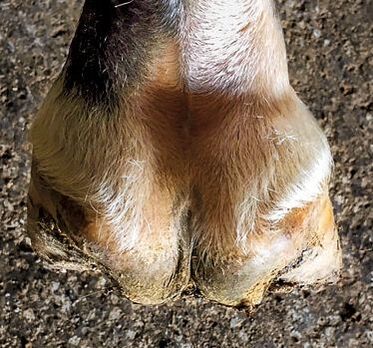
  Sharing these before and after photos today of this high/low horse. Left is before, right after. Above is before, below after.
What is high/low? - High/low is where one front hoof has a steeper angle than the other front hoof. The steeper hoof is the "high" hoof and the less steep one is the "low" hoof. Either one of these hooves could be the correct one; it depends on what caused the difference in the first place. Why is high/low a problem? - In the front hooves, the height of the hoof capsule directly impacts the height of the scapula and the arc of the stride of the leg in movement. A high-angled hoof will have a shorter stride, and the scapula will be sitting higher up than the opposing side. This will create an imbalance for saddle fit, with the rider often complaining that they lean to the side with the shorter hoof. This also presents a problem with symmetry riding one direction vs the other because the stride lengths will be different, and it can create a canter lead problem as well with the horse struggling to take the lead on the higher side. Not to mention, the horse will be uncomfortable and feel imbalanced in their body. They might even feel pinched in the shoulder under saddle on the higher side. What causes it? - There are a lot of reasons for high/low to show up. The most common cause I see is what we call a grazing foot. This is where a foal prefers to graze with one hoof forward and one hoof back, and they are always in the same position, i.e., the front left is always forward and the front right is always back. With proper trimming, the hooves can be maintained in balance, but with improper trimming, the hooves will develop differently, with the outstretched front hoof becoming low and the other growing in at a higher angle. A coffin bone does not finish growing until a horse is 3-4 years old, so proper trimming is crucial from about 3 months old to keep the hooves in balance and to prevent asymmetry. Another cause of high/low is a club foot. While this is not a true case of high/low, but rather the pathology of a club foot, it often presents with the same implications and must be managed as a high/low scenario. It is very common for clubbed hooves to be trimmed ineffectively and allowed to flare so that they appear more "normal," and unfortunately, this exacerbates the problem. Previous injury, conformational faults, or muscle weakness can also cause high/low as they can cause a horse to be stronger or more flexible on one side of the body than the other. This imbalance in the body will directly impact the weight distribution going down the legs and can create more pressure on one side than the other, which can also alter the shape of the hooves. How do we fix it? Can we? - "Fix" isn't really the correct word as it implies we can completely remedy the problem, but can we improve high/low? The answer is most of the time it can be improved to some degree with a combination of correct trimming, bodywork, and physical rehab for the horse. In the case of the horse pictured here, he needed a more effective trim to control the flaring hoof wall, proper management of his club foot, and he needed the heels on the low foot left alone and the heels on the high foot trimmed as low as possible but without thinning the sole, and without overstretching his tendons. Heel changes need to be made gradually, not all at once, or they can be a shock to the system and cause discomfort or injury. His rehab will be a work in progress and will take time, but he is already moving better and starting to grow in connected hoof wall attachment. Interested in learning more about proper hoof care and management? Check out our online hoof care course where you can delve deeper into these topics and gain valuable insights for your horse's well-being.
0 Comments
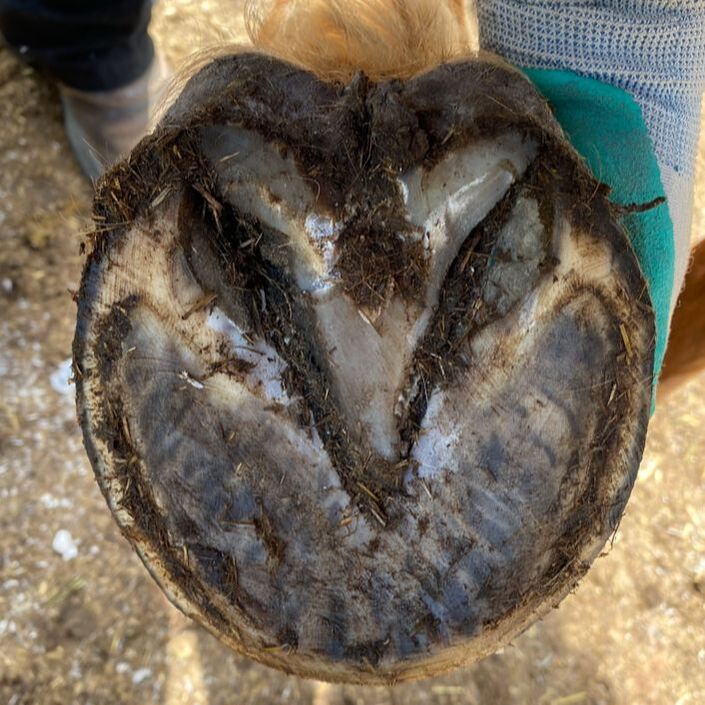
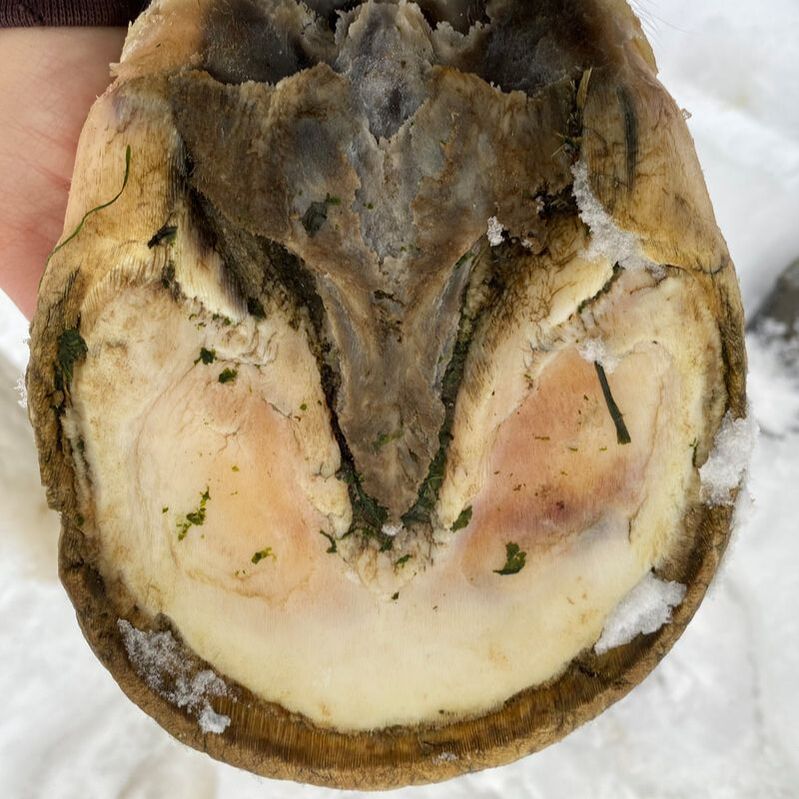
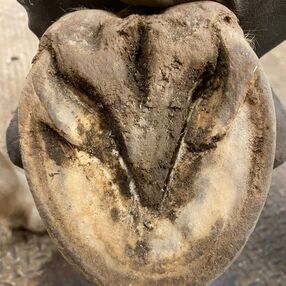
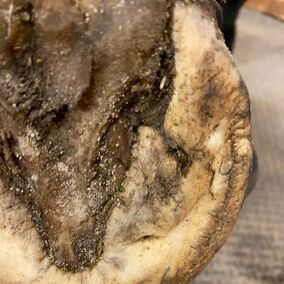
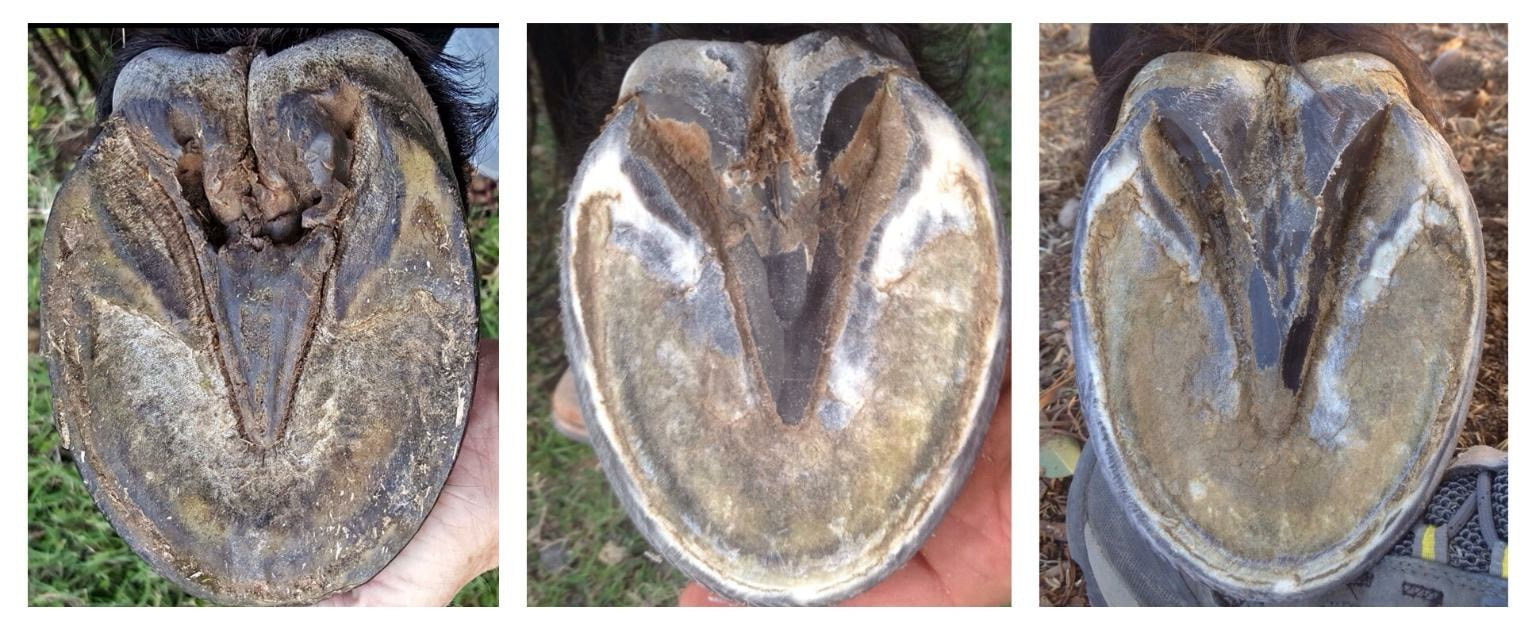 On the far left a very thrushy frog, the center is healing, the right is strong and the sulcus has closed in. Maintaining a horse's hooves is vital for their overall health and performance. Among the many aspects of hoof care, trimming the frog holds a special significance. The frog, that V-shaped structure in the center of the underside of the hoof, plays a crucial role in shock absorption, traction, and blood circulation. Properly trimming the frog not only ensures the horse's comfort but also prevents potential issues like thrush and caudal hoof pain. In this guide, we'll delve into the essentials of trimming the frog effectively, drawing insights from barefoot experts like Dr. Robert Bowker and Pete Ramey.
In conclusion, trimming the frog is a critical aspect of horse hoof care that requires attention to detail and a thorough understanding of equine anatomy. By following proper trimming techniques you can ensure optimal caudal hoof health for your horse. Consistency and attention to detail are key in maintaining healthy hooves and preventing potential issues down the road.
Peripherally Loading the hoof and prolapsed frogs, the pitfalls of traditional shoeing techniques4/14/2024
The concept of peripherally loading the hoof is not really something most barefoot trimmers endorse. While this approach aims to shift weight-bearing forces away from the internal structures of the hoof, such as the digital cushion, frog, and coffin bone, it can inadvertently lead to a host of issues, including a weak digital cushion and prolapsed frogs. Peripherally loading the hoof involves applying excessive pressure to the hoof wall, often through the use of shoes or improper trimming techniques. While the intention may be to alleviate strain on the internal structures, such as the coffin bone, navicular bone, and tendons, it can result in unintended consequences. One such consequence is the prolapse of the frog, where the frog tissue becomes compressed and displaced downward due to inadequate support and stimulation. Prolapsed frogs occur when the frog tissue, which plays a crucial role in weight distribution and shock absorption, becomes weakened and fails to maintain its proper position elevated up within the hoof capsule. This can lead to discomfort, lameness, and compromised hoof function. These horses will be very sensitive in the back of the hoof and can land toe first instead of heel first, and suffer from caudal failure if left untreated. Rehabilitating a hoof with prolapsed frogs requires a multifaceted approach that addresses both the underlying causes and the structural integrity of the hoof. Central to this approach is the careful stimulation and rebuilding of the digital cushion and frog tissue. By focusing on these essential components, we can help restore proper hoof function and mitigate the risk of further damage. First treat the frog for thrush, as the protecting structure for the digital cushion the frog needs to be the priority. Second, carefully bring the frog into a weight bearing state either barefoot, with boots and pads or with the use of soft hoof packing and composite shoes with frog support. The digital cushion serves as a critical shock absorber, dissipating the impact forces generated during movement. When peripherally loading the hoof, this vital structure may become underutilized and weakened. To counteract this, it's essential to implement strategies that encourage the development and strength of the digital cushion. This can include exercises that promote natural movement and weight-bearing, as well as proper trimming techniques that support healthy hoof function. Often the horse will learn to land toe first because of pain in the back of the hoof, but even as you remove those sources of pain the muscle memory will keep the horse landing toe first unless you also rehabilitate the body with postural changes and bodywork. Ultimately, the rehabilitation of prolapsed frogs is not just about restoring hoof health—it's about safeguarding the overall well-being of the horse. By prioritizing the stimulation and development of the digital cushion and frog tissue, we can help dissipate impact energy, protect the horse's joints and body, improve and restore correct biomechanics and promote long-term soundness and comfort. 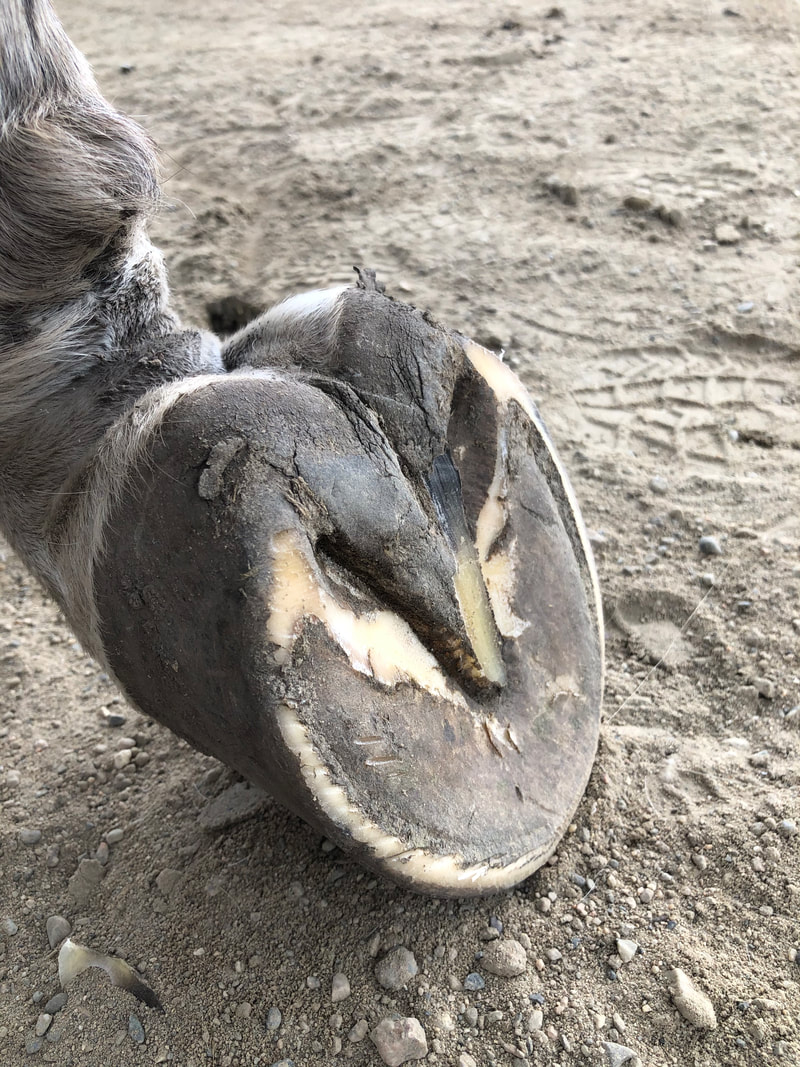 A healthy hoof where the entire bottom of the hoof shares in the weight load. The frog, heels, bars, sole and hoof wall working together. In the world of hoof care, one of the most intriguing and vital structures is the digital cushion. Often overshadowed by discussions of the hoof wall or frog, the digital cushion plays a pivotal role in maintaining hoof health and soundness, particularly in barefoot horses. Let's explore what the digital cushion is and why it's so important for equine comfort and performance. Understanding the Digital Cushion The digital cushion is a unique, elastic structure located within the back of the horse's hoof. It serves as a shock absorber, cushioning the impact forces generated with each stride. Composed of specialized fibrous and fatty tissue, the digital cushion is designed to compress and expand, effectively dissipating the energy generated during movement. Primary Function: Absorbing Impact At the heart of its function lies the remarkable ability to absorb impact. When a horse moves, the force exerted on the hoof is considerable, especially during high-impact activities. The digital cushion acts as a shock absorber, reducing the impact energy on the hoof structures and lower limb joints. It serves as nature's built-in shock absorber, ensuring the horse can move comfortably and efficiently. The Role of the Frog Often referred to as the "heart" of the hoof, the frog is closely intertwined with the digital cushion. While the frog itself provides traction and assists with blood circulation, it's essentially an extension and protector of the digital cushion. The frog helps distribute weight evenly across the hoof, promoting healthy function of the digital cushion and ensuring optimal shock absorption. Keeping the frog healthy is hugely important so that it can protect the digital cushion and deflect impact energy to it. From a barefoot perspective, maintaining the integrity of the digital cushion is extremely important. Unlike shod horses, which may rely on artificial support and peripheral loading from metal shoes, barefoot horses depend on the natural resilience of their hoof structures, including the digital cushion. By allowing the hoof to function as nature intended, barefoot horses can maximize the benefits of their digital cushion, promoting overall hoof health and soundness throughout the body. The digital cushion is built through stimulation. It needs to be used to strengthen it, it it is not being used it will atrophy and become weak. This means that a heel first landing and healthy frog are of the utmost importance and should be made a priority by your farrier or trimmer. As advocates for healthy hooves, it's essential to recognize and appreciate the vital role this remarkable structure plays in promoting soundness and comfort for our horses. 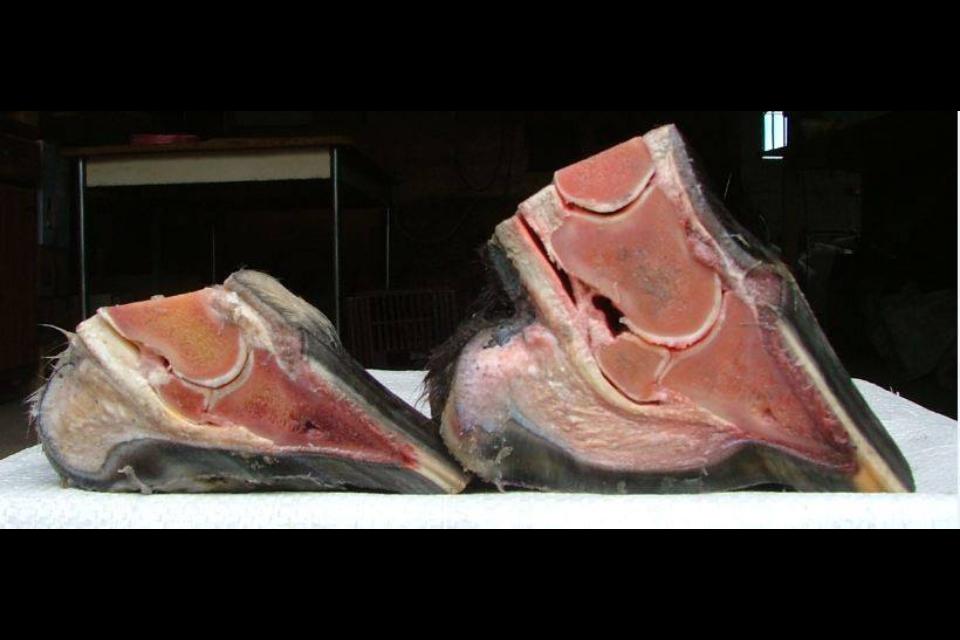 On the left an atrophied and weak digital cushion. Notice how little padding there is under the navicular bone. On the right, an healthy digital cushion supports the navicular bone and rear of the coffin bone. I have been trimming for about 15 years now, and my trim has definitely evolved and changed along the way. There are many cases where I don’t trim from the top - if the hoof doesn’t warrant it, but there are a lot of cases that I do trim from the top, and a lot of it, as I specialize in founder rehab. I learned a long time ago, that the best trimmers and farriers (and bodyworkers and trainers and coaches and horsemen), don’t subscribe to a specific method, but stay flexible to adapt to each horse, each hoof, and each moment as needed. I live by the philosophy to never say never or always when it comes to horses, because we are constantly learning and evolving and changing things up. A lot of the argument I get about trimming from the top is that it thins the hoof wall. And yes, I agree that it does that. In fact, thinning the hoof wall is actually part of what I’m aiming for. Not because I want to weaken the hoof or take away protection, but a thinner wall wears faster, and won’t apply as much leverage if it’s wearing as the wall grows down. And that leverage is another reason I rasp from the top. Every 1/2 inch of length is equal to 50lbs of pressure per square inch, and when a long toe applies pressure on the wall it can lead to flare and lamellar detachment. The biggest thing that I think people need to realize also, is that when we thin the hoof wall by rasping, there is stretched white line or lamellar wedge underneath it, which actually acts as an insulator to the wall, so we are in fact thinning the original wall, but the same amount of protection remains. So to me, there is no debate to be had. I will rasp from the top when flare is present, to reduce leverage on the lamina and the new growth that is coming in. If a hoof has no flare or leverage, then it doesn’t require rasping from the top. I would be absolutely thrilled to have someone show me a case study of a foundered horse that had a lamellar wedge, that was trimmed without ever having the wall rasped from the top, that was successfully rehabbed to have complete lamellar reconnection. Rasping from the top is hard work, and if I could find a way to rehab these horses without doing it, I’d love to save the energy. But the bottom line for me is that I’m in this business to fix horses, and this technique works well for me when used appropriately. 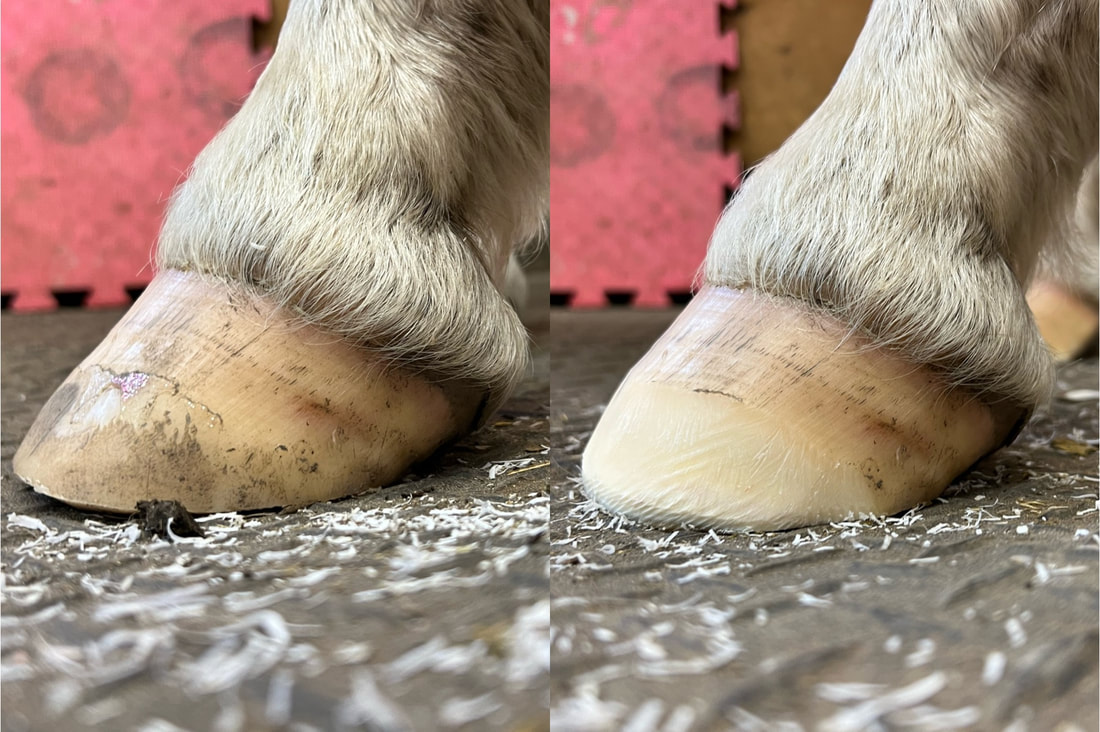 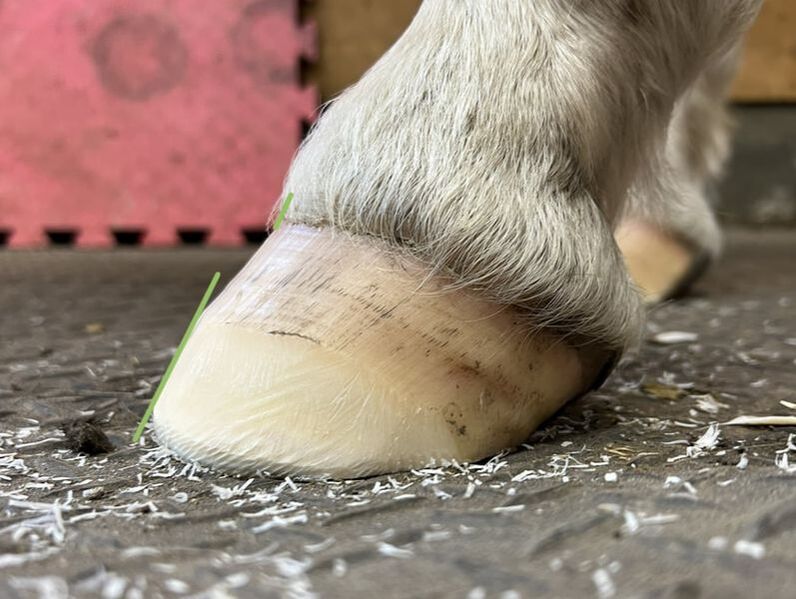 The following video shows a barefoot trim on Mustang, a previously wild horse. He has huge strong frogs and digital cushions, and very thick hoof wall. This video shows the trim on the front hooves only. This first video shows the trimming of a pretty well maintained "vertical" bar. The second video shows bar that is a bit more "overlaid" or "embedded" and how I would trim them differently. I try not to get too hung up on the "type" of bars, but instead just try to trim the bar to match the solar concavity and to allow the bar to function as it should - to help structure the shape of the back of the hoof and the collateral grooves. .
I get asked this question often from horse owners. Let's talk Quarter Flare to start. There are two issues that can cause the quarter to flare, first is mechanical stress placed on the hoof itself, the second is metabolic stress. In a healthy hoof, the bond or interdigitation of the sensitive lamina to the insensitive lamina is tight. This connection is the white/golden line we see on the bottom of the hoof. The golden line is formed by the terminal papillae's around the rim edge of the coffin bone as they secrete a flexible type of keratin. This keratin (golden line) acts like a silicone bond between the two structures of lamina. Flexibility is key, as the insensitive lamina grows down and past the sensitive lamina that stays attached to the coffin bone itself. Because this bond must be flexible/elastic to join these two structures, it is the weakest part of the horse's hoof. This bond can be broken by mechanical stresses put on the hoof. Mechanical stress is created when the hoof is allowed to grow too long, decreasing the ability of the frog to perform its role of providing support in the rear/center of the hoof, which then causes the full weight of the horse to push down on the hoof wall (peripheral loading). The weight and loading of the hoof wall can cause a great deal of leverage on the golden line which is how the quarter flare starts. As the wall moves away or flares, the golden line must stretch to cover the increasing distance between the two laminae. If the stress continues due to a long trim cycle or improper trimming, the golden line can break down, leading to the separation of the wall from the sole. When this separation happens, the golden line expands to cover this distance (lamellar wedge). To treat quarter flare caused by mechanical stress a shorter trimming cycle should be implemented with regular maintenance trimming being performed every 2-3 weeks, allowing the frog and heels, to bear the primary impact of the footfall and not the hoof wall. Metabolic Stress is a breakdown at the cellular level of the hoof. Systemic metabolic conditions such as stress, insulin dysregulation, PPID, obesity, mineral imbalance, dietary imbalance, or infection can cause a weakness within the cells of the hoof. This breakdown can cause issues within the hooves and the ability to create and maintain the strong bond between the laminae. Signs of metabolic conditions that show up in the hoof can be slow growth, angle changes to the hoof wall, brittleness, ridges, and fine line cracks in the hoof wall. 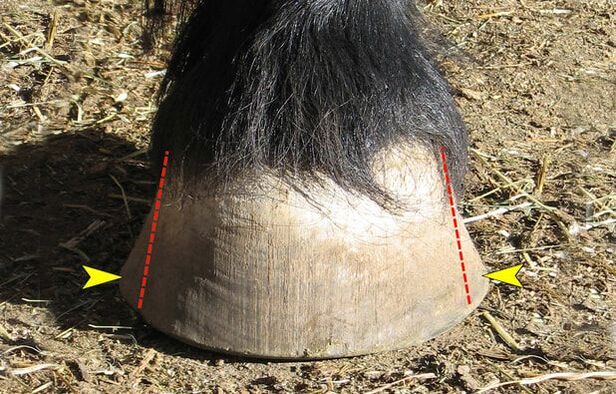 Flare in the quarters due to excess length and leverage. What is White Line Disease? Any weaknesses of the lamellar attachment can lead to microscopic openings for fungi and bacterial microbes to gain entry which can lead to infection. This infection can result in large cracks and chips, and separation as the golden line (the “silicone” that joins the sole and hoof wall) gets “eaten” away. As this bond weakens and if any metabolic conditions, improper trimming techniques or long trimming cycles are not addressed and corrected this can lead to the development of White Line Disease (seedy toe) in the hoof. The best defense against White Line Disease is prevention! Do not let the hoof wall peripherally load the hoof, and make sure any wall leverage is kept to a minimum with a good balanced trim and trim schedule. If you see a small cavity or separation in the golden line, make sure to first address the leverage that likely caused it, and second treat the area topically to prevent the microbes from taking over. My favorite treatment for non-invasive separation is to gently remove any debris from the area and to apply Artimud into any cracks or crevices that are present. For serious, invasive (more than a few mm of separation) cases of white line disease that are eating up into the area, I soak the hoof twice weekly with White Lightning, a liquid soaking solution first and then treat topically with Artimud for turnout. 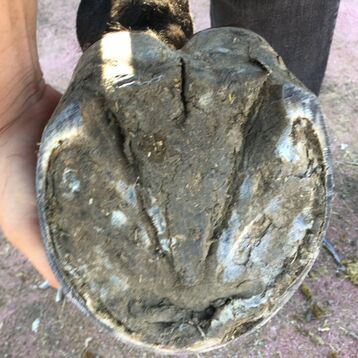 Separation in the golden line can allow dirt and debris to get stuck. This can lead to more serious cases of White Line Disease. Remember, quarter flaring, separation, and white line disease are all secondary conditions that are caused by leverage or a weakness within the hoof. First, address the cause of the weakness, and you will likely resolve the secondary issues. This is a maintenance trim on Jack, our IR school pony. He is trimmed every 4-6 weeks so there is usually little distortion and just a bit of excess length. Because he is IR, we diligently manage his weight and he rarely if ever gets grazing time (always with a muzzle). He lives out 24/7 on our Paddock Paradise track system. Please excuse the sometimes less then perfect video angles, trimming while filming with my GoPro on my head is a bit of an art lol. 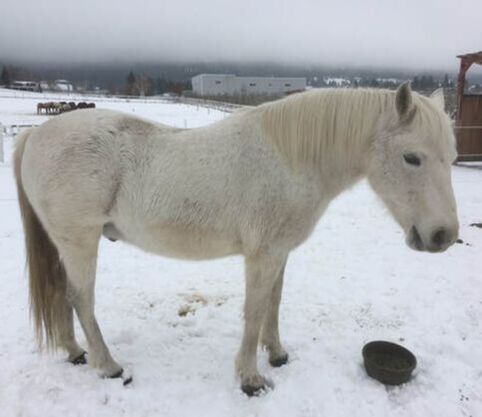  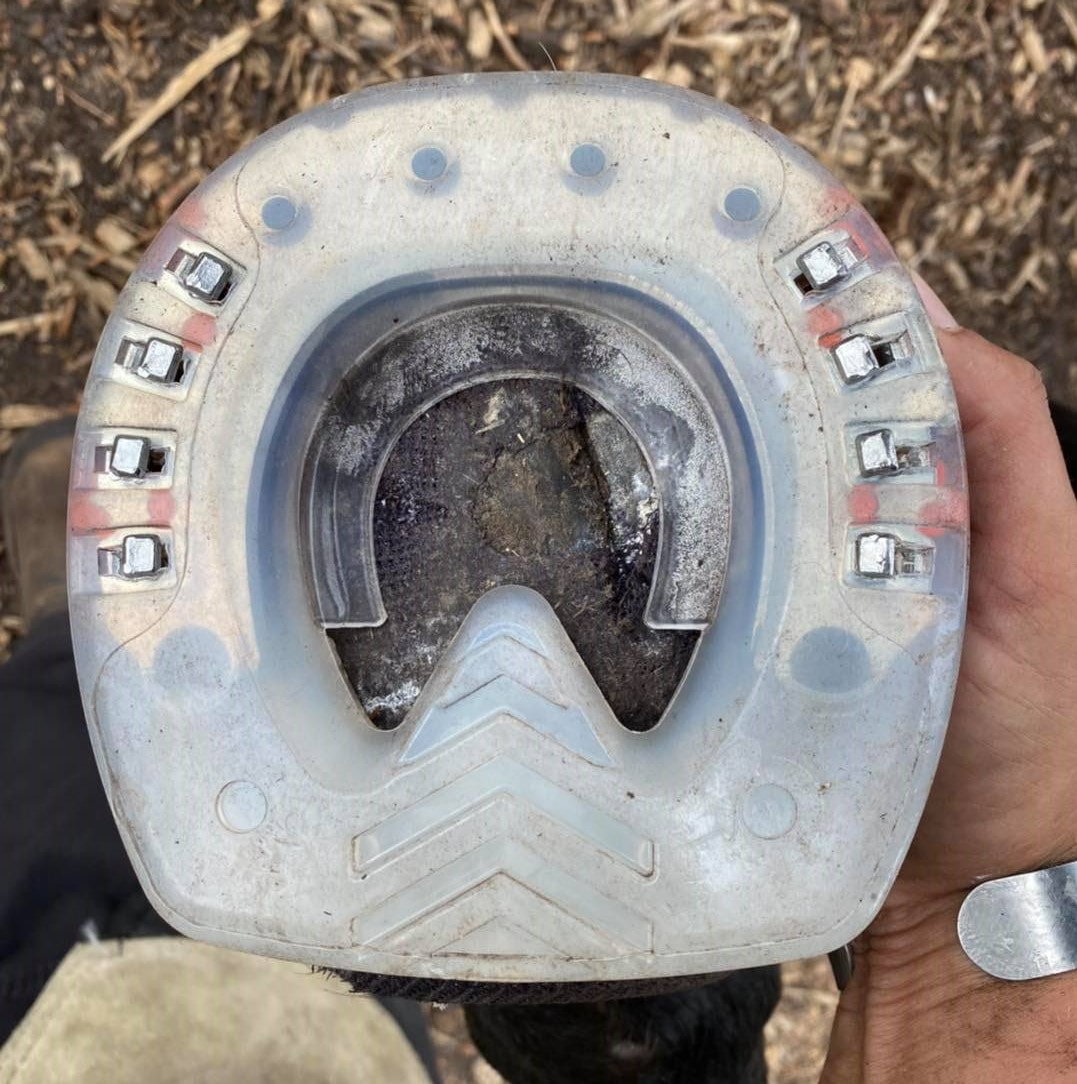 Our world is ever changing and the technology and research in the farrier industry is evolving fast. Composite shoes and pads are flooding the market, being manufactured by many different companies around the world. While I am a huge barefoot advocate, I am also an advocate for keeping horses comfortable and sometimes that means they require hoof protection. I am not in favor of traditional metal shoes because in my opinion they are too rigid and limit hoof flexion as well as increase the impact energy of movement (by negating digital cushion function). This impact must then be absorbed by the horse's joints and musculoskeletal system. Metal shoes also peripherally load the hoof (meaning they only weight the outer hoof wall), causing frog and digital cushion atrophy and lack of sole stimulation. Composite shoes are a good alternative as they can provide protection and comfort while still allowing the hoof to function naturally to absorb impact. This is because of their anatomically minded design that incorporates weighting the frog and therefore the digital cushions as well as the sole, bars and hoof wall collectively. [Weighting the whole bottom of the hoof as nature intended] Like traditional shoes, composites can be used in concert with hoof packing, wedges, anti fungal pastes, and be customized to the individual horses' needs and hoof shape. In order to fully understand the benefits that composite shoes can provide we have to understand when they may be a good option for a horse. I see all shoes, boots, pads, casts and hoof protection sources as a band aid approach. This is not a negative thing, but should be seen as a means to an end. In other words we should use these devices to keep the horse comfortable while we are addressing the root cause of the problem (i.e. weak or damaged hooves) so that we can ultimately return proper hoof form and function so that protection is not needed. Horses that have thin soles, disconnected hoof walls, weak frogs and digital cushions, who are foundered or have navicular disease can all benefit from the use of composite shoes. Below are several examples where I have applied composite shoes for various reasons: The most important part of applying a composite shoe is the trim you apply underneath the shoe. This goes for traditional metal shoeing as well. Setting the shoe back to the optimal breakover point is crucial. Leaving excess hoof wall at the toe will allow the toe to migrate forward, leading to under run or crushed heels and a distorted hoof shape. When does a horse need composite shoes? Horses are not naturally flat footed. Flat soles with a lack of concavity come from disconnected hoof walls. Horses that don't have this connection can benefit from composites because they add immediate "false concavity". This concavity provides relief to the inflamed and over stimulated solar corium on the underside of the coffin bone that is commonly seen in flat footed horses. These are typically the horses that are sold as "needing shoes", and are the ones instantly lame when the shoes are pulled. There is a severe breakdown of the hoof capsule and in my opinion it needs to be corrected, by facilitating a proper hoof function via the trim underneath the composite shoe. The horse can then grow in a well connected hoof wall that will in time re-elevate the coffin bone and create the concavity that is needed for soundness barefoot.
Horses that have thin soles also benefit from composites. They protect the sole and cause it to thicken by decreasing the wear on it. It is common practice for traditional farriers to "clean up" the sole during a trim, or "carve in concavity", thereby thinning the sole and removing the often ugly but helpful protective outer layer. Routine trimming like this leads to thins and weak soles that are unable to bear weight. Giving the sole a reprieve by using composite shoes call allow it to thicken and then we can transition back to barefoot in a way that allows proper hoof function to actually stimulate more sole growth and an overall thicker, healthier sole. Horses with navicular disease or a weak caudal hoof can also benefit from using composite shoes. The design of the composite shoes I use (Easyshoe Versa product line) incorporate frog support and a thick outer rim that also weights the sole of the hoof. Typically the back of the hoof becomes weak from a lack of proper stimulation. Traditional metal shoes only weight the heels and hoof wall, lifting the frog off of the ground. This lift reduces stimulation on the frog and therefore the underlying tissues of the digital cushion. This lack of stimulation over time can lead to atrophy and degeneration. When the soft tissue starts to fail, the horse usually overloads the toe and avoids weighting the heels, further compounding the problem and this can lead to irreversible damage to the navicular region. Using a composite shoe with sole packing and/or heel padding can often create enough of a cushion that these horses can start to comfortably weight the rear of the hoof again and start to regenerate the soft tissues. Over time you can reduce the padding and sole packing and eventually move from composite shoes back to barefoot. Prioritizing heel first landings is key to this rehabilitation process. 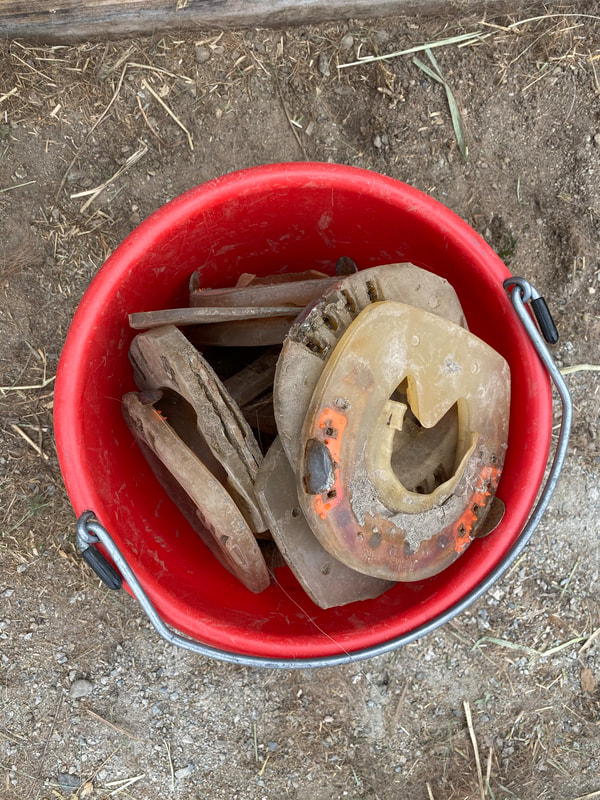 Composite shoes are very durable and often hold up better then metal shoes. I usually get 2-3 resets out of each pair. I love to be able to utilize composite shoes when needed in my practice. They truly have become a game changer for me. For clients who are not interested in using hoof boots, or horses that require 24/7 support in the beginning of their rehab these shoes can be the difference between soundness and pain. My number one goal of using composite shoes is to return the hoof to it's proper form so that doesn't require protection in the long run. In all actuality everything we can do with composite shoes can be done with some variation of hoof casts, boots and pads, but often the use of the composite shoes is far more convenient for the owner. While my primary goal is to help the horses, I can't facilitate that if I don't keep the owners happy :)  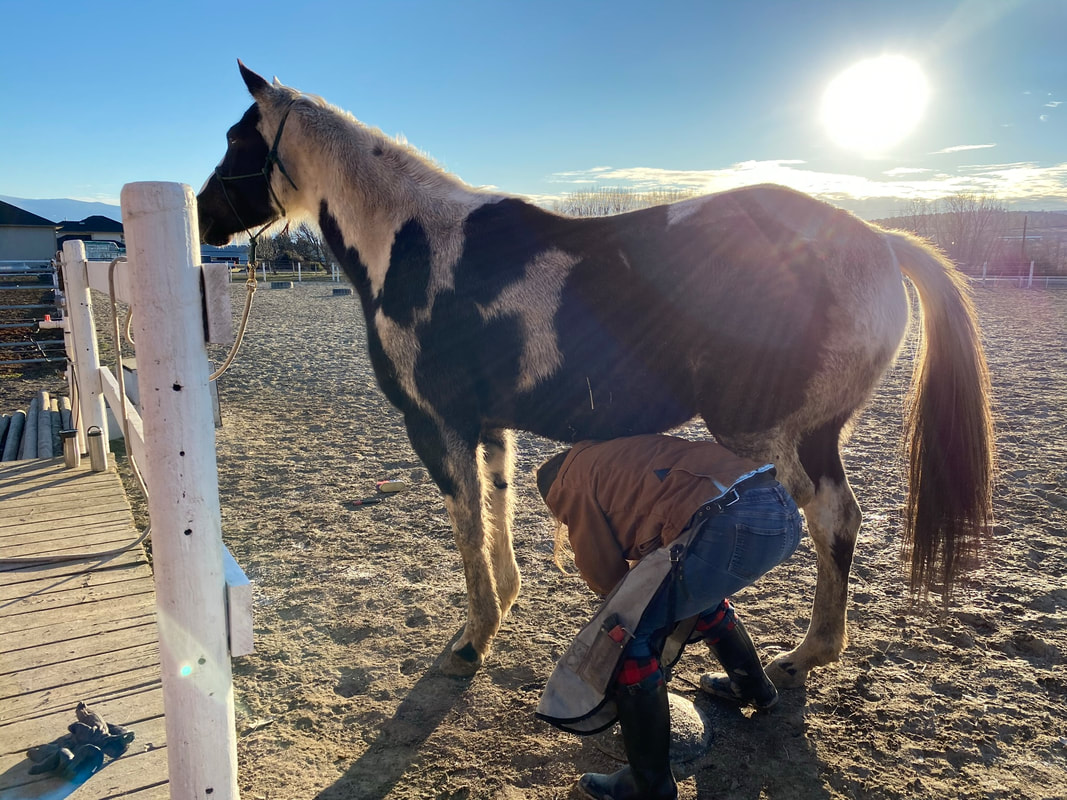 Yes!!! As a professional trimmer I have seen it all. I have trimmed rescue horses, show horses, race horses, competitive horses and backyard pasture ornament horses. From mini sized to draft sized, there are very few constants in trimming. Hoof shapes and sizes vary, conformation plays a huge part, but I can tell you with 100 percent certainty that the horse who behaves well always gets the best trim. I got into this line of work because I love horses. And it is legitimately my life's mission to help as many horses as possible. However, I have to keep my own personal safety at the top of my priority list when working, or else I may not be able to help any horses if I get hurt. Horse's that kick or strike or bite are a no brainier. These horse's need training before I can work on them, period. I am not a trainer in the capacity of my job as a trimmer, and if you wouldn't pick up it's hooves to clean them, don't call me to come and trim them. You would be amazed at how many clients I have encountered that I have asked "and how is she when you clean out her back hooves?, does she kick?" and to this their reply is "I wouldn't know, I was too nervous to try", or "well she tried to kick me, but I figured with your experience you would be fine". ---> Insert eyeroll here. So when I am dealing with a horse that is dancing around, pulling their hoof away, or any other annoying but not necessarily as dangerous as it could be behavior, I still have to be on guard. This means that sometimes I don't get to stand in the most comfortable position to trim, I don't get to get a thorough look at the hoof to assess balance etc, I have to trim on the fly so to speak and get done what I can in the moment. Accommodating horses because of behavior issues is challenging and it definitely compromises the trim quality. In my experience there is a huge difference between horses that have physical limitations or injuries that make it hard for them to stand for trimming and difficult horses due to behavior. Horses with physical issues aren't trying to get out of trimming, they are just trying to survive and reduce their pain or discomfort. I don't mind contorting myself in order to get them trimmed and keep them comfortable, but ultimately it does mean that they don't always get a complete trim. For instance sometimes horses can't lift the leg high enough for me to hold or use my stand, these horses get a functional trim but I can't be as detailed as I'd like. Functional is key here. I have trimmed horses where I have had to kneel down behind a back leg in order to trim because they had arthritis. I would not put myself in a compromising position like that with an ill behaved horse. Ill behaved horses aren't trying to be difficult, but they don't know better if we don't teach them. As I mentioned above, it is not in my capacity as a trimmer to train client's horses. I am also not the type of trimmer that will "smack a horse" with my rasp or "discipline" a horse (not that I believe this type of discipline is particularly helpful anyway). I believe that correcting these behaviors is the owner's job, and often times when a horse is misbehaving I will step back and look to the owner to correct the problem. When I am training my own horses to stand for trimming their are a few techniques that I use. First let me start off by saying that picking up and holding the hooves has nothing to do with the hooves. This can be a hard concept for people to grasp, but it is a respect issue and not a hoof issue. Moving your horse on the ground is the key to teaching them to stand. Can you circle them, send them out, bring them back, ask them to move their feet faster, slower, stop? You will gain their respect and they will let you be the leader if you can take control of their movement and show them that you are in charge of the space, but that you are fair. When I have a horse that is dancing around and doesn't want to stand I give them a choice. They can choose to stand nicely, or I will ask them to move their feet or do something that requires more energy or thought until such a point that they will choose to stand still. This isn't a punishment, it is a choice. Forcing an anxious bouncing horse to stand still is dangerous, they are bound to explode at some point and it's better to channel that anxiety into movement and getting them back to the thinking side of their brain as opposed to the reaction side. Horses that are stubborn or dominant (read left brained) usually respond well to backing up. Again I offer a choice: they can stand still and let me trim, or we can back up with effort clear across the arena. After one or two back up sessions they usually choose to stand still. I used to trim an Appaloosa and it could take up to an hour to get him trimmed. He would dance around and pull the rope from the owner's hands and run off etc. He generally had poor manners to begin with, and she was a very passive owner who allowed him to take control of the relationship. One day she couldn't be present for the trim and asked me to do it alone. It took me approx. 20 mins start to finish to get him trimmed. This is how I set him up to succeed: First, I attached a long line to his halter instead of a lead rope, and I didn't tie him, I just left the rope on the ground in front of him where I could quickly and easily grab it if he decided to run off etc. Second, every singe time he pulled his foot away or even thought about trying to leave I dropped everything, literally dropped my tools, and backed him up with serious effort about 50 feet. When I say back him with effort I mean quickly and with purpose. No dawdling or lazily drifting backward. And I did not get rough with him, but I made sure he knew that he needed to get out of my space in backward fashion ASAP. After about 3 of these little back ups, he stood like a champ for the trim and every trim after that. He just needed to understand his choices (and boundaries). Trimming is an art form. Understanding the anatomy and function is key, but also being able to physically apply the desired to trim appropriate to the anatomy is the bigger picture. I am constantly trimming, then assessing, tweaking the trim, checking again, etc. And when the horse starts getting impatient and pulling away I may miss a small detail or little assessment that might result in imbalance or unevenness. While I always try to do the best trim possible, there are a lot of factors that can impact the quality of the trim. Having a clean and dry place to work also makes a big difference. Trying to trim wet and muddy/snowy hooves is a nightmare. They are slippery, I can't hold them, and my tools get clogged and jammed. If the horse is short on patience to begin with and every time he takes his foot away he puts it down in mud, I have to then clean it again before I can continue to work. This is frustrating and it also tests the horse's patience as the trim takes longer. I don't need to have a barn or stall to work in, but a simple rubber mat on the ground or a concrete driveway makes a big difference. Toweling off your horse's legs so they aren't caked with mud is also helpful. (Pro Tip: make sure your horse is comfortable standing on the rubber mat before the farrier arrives lol). So the next time that your farrier or trimmer is around, pay attention to how well your horse stands for them and how easily they seem to be able to do their job. If you see any errant behaviors that you could address before their next visit, I'm sure they would appreciate it. And if you see something but aren't sure how to correct it, as your trimmer. They may have an idea for you, or a technique that they have found worked in the past, and I guarantee they will very much appreciate your concern for their safety and ability to perform their job. I hope after reading this article that you understand it is in your horse's best interest to behave well for trimming as they will get a far more detailed and thorough trim if they stand quietly, plus your farrier may come back a second time (wink).  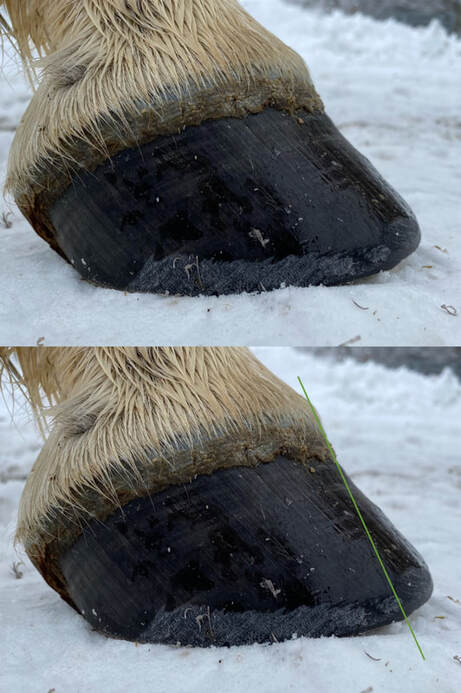 What is breakover when talked about as a trimming landmark? Breakover is trimmed at the forward most part of the hoof at the toe. It is the very last part of the hoof to be touching the ground as the horse breaks over and lifts the leg into the swing phase of the stride. It is usually trimmed as a bevel or roll into the hoof wall, but occasionally is trimmed back farther into the golden line or even the sole if the sole is very stretched forward. How do you know where to set breakover? There are a couple of ways. This picture shows the angle of new growth at the coronary band and if we were to follow it all the way down, breakover should be where the hoof wall would be if it were well connected. Follow the green line down and it shows the beginning of where I trimmed breakover in line with that upper growth. Another way I determine breakover is by reading the sole’s concavity. Solar concavity mimics the coffin bone concavity, so following the concavity out until it plateaus is sometimes also an indicator of where breakover should be, but there are a few exceptions to this method. For instance a foundered horse will have very little to no concavity, and a horse with retained sole may not show the concavity properly. The following video is a good example of setting breakover on a healthy hoof based on solar concavity. This process would be somewhat similar on a foundered hoof or a hoof with a lack of concavity, but we must make sure not to trim too short as generally hooves with less concavity have a thin sole and a lack of hoof wall connection. In those cases I find trimming breakover according to the new growth at the coronary band more accurate. 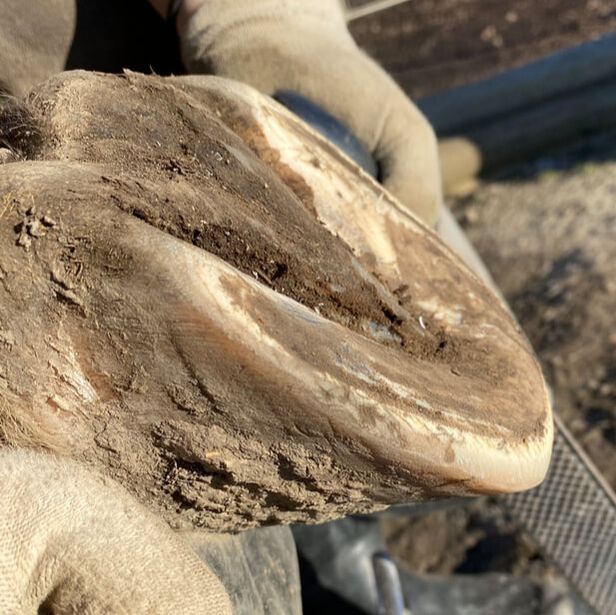 The picture above shows breakover set at the edge of the sole along the top of the ridge of concavity. There is a little bit of excess sole at the tip of the frog, or just behind what we would call the toe callous, but if you could envision the concavity on either side wrapping around and meeting up underneath it, the bevel or breakover would be along that edge. In my opinion setting a proper breakover is probably the single most important part of the trim, and one of the main aspects of trimming that I find a lot of professionals get wrong.  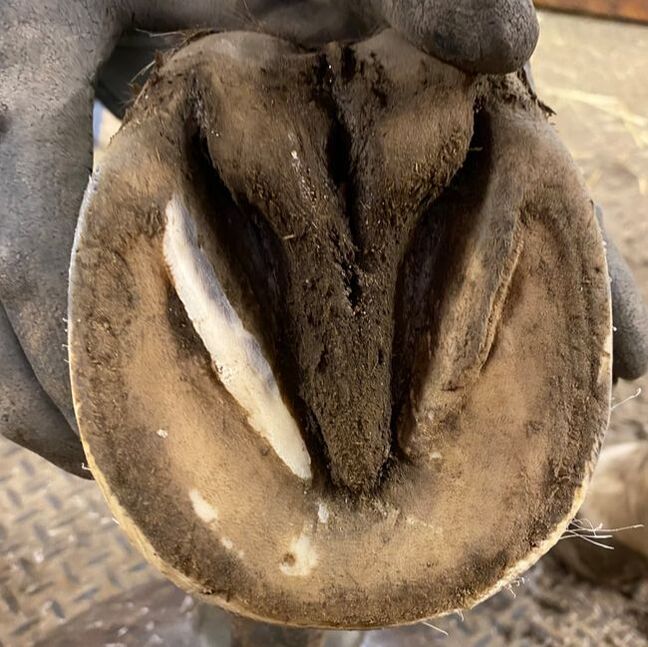 This photo is a great illustration of trimming a tall vertical bar in order to allow downward expansion of the hoof during the peak impact phase of loading. I like to trim the tall vertical bar to ramp downwards from just in front of the heel surface along the natural concavity of the sole. [The natural function of the hoof to dissipate impact energy works like this: First the heels and frog strike the ground. This allows the digital cushion to absorb the brunt of the impact because it is made up of elastic fiber-rich dynamic tissues. These tissues are able to compress and store energy under load. The hoof then rolls over onto the solar surface allowing the digital cushion to further compress and the natural arch of the hoof to expand downward. This includes the expansion of both the heels and the collateral grooves. The hoof then breaks over at the toe, allowing the digital cushion to use this stored energy to drive recoil back to a resting state.] The solar arch on the bottom of the hoof allows this downward expansion to happen without restriction. We also have to consider is the horses willingness to weight the hoof during this phase of the stride. If we leave the bar high and vertical, when the hoof rolls over onto the solar surface the bar can act as a pressure point and cause excess pressure on the DDFT and navicular bone. This can then alter the horse's stride and cause them to land laterally or toe first. Altered landings can cause the impact energy to have to be absorbed by the horse's joints and muscles and lead to further issues. It is important to recognize that over trimming, just like under trimming the bars, can also have negative implications to the hoof. The bar makes up half of the collateral groove and the frog makes up the other half. If we trim the bar too low, the grooves will become shallow and reduce the natural concavity that the hoof needs in order to expand downward. Over trimming the bar can also thin the bar and lead to sensitivity of the bar's corium. Bar trimming is probably one of the most contentious issues between different methods of barefoot trimming. Personally I like to keep it simple: trim where needed, don't where it's not and most importantly, do no harm.
Overlaid or embedded bars grow out laterally over the sole. They often tend to grow over and into the sole creating bruising and sometimes abscessing. The above picture on the left shows vertical bars and the right shows embedded bar. Embedded bars are difficult to deal with and left unchecked can lead to bruising, discomfort and abscessing. Embedded bars show up more as a lump overtop of the sole and need to be trimmed so that they aren't causing a pressure point during peak impact. This is easier said then done as they often become ingrown into the sole and have to be trimmed out little by little in order to avoid over thinning the bar/sole junction and causing sensitivity to the bar's corium. I generally trim embedded bars down to match the natural concavity of the sole, but no lower. I trim frequently and let the sole push them out gradually. Some horse's are more sensitive and the bar tends to fold over more often then others. In these sensitive horses the bar can bruise and cause discomfort so I tend to trim it more often. I have a mare with PPID and no matter what I do her bars fold over and abscess if left for 4 - 6 weeks. I manage her with bi-weekly trimming just to keep the bars in check and she manages well. The following short video shows the difference between trimming vertical and embedded bars.  When it comes to rehabilitating horses, or for me even just owning horses, I approach it with the whole horse in mind. For me my horses are companion animals, riding animals, and animals that I use to facilitate my business. They are also living, breathing beings with their own thoughts, feelings and needs. They make friends, have family groups and form attachments to certain horses, animals and people. My main area of focus in my business is hoof care, but in order to achieve optimal hoof health there are many other areas that must be working properly in order for the hooves to be healthy.  DIET Let’s start with the diet. There are many conflicting opinions on the optimal diet for our horses. I have taken several equine nutrition courses, been to many seminars and done plenty of research. What I have found is that individual horses needs vary so a one size fits all approach doesn’t work. This post isn’t about nutrition specifically so I will try to keep it short. Up until recently I had a specific combination of feeds and minerals that I fed my herd of 10 on a daily basis. I was feeding each feed or mineral for a specific reason that I had predetermined that the horses needed. I was feeding those minerals because of what I had learned about minerals and hoof health. How did I come up with the theory that they needed them? Well I had read, researched or had been told by a trusted source that they needed them. I had never seen any reason in my horses’ outward appearance, behaviour or apparent health that made me think there was a deficiency, but I assumed like most people do that they should be supplemented with something and therefore I built my list of supplements and off I went to the feed store. I fed these things for years until just this past spring when I heard something that interrupted my thought pattern. I had scheduled an osteopathic treatment for two of my horses with Dr. Laura Taylor and it was while in deep discussion with her about equine diets and nutrition that she said something that has stuck with me ever since. She said “if you are feeding or supplementing your horse with something, you should see some type of result”. Weather those results are physical, such as seeing an improvement in their hair coat or outward appearance, emotional, such as seeing less anxiety or behavioural problems, or internal, such as something affecting the organ systems in the body or the musculoskeletal system causing stiffness or even lameness. The point is you should see some type of result from what you are feeding, or you should see a result of not feeding it... This caused me to rethink my horses diets and cut out everything but pasture and hay for three months. What I found was that there was no change in them. Their hair coats were still beautiful and shiny, their hooves were still brilliant and they were still emotionally sound and happy. The moral of the story for me was to keep it simple. And I’m not saying all horses don’t need supplements, but what horse owners need to do is understand what they are feeding and to make sure it is necessary for your horse before blindly feeding something just because someone else does, someone told you to, or because of some fancy packaging. I have now started to include some new supplementation to the hay and pasture diet of my herd, more about this in an upcoming BLOG that will be dedicated to nutrition  MOVEMENT = LIVING ENVIRONMENT After looking at the diet I also want to address the horse’s living environment. Does he stand around in a stall all day, a small paddock, or a pasture or larger open area? Is he alone or kept with others? What those things mean to me is does the horse get enough movement to fulfill his physical and mental needs? Does he have herd mates to fulfill his social and emotional needs? Does his paddock have an enough varied terrain to adequately stimulate his hooves? This is maybe the most important part to me. My horses live in a herd, on a track based paddock system. They have access to pasture when needed and are constantly on the move. I can regulate their feed and movement as required. None of my horses get “hot” because they are standing around all day, and they don’t get bored because their social and emotional needs are fulfilled. None of them need a “job” or need to be ridden in order to keep their cool. They live like horses, and yet I can ride and play with them as needed. I have very few instances of cribbing or pacing or any other bad habits. Those are byproducts of emotional stress that doesn’t exist in my herd. Making sure the horse’s living environment is conducive to a happy and healthy horse is important because then they are able to keep physically fit and engaged which will help with the healthy hooves we want to grow  DENTAL HEATH = BALANCE Another huge factor is teeth. I recently went to Florida to further my knowledge and become a graduate of the Horsemanship Dentistry School. This was so important for me as I have always known there was a connection between what was happening in the mouth and the soundness in the body but I needed more information. What I learned was so mind blowing. An imbalance in the teeth will create an imbalance in the jaw that would translate to an imbalance in the neck, shoulders and feet. An imbalance on the front end will affect the hind end and so on. It becomes a cascade effect, and the best part is when I am able to feel an imbalance in the mouth, correct it and see a direct improvement in how the horse moves or behaves. Horses are so innately in tune with themselves that even just a slight dental problem can have a big effect. The dentistry school I went to teaches manual balancing without the use of sedation so that you can watch the horse respond to the changes you make. I have never quite done anything else as intimate and rewarding with my horses as putting my hand inside their unrestricted mouth. With no speculum to protect me, and no sedation to alter their state of mind, I can remove any sharp points inside their mouths and watch them lick and chew and feel the area with their tongue. That is usually followed by them pressing their head into my chest with thanks. No joke, this just gets my heart pumping.  EXERCISE = MUSCLE The last thing I will touch on in our whole horse approach to health is riding and the subsequent muscle development. Riding can play a huge part in the health of your horse’s hooves. For instance, a balanced horse that is ridden round (not over bent) will be travelling in balance from the front end to the hind end and engaging their core muscles and therefore loading their hooves optimally. A horse ridden hollow or unbalanced will create unbalanced forces on the hooves and therefore may not wear evenly. A horse ridden very over bent will travel with too much weight on the front or hind end and not travel in a balanced manner. How the horse is conditioned to riding will also affect how he will move in the pasture or paddock. Wild horses are conditioned to move 20-40 miles per day on varied terrain and tend to build well balanced bodies and hooves. When we keep horse in domestication we inhibit their ability to move freely and they don’t always understand how to move properly because of this. We must teach them how to carry the weight of a rider and still move in balance and harmony. 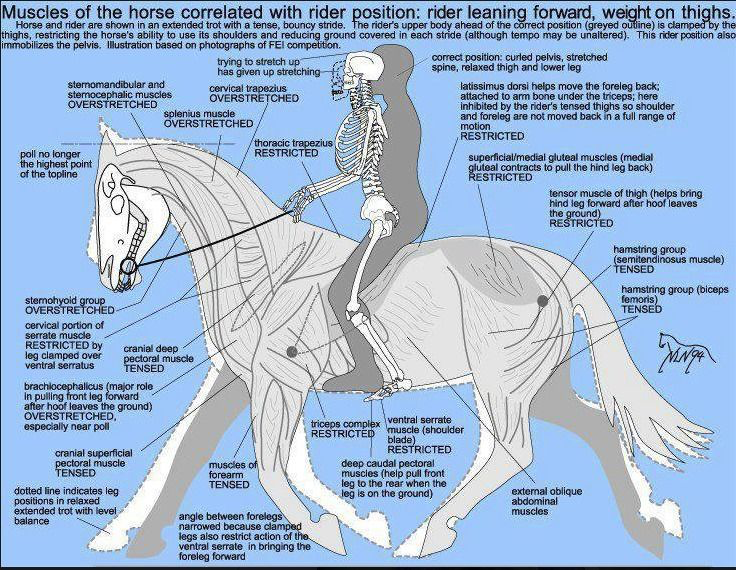 HEALTHY HOOVES = HEALTHY HORSES
Expectations – Having realistic expectations is very important when transitioning your horse from shod to barefoot. Expecting your horse to perform the same way barefoot as they have in shoes is unrealistic. It takes time to strengthen and built hoof health and often times the shoeing process over many years has caused much damage within hoof. It is very much the same as asking a seasoned marathon runner to compete without their running shoes. It would be uncomfortable for them to feel the hard or rocky ground under their sensitive feet for the first few times. However, given enough time the marathon runner could build adequate callous so that he could perform barefoot. Taking horses barefoot should be about the long term health of the horse, not the rider’s short term performance goals. This being said, we must still make sure that our horses are comfortable when transitioning by providing them with hoof boots when needed and correct and frequent natural trims. Time - A hoof that has been in shoes for extended periods will take time to heal internally as well as externally. Perpetual shoeing cycles can cause contraction and atrophy of the internal energy dispersing structures of the hoof. A horse that is shod is peripherally loading the hoof, which means that only the outside rim of the hoof is impacting the ground. This causes the frog and digital cushion (a structure paramount to a healthy barefoot hoof) to atrophy and weaken. However the good news is that the digital cushion has tissue similar to stem cells within it, and given the right opportunity (ie a balanced natural trim with proper stimulation) it can regenerate. The other problem with shoes is the lack of flexibility within the hoof. A metal horse shoe cannot expand and contract like a natural hoof does so there is less flexion and movement within the hoof. Less flexion and movement results in decreased blood flow and energy dissipation leading to further tissue damage. Upon pulling the shoes and providing a natural trim circulation and flexion are immediately restored, often resulting in temporary minor discomfort for the horse as circulation is increased and blood flow is restored back to a normal state.  Environment – A barefoot horse’s living environment plays a large role in strengthening their hooves. A horse that lives on soft pasture will have a hard time building the callous needed to ride on a rocky trail without some form of hoof protection. Whereas a horse that lives on hard rocky ground will have no trouble travelling on a rocky trail as his hooves would have already been conditioned to it. Even if all you have for your horse is soft pasture or dirt, adding some river rock around water troughs or in shelters or a favorite hangout spot can be a big help. Exposure to varying surfaces is important in conditioning the hoof and building strength.
Deciding to take your horse barefoot can be a complex decision. While it is greatly beneficial to them to restore natural hoof function, you must make sure you are ready to face the challenges involved with the transition. I suggest you speak with your hoof care provider about the factors mentioned above as well as discuss the overall health of your horses’ hooves and the expected length of the transition period. Published in Saddle Up Magazine in two parts, April 2015 and May 2015 Nature seems to have a way when it comes to getting things right. The mathematical simplicity that exists when you break a hoof down into sections is quite amazing. At the Okanagan School of Natural Hoof Care we teach a trimming method called the Hoof Print Trim. This method was created by Cheryl Henderson, founder of the Oregon School of Natural Hoof Care. The Oregon School was the first of its kind in North America. A center devoted to the practice of Natural Hoof Care and a better life for our equines. Cheryl Henderson has spent many decades developing and researching her method and has proven it again and again with thousands of dissections and case studies. Our program teaches this method and also relies on the ability to “read” the hoof and each horse’s specific conformation to adapt the trim to their needs. This system allows us to teach the fundamentals of trimming in a short time frame. The formula of a healthy hoof is as follows: the width at the fulcrum (widest point on the bottom of the hoof) equals the length heel to toe. This means that the hoof should be a perfect circle, hind hooves abide by this measurement also but the hoof tends to be more spade shaped. The frog should equal 2/3 of the solar view of the hoof from the back to the front, the remaining sole to the dorsal (front) hoof wall is the other 1/3. The hairline should be at a relaxed 30 degree angle to the ground. All hooved animals have a naturally occurring 30 degree hairline that only becomes distorted through genetic defect, altered living environments and lack of movement, or human trimming error. These formulas have been proven again and again through the study of wild horses’ hooves and as well through countless dissections and case studies. Even the most distorted hoof shapes follow these parameters and can often be brought back into balance in just a few trims depending on the severity of the distortion. This does not mean however that we just measure and cut. These guidelines must be paired with our “reading” of the hooves’ clues to help us determine each horses’ needs. For instance some horses have club feet, therefore this physical deformity will impact the heel height and the angle of the hairline. This is where reading the hoof and determining the best approach for each specific horse is extremely important. A deformity like club foot can sometimes be corrected or improved, but many times is just something you have to work with and adapt your trim around. 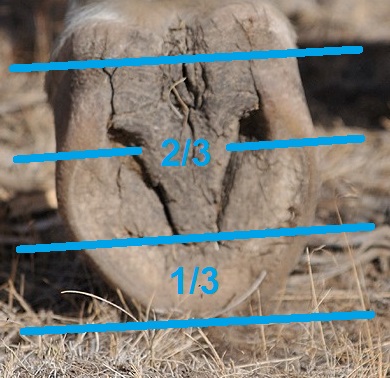 Showing the 2/3 to 1/3 balance of the hoof The Hoof Print Trim is a great starting point for those learning to trim because you can measure and draw where the healthy hoof should be and then train your eyes to “read” the hoof and evaluate using both sets of clues where you should trim. This method starts with evaluating the baseline. The baseline is the rearmost part of the hoof, where we will trim our heel height down to as well as where we take our measurement from heel to toe after establishing the width at the fulcrum. To find our baseline we measure from the back of the heel bulbs at the hairline to the collateral groove exit. On most average sized horses this measurement equals 1 ¼ inches. It varies for ponies or smaller horses and the taller horses and drafts but this is just an average, and again not a measurement we would simply just cut without “reading” into the rest of the hoof first and accounting for and deformities or pathologies etc. After establishing the correct baseline by evaluating the frog health, the periople wear marks, the heel surface, and sole thickness in switchback at the rear of the hoof, we can measure our fulcrum to establish our toe length. 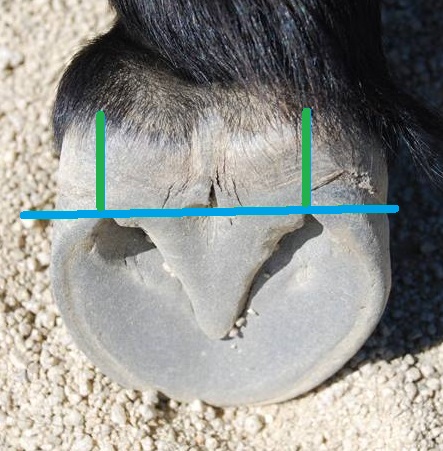 Establishing the baseline The fulcrum is simply the widest part on the bottom of the hoof. It is almost always about ¾ inch behind the apex of the frog occurring at the mid-point of where the coffin bone sits inside the hoof and is not usually distorted by flaring or stretched lamina. We measure the fulcrum from the golden line on one side to the golden line on the other side, not from wall to wall. If the measurement was 4 ½ inches, we would then measure from our baseline forward 4 ½ inches and mark where our golden line should be at the toe. In a balanced hoof that has been trimmed regularly and correctly, this mark will line up with the golden line at the toe. I just want to reiterate that this is also not a cut line, we still have to add our wall thickness to determine where the cut line will be. We also must “read” the hooves’ wear patterns and toe callous before deciding where to cut. Now that we have determined the circumference of the hoof we can establish the 2/3 to 1/3 balance. The baseline to the apex of the frog should be 2/3 of the overall hoof length. Frogs can get stretched forward into the sole’s 1/3 and occasionally need to be trimmed back. This measurement will determine if the frog has migrated forward. However all of our measurements to this point would be inaccurate if we had measured our baseline wrong, so caution must be taken to measure correctly and confirm we are right by reading” the clues and wear marks in the hoof. After establishing the baseline and the heel height we must determine the length of the toe. We do not use the white line as a determining factor as it can stretch and migrate forward giving a false location for the toe length. In order to determine the proper length we measure the fulcrum width from white line to white line on either side of the hoof. A front hoof should be the same width as length. So if the fulcrum is 4 ½ inches from white line to white line then our measurement from the baseline at the rear of the hoof to the toe would be 4 ½ inches. This is not a cut line though, we still have to add the thickness of the hoof wall to this measurement. A lot of times in a run forward hoof the white line can stretch forward and this measurement can seem extreme. However even though the wall flares forward and the white line stretches, the internal structures do not move or migrate. The coffin bone can rotate and sink lower in the hoof capsule in a laminitic or foundered horse, but even in those cases the geometrical mapping will establish the location of the coffin bone before we start to trim and we can work to bring balance back to the hoof. 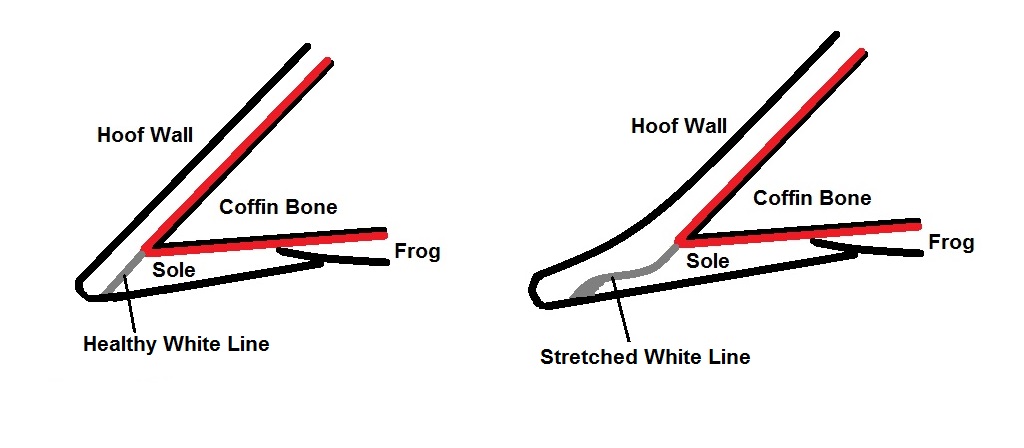 Another factor we have to consider when aligning the bones of the hoof and lower limb is the hairline angle. All hooved animals in nature have a 30 degree hairline in their natural environment (barring rare genetic defects) and the horse is only an exception when trimmed and managed ineffectively. Studies of wild horses in the US Great Basin have shown that when allowed to naturally wear their hooves in their wild environment they almost always have a 30 degree hairline. The few horses with this exception have a genetic defect of a club foot. A club foot is a coffin bone with a steeper dorsal angle and therefore creates a hoof with a steeper dorsal hoof wall angle and a higher heel. Both of these pathologies will affect the hairline angle. After evaluating the baseline, the fulcrum, the toe length and the hairline angle, we finish our trim by defining and trimming the bars and putting the mustang roll on the front of the hoof. The bars function is for support in the rear of the hoof and it is important that they are not over trimmed, however they must also not be left to grow over the sole as they can cause bruising and abscessing. A mustang roll is a rounding of the hoof wall at the toe to remove any leveraging forces on the hoof wall and to create a smoother breakover. The mustang roll is one of the defining differences between a barefoot trim and a traditional farrier trim. 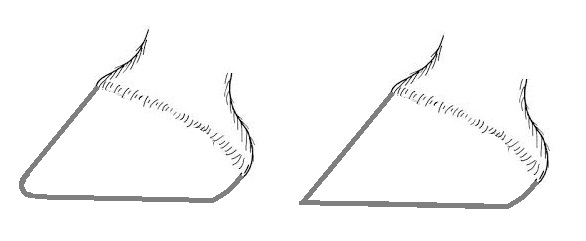 On the left a natural trim with a mustang roll, on the right a traditional pasture trim. published in Saddle Up Magazine March 2015 #1, Trims Frequent trimming is the most important step in building and maintaining healthy hooves. The average horse should be trimmed on a 6 to 8 week schedule. This can be varied slightly depending on the time of year and how fast the hooves are growing. It also depends on the amount of movement and exercise the horse is getting over varied terrain. Anything more than an 8 week cycle is just damage control and will not facilitate the growth of a healthy strong barefoot hoof. During rehabilitation trimming of damaged and sensitive hooves, the frequency of trims can vary anywhere from once per week to every 4 weeks depending on the situation. #2, Movement Even with frequent trimming practice, a horse will not develop strong hooves without movement. Wild horses in the US Great Basin have been documented to travel up to 40 miles per day in search of food, water and shelter. In contrast our domestic horses usually live in paddocks where they are fed next to their water and do not have to travel far for shelter. One of the best things we can do for our horse’s hooves and wellbeing is to keep them in a herd on a track based paddock system. A track based system where horses are fed throughout the track encourages horses to move on average 7 times father then they would in an open paddock. For more information on this type of horse keeping I would urge you to read Jaime Jackson’s book, Paddock Paradise. #3, Terrain Movement is key, but movement on varied terrain is plays an important role in hoof strength. A horse that lives in a soft grass paddock and only works in a sand arena will not be able to callous his hooves to be comfortable on hard packed ground or rocks. The best way to condition your horses’ hooves is to bring the surface you want them comfortable to ride on into their paddock. That means you can bring in river rock, pea gravel, and road crush gravel. Putting these materials around areas your horse frequents is key. You don’t have to do your entire paddock in them. Placing them around the water trough, or in their shelters is a good way to ensure exposure to those surfaces. At first the horse might be uncomfortable, but over time their hooves will start to callous and strengthen and they will become able to traverse those surfaces without discomfort. 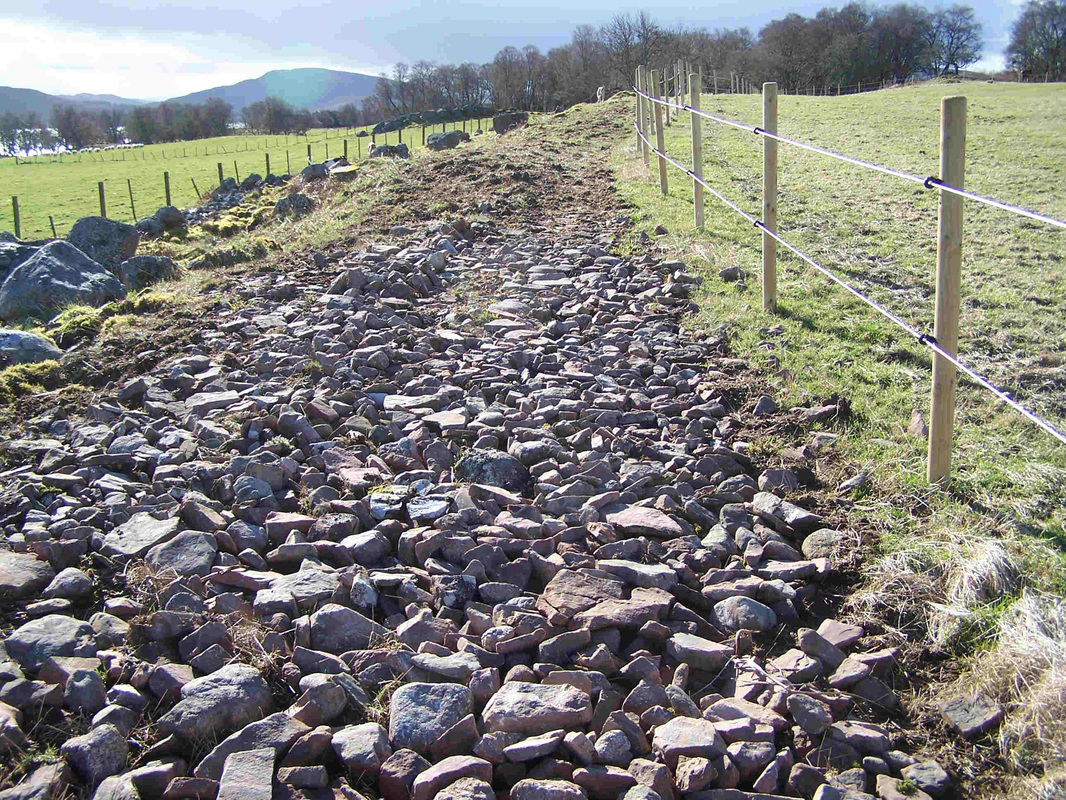 A track based paddock with varied terrain. #4, Diet A low carbohydrate and high fibre diet is essential for hoof health. It is also important to make sure your horse’s diet is balanced in vitamins and minerals. A diet rich in carbohydrates can cause sensitivity in the hooves, poor horn growth and laminitis. Horses are designed to forage 14-16 hours per day. The best way to feed our domestic horses is by slow feeding. There are many great feeders and nets on the market to simulate natural grazing. #5, Time Patience is key in rehabilitating damaged hooves as well as forging strong healthy barefoot hooves. It takes time to build callous, and to condition the hoof to the environment. Rehabilitation also takes time as you cannot always achieve your trimming goals for a specific horse in one trim. Soundness is key when trying to build healthy hooves and the horse’s comfort must always be a priority. 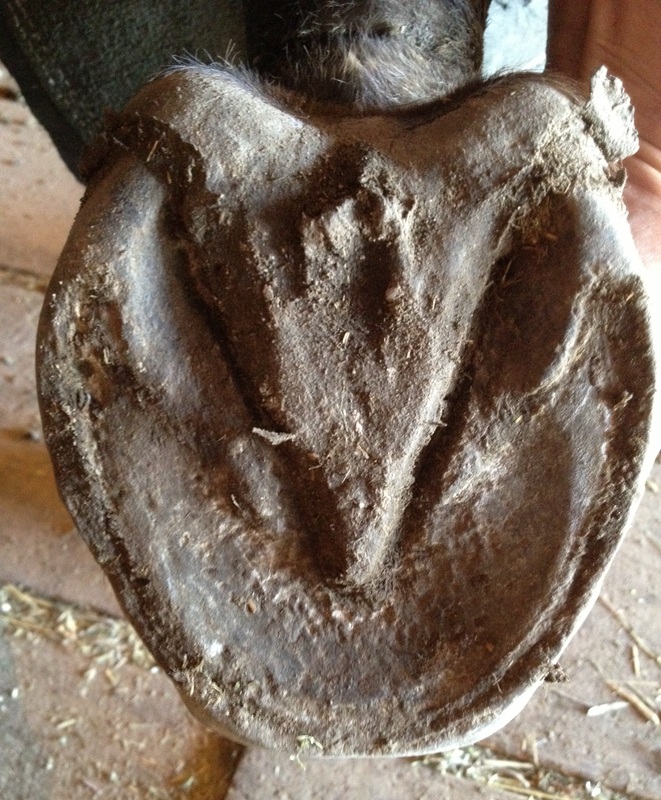 A healthy barefoot hoof, comfortable on varied terrain. This horse lives on a rocky track and is mostly self trimming, requiring a minor touch up every 6 weeks to maintain balance. Published in Saddle Up Magazine February 2015 For many horse owners, evaluating and trimming their horse’s hooves is a task left up to their farrier/trimmer. But how do you know that the person that you have hired is doing a good job? You have to be able to evaluate your horse’s hooves beyond the scope of how sound the horse moves. While soundness in the present is important, the horse’s long term hoof health is also a major factor owners must consider. I see many cases where long term incorrect hoof shape or function has lead to irreversible damage while the horse appeared sound until it was too late to correct. However I also see a lot of horses that I am able to rehabilitate and return to use after a deformed hoof has broken down. There are 5 key points horse owners can use to evaluate their horses’ hooves: Heel Placement – The heels should be positioned at what we call the baseline. The baseline is an invisible line that runs across the back of the frog and collateral grooves, and in a well-trimmed hoof also aligns with the heels rearmost surface. When heels are allowed to overgrow or migrate forward from this line, the balance of the hoof is distorted and excess stress and tension is placed on the horse’s joints, tendons and ligaments. Long or forward heels can also shorten stride length. Frog Integrity – When a horse moves forward, their natural stride should allow them to land heel first. If the heels are in the correct position as mentioned above, the heels and frog will contact the ground simultaneously. The frog’s primary function is to protect the digital cushion. The digital cushion lies underneath the hard calloused frog and is a large pad of fatty tissue. The digital cushion absorbs impact and dissipates energy. If the frog is infected with thrush or bacteria, or underdeveloped from long heels keeping it elevated and not touching the ground, this portion of the hoof’s function cannot be performed. Without the energy dissipation of a healthy frog and digital cushion excess stress is placed on the horse’s joints. Wall Connection – A well connected hoof wall supports the coffin bone and allows the hoof to function as intended. The hoof wall grows downward from the coronet to the ground and should not flare or deviate in angle as it descends. A hoof wall that changes its angle part way down the hoof will have a poor connection and decreased concavity in the sole. A disconnected wall can lead to the coffin bone sinking down into the hoof capsule causing inflammation in the sole resulting in sensitive hooves. 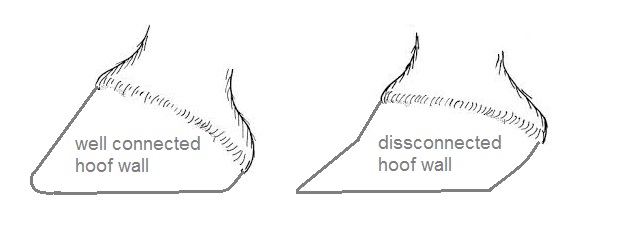 Sole Thickness – Sole thickness is key to soundness and comfort. A thick sole protects the coffin bone and pads the hoof. The sole should be firm and calloused, you should not be able to flex it when pressing with your fingers. It should have a smooth appearance, and it should have a slight concavity. Concavity varies for each individual horse dependent on their coffin bone shape but the bottom of the hoof should not be flat. A flat hoof signals a balance issue, perhaps in the wall connection or a problem with overgrown bars. Bar Definition – The purpose of the bars are to support the back of the hoof upon impact. The bar is an extension of the hoof wall as it wraps around from the heel surface. The bars should run at a downward slope from the heel to the mid-point of the frog. The bar should also be upright and defined, not laid over or blended into the sole. When bars invade the sole it can cause many different issues, the most common are: sensitivity on hard ground and reoccurring abscessing. In rare cases embedded bar can also cause navicular like symptoms. Horse owners must learn to recognize what a healthy hoof looks and functions like. Hoof care is a fundamental component of horse ownership and you must know how to recognize a problem before it causes long term damage. 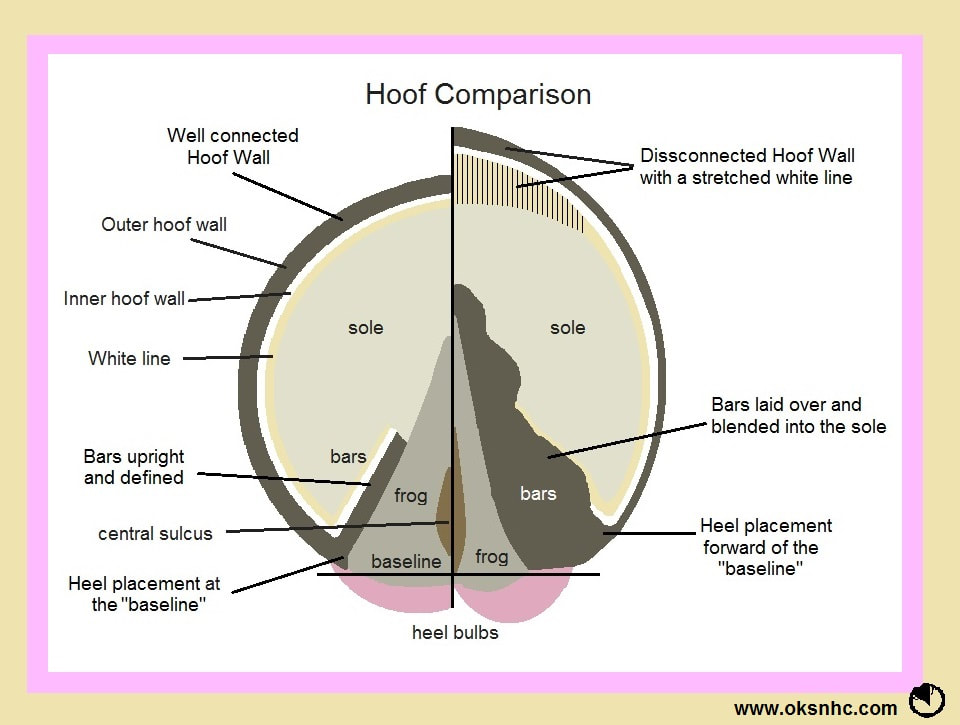 |
AuthorKristi Luehr is a barefoot trimmer/farrier, author, and founder of the Okanagan School of Natural Hoof Care. She is certified by the Canadian Farrier School as well as the Oregon School of Natural Hoof Care, and also has certification in equine massage and dentistry. Her focus is to educate owners about hoof anatomy, function and proper barefoot trimming that supports and grows healthy and functional hooves specific to each horse's individual needs. She is the author of three online courses specific to hoof care and is always striving to create more educational content for students to learn from. Archives
May 2024
|

 RSS Feed
© COPYRIGHT OKSNHC 2024. ALL RIGHTS RESERVED.