
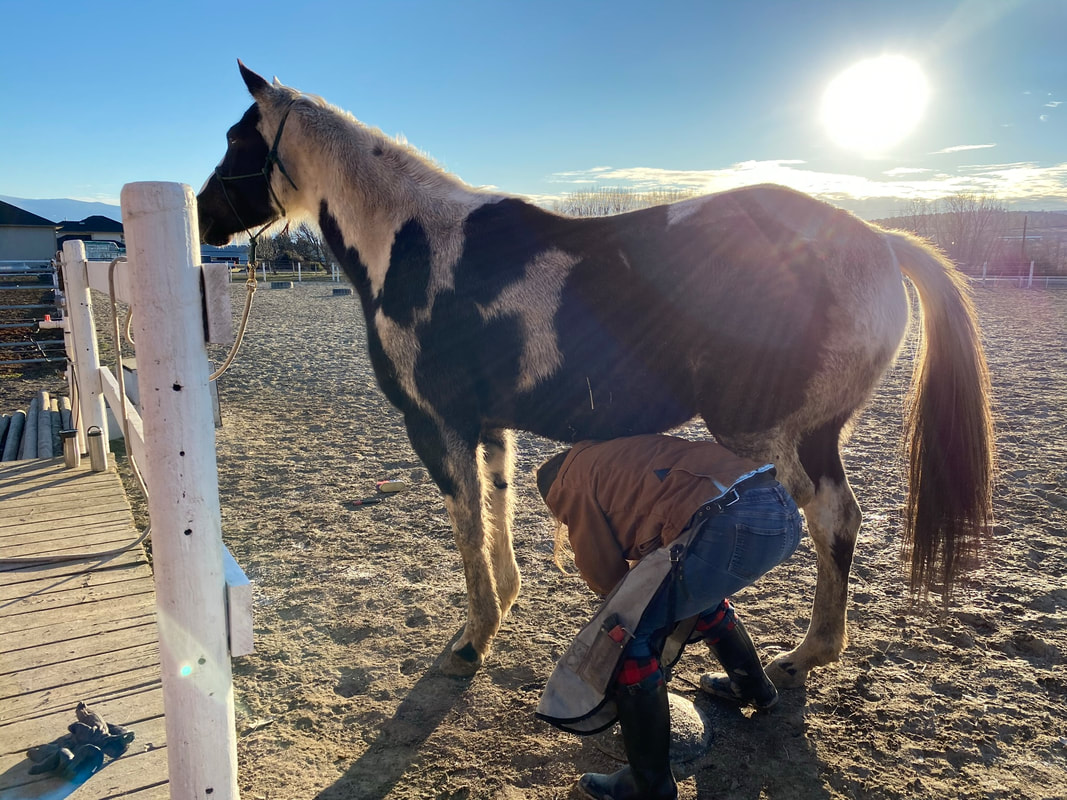
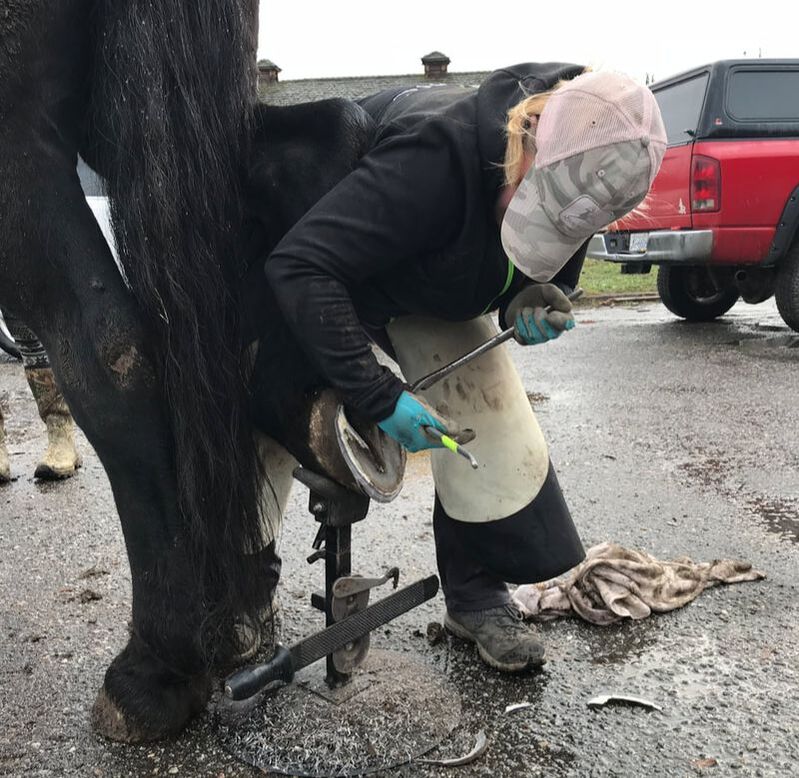
 Yes!!! As a professional trimmer I have seen it all. I have trimmed rescue horses, show horses, race horses, competitive horses and backyard pasture ornament horses. From mini sized to draft sized, there are very few constants in trimming. Hoof shapes and sizes vary, conformation plays a huge part, but I can tell you with 100 percent certainty that the horse who behaves well always gets the best trim. I got into this line of work because I love horses. And it is legitimately my life's mission to help as many horses as possible. However, I have to keep my own personal safety at the top of my priority list when working, or else I may not be able to help any horses if I get hurt. Horse's that kick or strike or bite are a no brainier. These horse's need training before I can work on them, period. I am not a trainer in the capacity of my job as a trimmer, and if you wouldn't pick up it's hooves to clean them, don't call me to come and trim them. You would be amazed at how many clients I have encountered that I have asked "and how is she when you clean out her back hooves?, does she kick?" and to this their reply is "I wouldn't know, I was too nervous to try", or "well she tried to kick me, but I figured with your experience you would be fine". ---> Insert eyeroll here. So when I am dealing with a horse that is dancing around, pulling their hoof away, or any other annoying but not necessarily as dangerous as it could be behavior, I still have to be on guard. This means that sometimes I don't get to stand in the most comfortable position to trim, I don't get to get a thorough look at the hoof to assess balance etc, I have to trim on the fly so to speak and get done what I can in the moment. Accommodating horses because of behavior issues is challenging and it definitely compromises the trim quality. In my experience there is a huge difference between horses that have physical limitations or injuries that make it hard for them to stand for trimming and difficult horses due to behavior. Horses with physical issues aren't trying to get out of trimming, they are just trying to survive and reduce their pain or discomfort. I don't mind contorting myself in order to get them trimmed and keep them comfortable, but ultimately it does mean that they don't always get a complete trim. For instance sometimes horses can't lift the leg high enough for me to hold or use my stand, these horses get a functional trim but I can't be as detailed as I'd like. Functional is key here. I have trimmed horses where I have had to kneel down behind a back leg in order to trim because they had arthritis. I would not put myself in a compromising position like that with an ill behaved horse. Ill behaved horses aren't trying to be difficult, but they don't know better if we don't teach them. As I mentioned above, it is not in my capacity as a trimmer to train client's horses. I am also not the type of trimmer that will "smack a horse" with my rasp or "discipline" a horse (not that I believe this type of discipline is particularly helpful anyway). I believe that correcting these behaviors is the owner's job, and often times when a horse is misbehaving I will step back and look to the owner to correct the problem. When I am training my own horses to stand for trimming their are a few techniques that I use. First let me start off by saying that picking up and holding the hooves has nothing to do with the hooves. This can be a hard concept for people to grasp, but it is a respect issue and not a hoof issue. Moving your horse on the ground is the key to teaching them to stand. Can you circle them, send them out, bring them back, ask them to move their feet faster, slower, stop? You will gain their respect and they will let you be the leader if you can take control of their movement and show them that you are in charge of the space, but that you are fair. When I have a horse that is dancing around and doesn't want to stand I give them a choice. They can choose to stand nicely, or I will ask them to move their feet or do something that requires more energy or thought until such a point that they will choose to stand still. This isn't a punishment, it is a choice. Forcing an anxious bouncing horse to stand still is dangerous, they are bound to explode at some point and it's better to channel that anxiety into movement and getting them back to the thinking side of their brain as opposed to the reaction side. Horses that are stubborn or dominant (read left brained) usually respond well to backing up. Again I offer a choice: they can stand still and let me trim, or we can back up with effort clear across the arena. After one or two back up sessions they usually choose to stand still. I used to trim an Appaloosa and it could take up to an hour to get him trimmed. He would dance around and pull the rope from the owner's hands and run off etc. He generally had poor manners to begin with, and she was a very passive owner who allowed him to take control of the relationship. One day she couldn't be present for the trim and asked me to do it alone. It took me approx. 20 mins start to finish to get him trimmed. This is how I set him up to succeed: First, I attached a long line to his halter instead of a lead rope, and I didn't tie him, I just left the rope on the ground in front of him where I could quickly and easily grab it if he decided to run off etc. Second, every singe time he pulled his foot away or even thought about trying to leave I dropped everything, literally dropped my tools, and backed him up with serious effort about 50 feet. When I say back him with effort I mean quickly and with purpose. No dawdling or lazily drifting backward. And I did not get rough with him, but I made sure he knew that he needed to get out of my space in backward fashion ASAP. After about 3 of these little back ups, he stood like a champ for the trim and every trim after that. He just needed to understand his choices (and boundaries). Trimming is an art form. Understanding the anatomy and function is key, but also being able to physically apply the desired to trim appropriate to the anatomy is the bigger picture. I am constantly trimming, then assessing, tweaking the trim, checking again, etc. And when the horse starts getting impatient and pulling away I may miss a small detail or little assessment that might result in imbalance or unevenness. While I always try to do the best trim possible, there are a lot of factors that can impact the quality of the trim. Having a clean and dry place to work also makes a big difference. Trying to trim wet and muddy/snowy hooves is a nightmare. They are slippery, I can't hold them, and my tools get clogged and jammed. If the horse is short on patience to begin with and every time he takes his foot away he puts it down in mud, I have to then clean it again before I can continue to work. This is frustrating and it also tests the horse's patience as the trim takes longer. I don't need to have a barn or stall to work in, but a simple rubber mat on the ground or a concrete driveway makes a big difference. Toweling off your horse's legs so they aren't caked with mud is also helpful. (Pro Tip: make sure your horse is comfortable standing on the rubber mat before the farrier arrives lol). So the next time that your farrier or trimmer is around, pay attention to how well your horse stands for them and how easily they seem to be able to do their job. If you see any errant behaviors that you could address before their next visit, I'm sure they would appreciate it. And if you see something but aren't sure how to correct it, as your trimmer. They may have an idea for you, or a technique that they have found worked in the past, and I guarantee they will very much appreciate your concern for their safety and ability to perform their job. I hope after reading this article that you understand it is in your horse's best interest to behave well for trimming as they will get a far more detailed and thorough trim if they stand quietly, plus your farrier may come back a second time (wink). 
1 Comment
Montana is a paint mare that presented with a disconnected hoof wall, and both rotation and sinking of the coffin bone. She has an extremely flared hoof capsule and a very flat sole with zero concavity. Her owner repots that she is tender when ridden barefoot and "requires shoes or boots" when ridden to keep her sound.
|


 Jan 23 2021 | 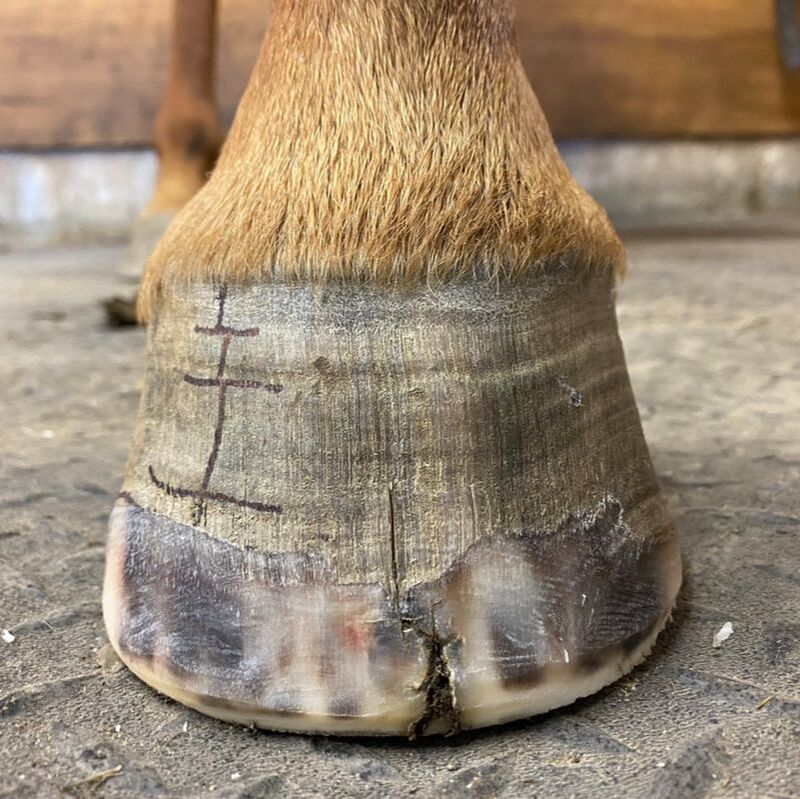 Aug 9 2021 |
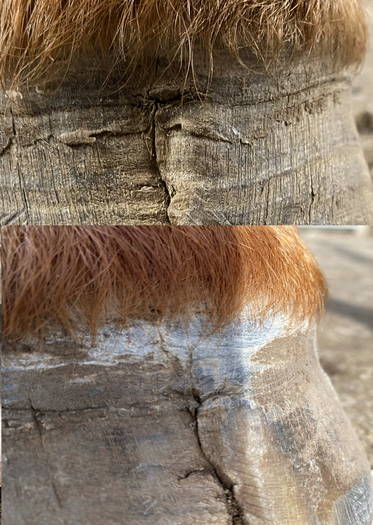
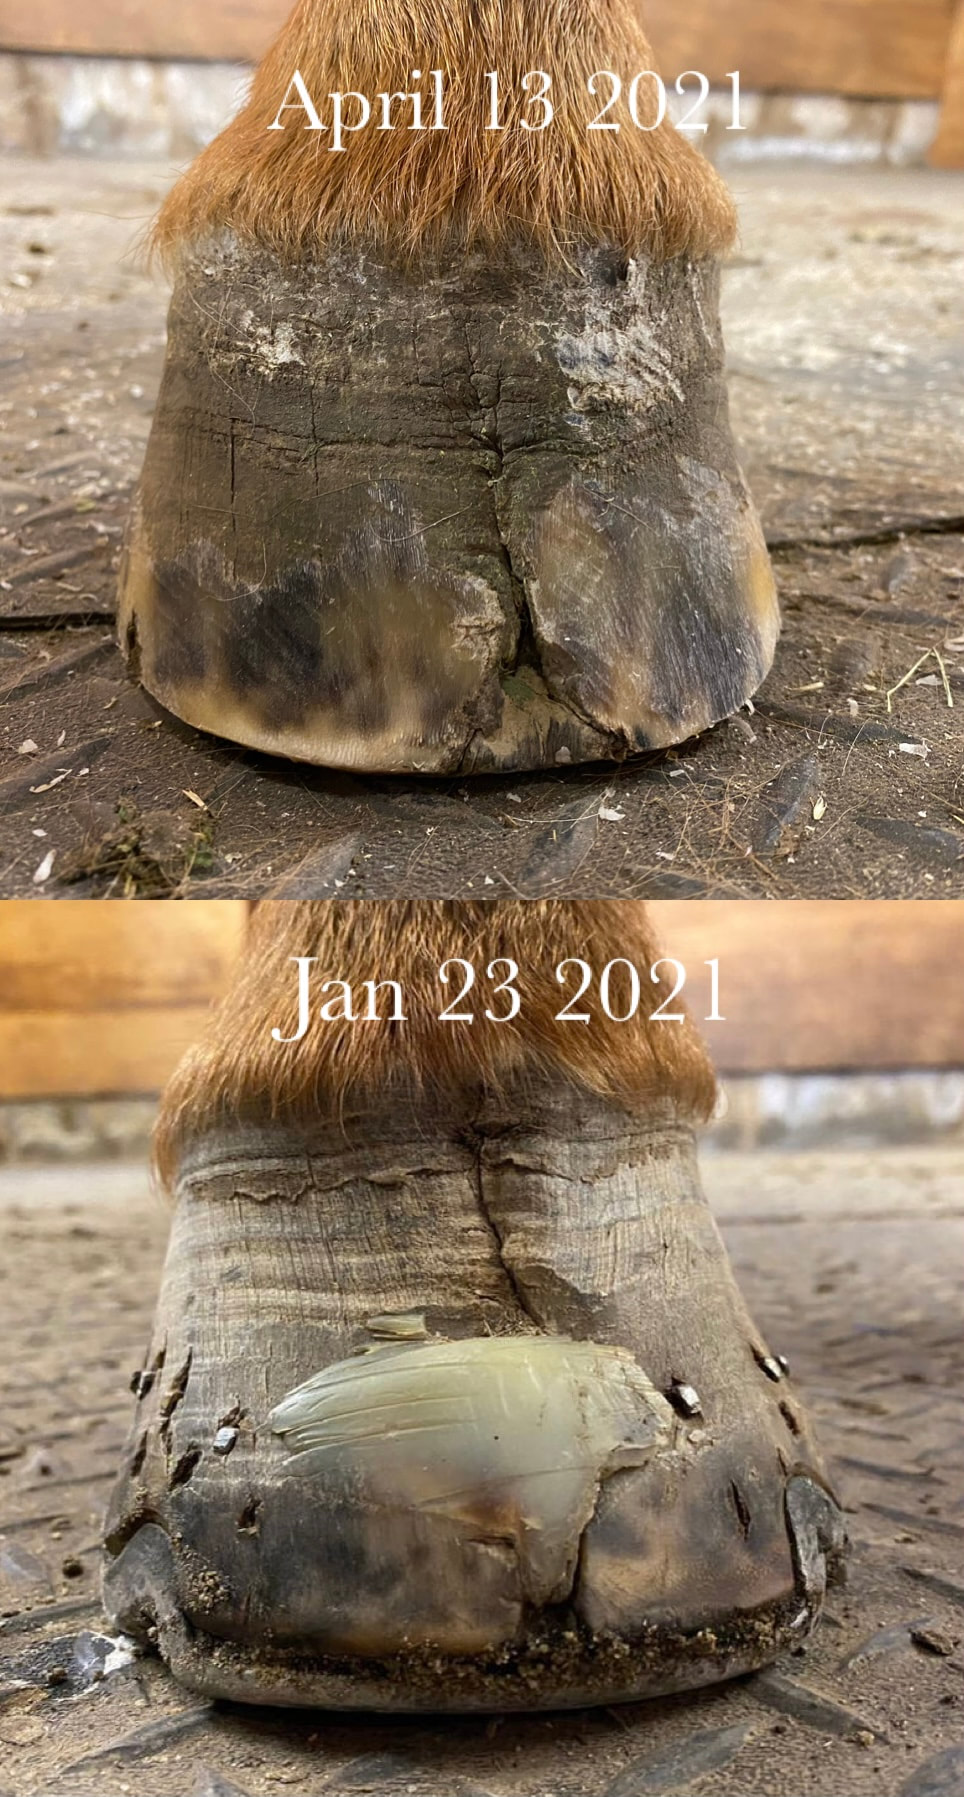
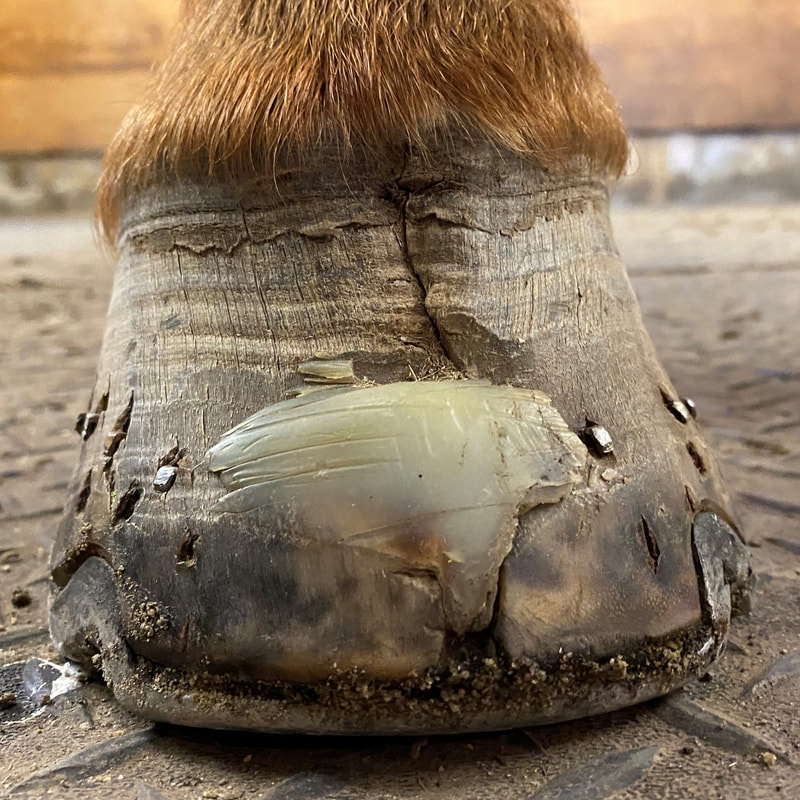
It's a bittersweet moment for us here at OKSNHC as Dixie gets ready to go home! Just over 6 months have passed, and Dixie has grown in almost an entirely new hoof! The crack is almost grown out, likely just one more trim will see that through. Dixie's home is about 2.5 hours from me, so one of my students will now be taking over her care along side her owner.
The small vertical crack you can see just above the trimmed area is superficial and will also grow out within the next couple of trims. Over the next 6 months, with proper trimming I expect Dixie to be able to grow in an even better connected hoof wall. You can see the marker lines I drew in the after trim pic showing the various levels of wall angle deviation. These angles are based on hoof leverage and reducing this leverage was my entire goal during this rehab resulting in being bale to grow out the crack.
For over 5 years Dixie suffered with that crack, being worked on by some very experienced and knowledgeable farriers. Clearly from the before picture you can see that they tried everything they knew. Shoes to hold the crack together, glue to help keep it together... I have always and will always maintain, it's not a shod vs barefoot debate, its the trim under the shoe or without the shoe that counts.
Throughout the rehab Dixie had highs and lows. There were some moments she required a composite shoe or hoof cast to be comfortable, and now 6 months later she is sound barefoot. Her transition is not entirely complete, she will require hoof boots for trail riding on rocky ground until she can build more callous and get used to the terrain, but in the paddock, pasture and arena she is 100% sound barefoot.

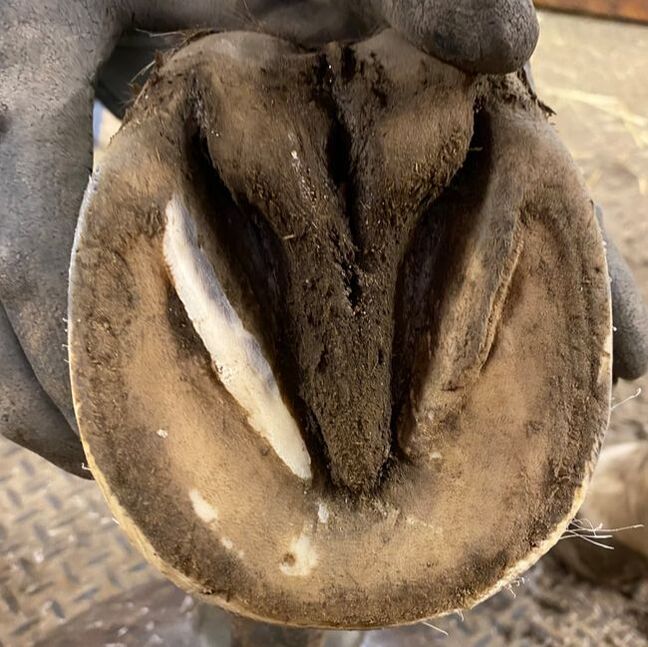
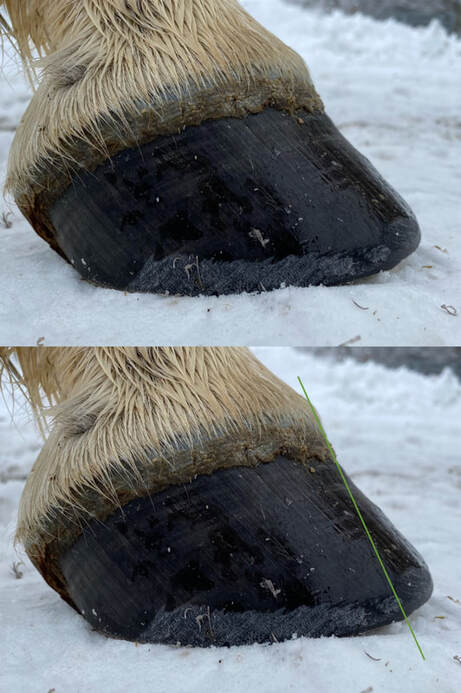
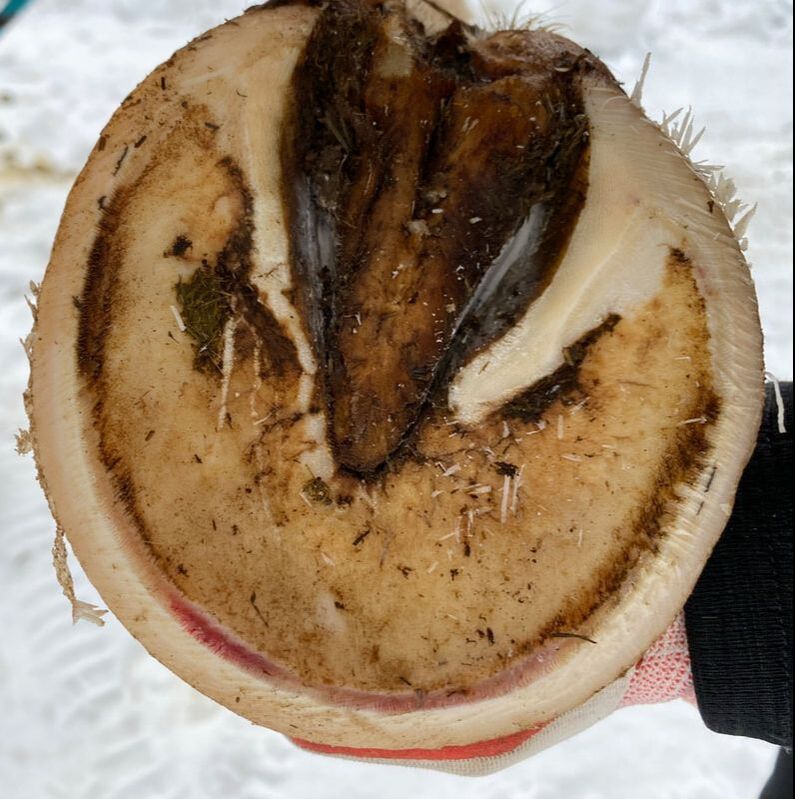
This photo is a great illustration of trimming a tall vertical bar in order to allow downward expansion of the hoof during the peak impact phase of loading.
I like to trim the tall vertical bar to ramp downwards from just in front of the heel surface along the natural concavity of the sole.
[The natural function of the hoof to dissipate impact energy works like this:
First the heels and frog strike the ground. This allows the digital cushion to absorb the brunt of the impact because it is made up of elastic fiber-rich dynamic tissues. These tissues are able to compress and store energy under load.
The hoof then rolls over onto the solar surface allowing the digital cushion to further compress and the natural arch of the hoof to expand downward. This includes the expansion of both the heels and the collateral grooves.
The hoof then breaks over at the toe, allowing the digital cushion to use this stored energy to drive recoil back to a resting state.]
The solar arch on the bottom of the hoof allows this downward expansion to happen without restriction. We also have to consider is the horses willingness to weight the hoof during this phase of the stride. If we leave the bar high and vertical, when the hoof rolls over onto the solar surface the bar can act as a pressure point and cause excess pressure on the DDFT and navicular bone. This can then alter the horse's stride and cause them to land laterally or toe first. Altered landings can cause the impact energy to have to be absorbed by the horse's joints and muscles and lead to further issues.
It is important to recognize that over trimming, just like under trimming the bars, can also have negative implications to the hoof. The bar makes up half of the collateral groove and the frog makes up the other half. If we trim the bar too low, the grooves will become shallow and reduce the natural concavity that the hoof needs in order to expand downward. Over trimming the bar can also thin the bar and lead to sensitivity of the bar's corium.
Bar trimming is probably one of the most contentious issues between different methods of barefoot trimming.
Personally I like to keep it simple: trim where needed, don't where it's not and most importantly, do no harm.
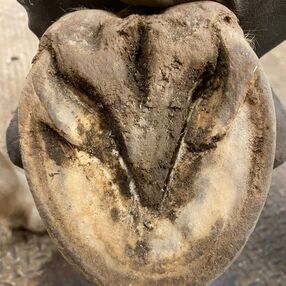 |  |
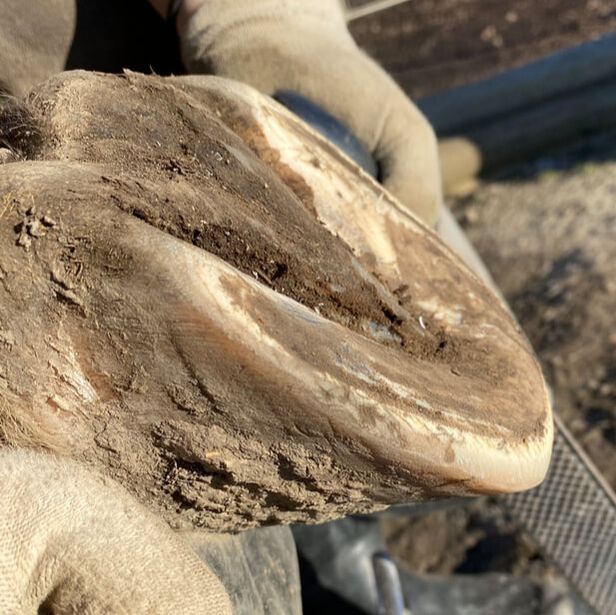
Overlaid or embedded bars grow out laterally over the sole. They often tend to grow over and into the sole creating bruising and sometimes abscessing.
The above picture on the left shows vertical bars and the right shows embedded bar.
Embedded bars are difficult to deal with and left unchecked can lead to bruising, discomfort and abscessing. Embedded bars show up more as a lump overtop of the sole and need to be trimmed so that they aren't causing a pressure point during peak impact. This is easier said then done as they often become ingrown into the sole and have to be trimmed out little by little in order to avoid over thinning the bar/sole junction and causing sensitivity to the bar's corium.
I generally trim embedded bars down to match the natural concavity of the sole, but no lower. I trim frequently and let the sole push them out gradually.
Some horse's are more sensitive and the bar tends to fold over more often then others. In these sensitive horses the bar can bruise and cause discomfort so I tend to trim it more often. I have a mare with PPID and no matter what I do her bars fold over and abscess if left for 4 - 6 weeks. I manage her with bi-weekly trimming just to keep the bars in check and she manages well.
The following short video shows the difference between trimming vertical and embedded bars.

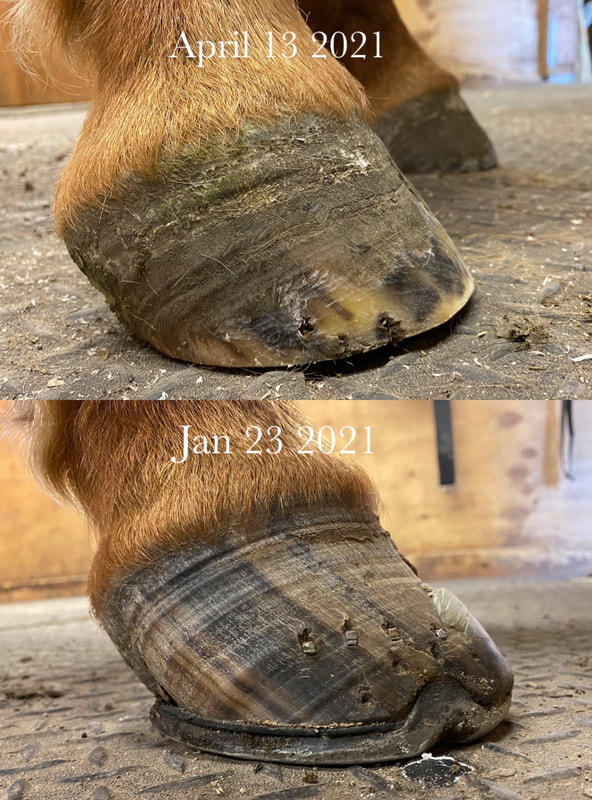
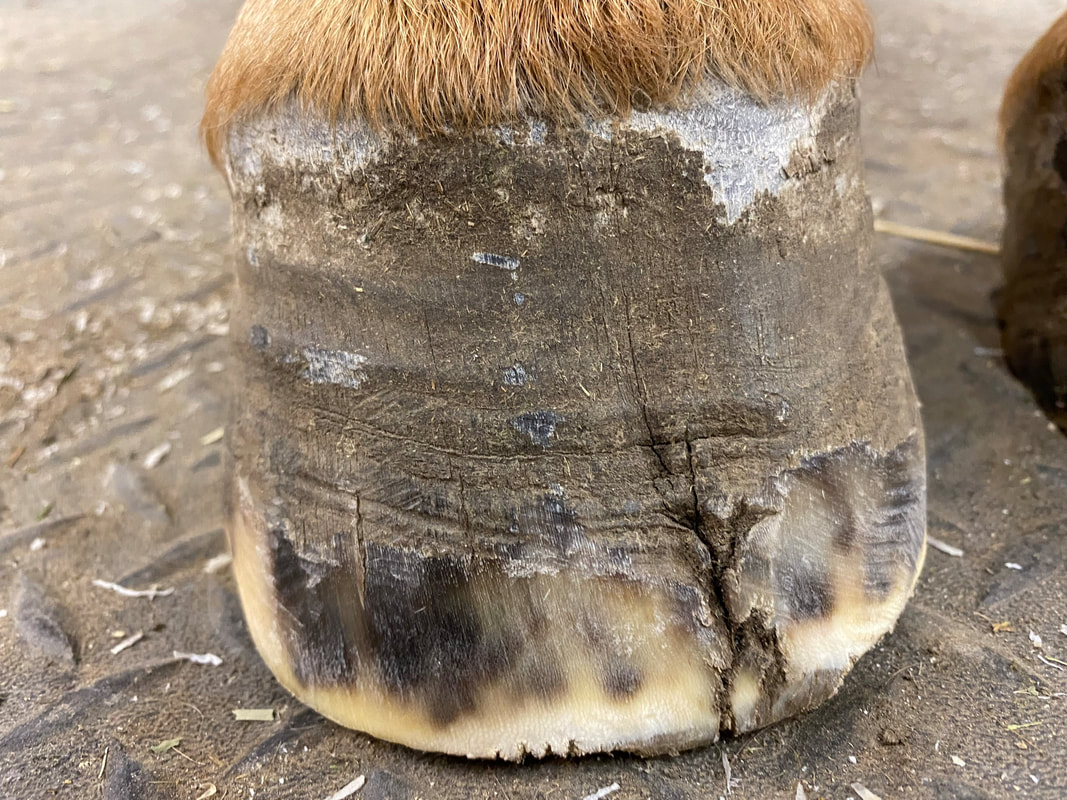
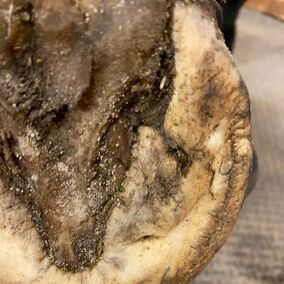
Inevitably this time of year I get panicked calls or texts from owners asking about bruising in the white line. When horses are walking in snow and their hooves are relatively clean the bright reddish purple bruising can look quite alarming.
While this bruising can be a sign of something more serious, it is usually just caused by walking on frozen uneven ground.
Most of our domestic horses live in soft dirt paddocks or pastures and during our winters here in Western Canada, the ground will go through periods of thawing and freezing, creating soft mud one day and hard frozen lumpy ground the next. The horses adapt well and can move about awkwardly on the frozen uneven ground, but often they will take a misstep here or there and that can result in bruising of the white line as shown in the picture. This type of bruising is generally is isolated to just one hoof and doesn't generally cause soreness or lead to anything worse, but it can be alarming if you don't know the cause.
What if it's more serious? If you are seeing this bruising when the ground is not frozen and hard, or it is present in both front hooves or all four hooves equally, it could be a sign of repeated toe first landings or even laminitis (caused by metabolic conditions).
The hoof functions as a shock absorber to the rest of the body, and to work this way the horse must land heel first where all of the shock absorbing structures are located. When there is a breakdown of hoof integrity in the rear of the hoof, horses will compensate by landing toe first. As there are no shock absorbing structures in the front half of the hoof, the impact can create this bruising among other more serious complications. You can use your cell phone to take video of your horse moving at a walk and a trot and play it back in slow motion to determine how they are landing. Occasional toe first landings are normal, such as when a horse is unmotivated or travelling uphill, but repeated toe first landings on soft surfaces such as a sand arena or pasture are a red flag and should be discussed with your vet and farrier.
Laminitis can also cause this bruising and horses with metabolic conditions are at a greater risk of suffering complications during wintertime. Here in Western Canada, it is common among horse owners to try and "fatten their horses up" leading up to wintertime with the belief that they will stay warmer during our cold winter months if they have a little extra "padding". While this is true, often we ride significantly less in the winter leading to a more sedentary day to day life for the horse. This increased weight and feed regimen can lead to an obese horse in a very short timeframe and can lead to laminitis. While I am certainly not advocating for under feeding your horse during winter, I recommend you watch their weight closely and manage it as you would throughout the rest of the year. Metabolic horses are a challenge to care for and keeping an eye on the integrity of the white line can be beneficial in preventing and becoming aware of hoof issues that can lead to laminitis. Bruising can be an indication of laminitic events, even if not enough to trigger full blown laminitis. A stretched white line is an indication of a loss of hoof wall connection and should be discussed with your vet and farrier.

In this post I want to address the common myth that growth rings indicate instances of laminitis. While they can indicate laminitis, it is rare that they do, and more importantly they are a roadmap to understanding the connection of the hoof wall to the coffin bone via the lamina.
I have been a barefoot trimmer for 11 years and have been teaching horse owners to trim their own horses for 6 years. Throughout my career I have seen both laminitic and foundered horses and I have been able to successfully rehabilitate many of them. The most important part of the rehab process is understanding the condition that you are dealing with.
Horse owners, vets, and farriers often use the terms laminitis and founder interchangeably, but it is my personal mission to educate people on the correct use of these terms. This is important because the physiology of each condition are quite different.
Laminitis = inflammation / pathology of the lamina.
Founder = Separation of the coffin bone from the hoof wall (detachment of the lamina).
Founder = Separation of the coffin bone from the hoof wall (detachment of the lamina).
Laminitis alone does not create an external physical change to the appearance of the hoof. Laminitis is inflammation within the lamina of the hoof capsule. It is extremely painful for the horse, and can cause heat in the hoof and a throbbing digital pulse, but it doesn't not create flare externally on the hoof capsule. Laminitis and founder are not mutually exclusive; a horse can have laminitis and not founder, and a horse can be "mechanically foundered" and not have laminitis. A horse can also have laminitis that subsequently leads to founder, but this can often be prevented. For more on this check out our new online course linked below.
Founder is a disconnection between the hoof wall and the coffin bone that leads to the formation of a lamellar wedge (stretched white line). It is a breakdown of the lamellar attachment that allows the hoof wall to migrate out and away from the coffin bone. This results in the coffin bone's tip rotating downwards towards the sole and produces the flare that you see visually on the outside of the hoof.
When looking at the growth rings of the hoof or at the wall structure itself it is important to know that in a healthy hoof the growth from the coronary band to the ground should be at a uniform angle as seen in the top hoof on the graphic below.
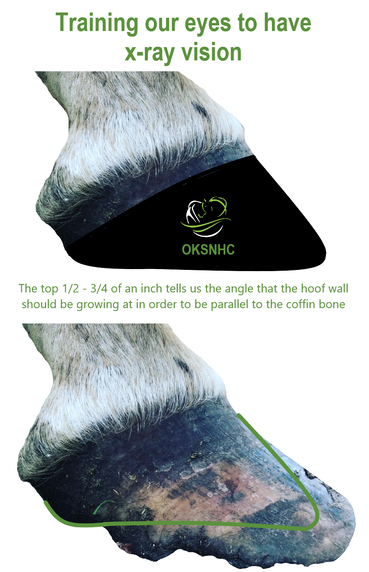
The hoof on the bottom of the graphic shows the wall coming in at a steeper angle at the top of the hoof and then progressively flaring as it grows down. The flaring indicates hoof wall disconnection and possibly founder. This graphic is from our newly released Laminitis and Founder Online Course. Check it out for more info on the complete rehab process and further clarification between laminitis and founder.
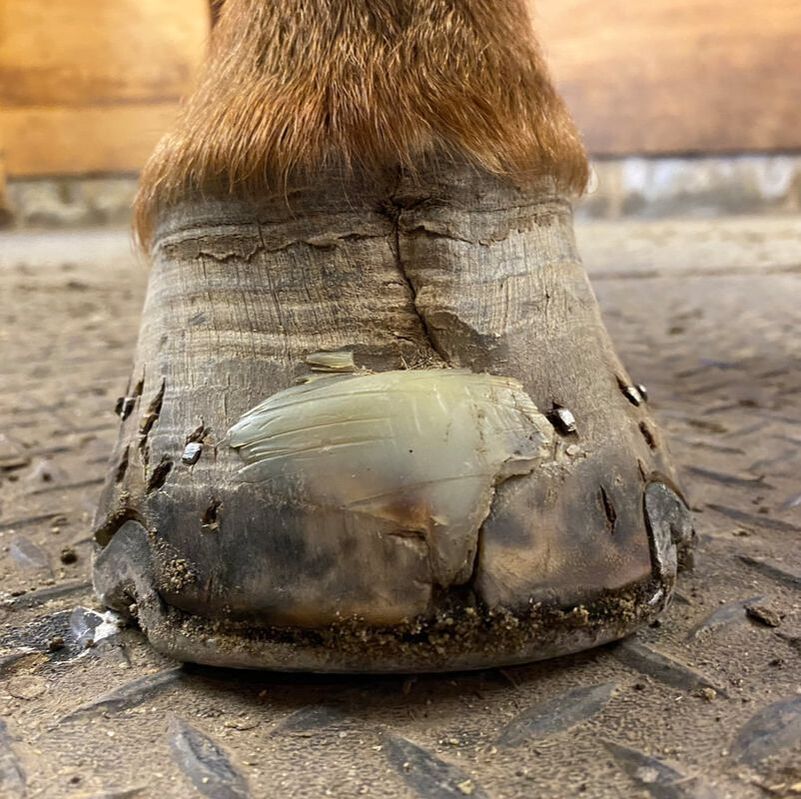
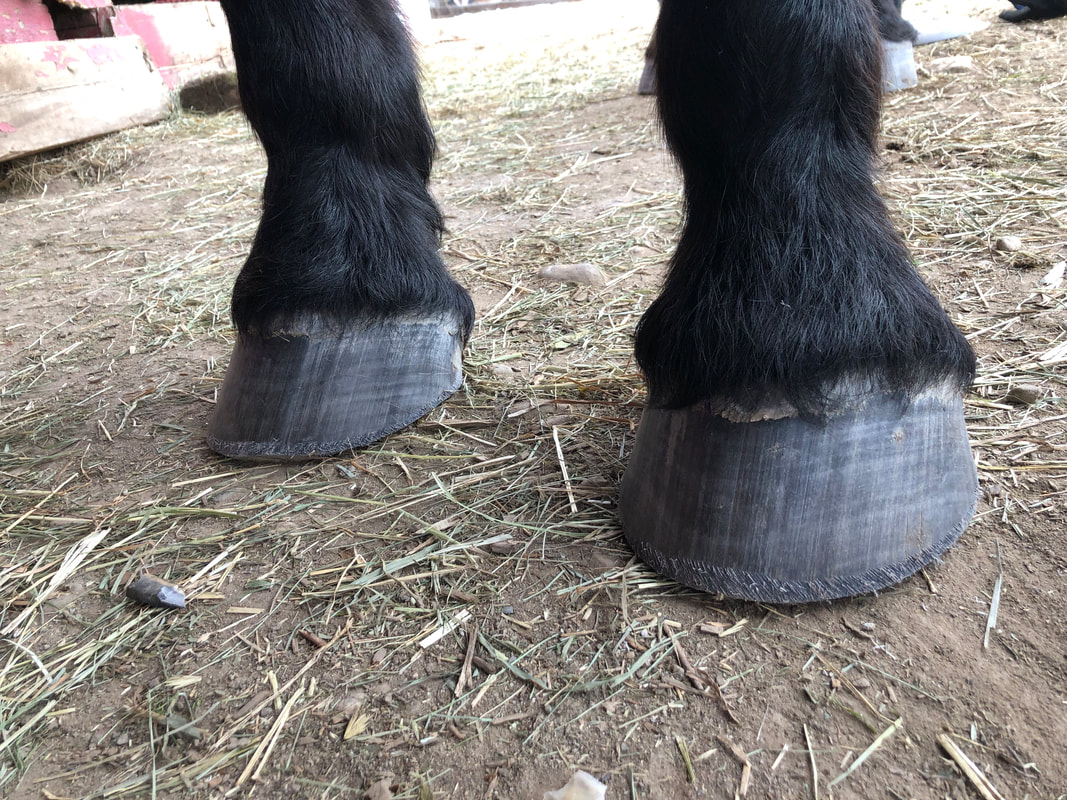
In the picture below you can see significant growth rings present both halfway down the hoof and also just below the coronary band. This was a picture sent to me by a student who was worried her horse had suffered laminitis and she had not noticed it. The horse had not been lame or sore but because of the growth rings she was worried that she wasn't on the right track with her trimming. I get asked this question a lot so I though it best to explore it in this post.
In the picture below you can see significant growth rings present both halfway down the hoof and also just below the coronary band. This was a picture sent to me by a student who was worried her horse had suffered laminitis and she had not noticed it. The horse had not been lame or sore but because of the growth rings she was worried that she wasn't on the right track with her trimming. I get asked this question a lot so I though it best to explore it in this post.
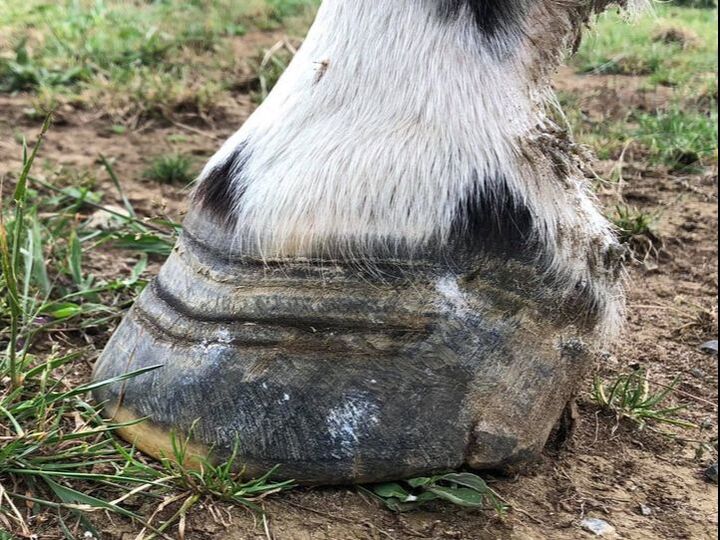
This horse was foundered when the student started trimming it a few months ago. I can tell this by the flared and rasped lamellar wedge in the bottom third of the hoof in comparison to the new growth angle at the top. With proper trimming resulting in a reduction of leverage on the lamellar wedge, the hoof wall and coffin bone that were once separated are reattaching. As they do so they are creating a tighter connection that when it grows down from the coronary band appears as a tighter growth ring. The first significant change is shown at the ring halfway down the hoof wall. This is when the correct trimming started that allowed the hoof wall connection to resume. The second ring just below the coronary band shows where the connection became even tighter as more of the wedge has been grown out.
The growth ring on the hoof below is not as significant as the picture above, but it is indicative of a tighter hoof wall connection as well. In this horse's case, it was a new living environment and diet that allowed more frequent correct trimming that caused it. While his hoof health was already good, the connection was able to improve creating the growth ring you can see just above the halfway point of his hoof wall.
The growth ring on the hoof below is not as significant as the picture above, but it is indicative of a tighter hoof wall connection as well. In this horse's case, it was a new living environment and diet that allowed more frequent correct trimming that caused it. While his hoof health was already good, the connection was able to improve creating the growth ring you can see just above the halfway point of his hoof wall.

Some people call these rings "event lines", and this is probably a more aptly named term, as they apply to an event that changed the connection of the hoof wall for some reason. These events can be more effective trimming methods, diet or living environment changes, health changes in the horse that affect hoof wall connection and more.
My goal with this post was to answer the question of: "Are these growth rings indications of a laminitis event?" This is a question I get asked often, and hopefully with just the little bit of hoof knowledge I shared in this post it should help to clear things up. If you are looking to further your knowledge of the hoof check out our Online Hoof Anatomy, Theory and Barefoot Trimming Course. This course provides an in depth study of hoof anatomy and function and is a beginners guide to learning how to trim their own horse.
If you liked this post comment below or share it on our favorite social media app! I would greatly appreciate it.
Have a suggestion for a future blog topic? Email me!
When I first started trimming almost 10 years ago there were no fancy job titles like hoof care specialist or hoof care practitioner. There were farriers and barefoot trimmers. The former implied you were a blacksmith that could forge handcrafted shoes and the latter meant you were a horse obsessed hippie that thought all horses should should be barefoot in spite of their soundness. What I wanted to do didn't fit into either category so I decided to call myself a natural trimmer. Wild horses don't get their hooves trimmed every 6 weeks, they wear them off constantly because of their nomadic lifestyle. This is natures way of maintaining balance or what I would call "natural".
Barefoot trimmers back then (and lets be honest even some today) tend to come across as a little bit fanatical. There have been well known trimmers who believed in regular aggressive trimming that made hooves bleed, drastic immediate angle changes to the hoof that left horses sore or caused injury and/or permanent damage and so on. These trimmers also tend to be somewhat overzealous trying to impress their views upon every unsuspecting horse owner they come across. This cult like mentality led to a general resistance in the horse world to the barefoot movement and created a stigma of sorts that all barefoot trimmers must trim aggressively regardless of how it affects the horse.
I wanted to separate myself from that stigma and at the same time not confuse potential customers by calling myself a farrier. While it's true that farriers don't just forge metal shoes, but also trim hooves, I didn't want to have to explain over and over again that I was only a "barefoot" farrier.
There it is again, that "barefoot" word. Another reason I have an issue calling myself a barefoot trimmer is that I don't think all horses should be barefoot all of the time. Let me explain. While I do believe the hoof is meant to be bare to be healthy, there are situations where a horse's comfort level needs to be prioritized over these beliefs. And really sometimes a weak or distorted hoof requires some intervention/protection to become healthy again so that it can function as nature intended ---> bare. So in saying this there are cases in my business where I use composite shoes, hoof boots or hoof casts to help rehabilitate hoof issues and therefore I cannot say those horses are "barefoot".
What I believe is the difference between natural/barefoot trimmers and farriers is that farriers believe the hoof can function optimally with support when fixed with a metal shoe, and natural/barefoot trimmers believe the metal restricts the hoof function and circulation and compromises hoof health. Farriers that use metal shoes routinely restore usability to unsound horses via shoeing and horse owners appreciate this. My concern with is this: if a horse is unsound barefoot due to a weak or compromised hoof and you apply a shoe and the horse walks off sound, did you fix the weakness or just cover it up?
There will always be horse owners that prefer the ease of having their horse shod to maintain or "restore" soundness, and I have no issue with that. In this free world that we live in people are lucky enough to be able to choose what works for them and their horse. My approach to the same weak or compromised hoof might be to use a form of hoof protection when the horse needs it, but ultimately I want to restore hoof health and remove the weakness so that the horse doesn't require the shoe/boot/cast etc in order to be sound.
So ultimately I chose my own path, and called myself a natural trimmer in order to place myself in between what I saw back then as two camps divided. I like to think of myself as Pat Parelli would say as an "extreme middle of the roadist" in all aspects related to horses. And what that means to me is that I try to never become so overzealous in my views that I cannot appreciate another person's point of view, that I will not press my views upon others fanatically, but will share my knowledge openly when asked. I am also not afraid to continue learning and trying new methods and techniques. As Pete Ramey says, I try to "never say never or always" when it comes to trimming because as soon as you do you will encounter a situation where you end up doing something you never thought you would or straying from your usual tactics in the best interest of the horse.
10 years ago when I decided I wanted to learn to trim my horse there weren't many references or places to go to learn. There were of course traditional farrier programs, but I was looking for more a natural approach. I started with reading books by Pete Ramey, Dr. Stausser and other barefoot pioneers but there wasn't a lot available online. This was back before the evolution of Facebook how-to groups and online courses. I struggled my way through balancing what I was reading with my experiments in trimming my own horses and I found that it was an extreme learning curve. Eventually I sought out help and attended one of those traditional farrier courses. I learned a lot about what I wasn't really interested in at that course, but I also learned to use the tools and how to interact with the horses so it was definitely a valuable resource for me.
What I craved all those years ago was a course that would not only teach the theory and science behind barefoot trimming but would also have a hands on component that could help me to build my skill. After trimming for several years and with the encouragement of Cheryl Henderson of the Oregon School of Natural Hoof Care I was able to put together a program exactly as I had wished for back when I learned to trim in order to help others progress with a less steep learning curve then I had experienced. My ultimate goal has always been to help as many horses as I can in my lifetime and I quickly realized that teaching others how to help horses was the most advantageous way to do that.
The 6 day barefoot trimming course that I have developed as gone through much evolution since its initial inception. My first course in 2014 was a bit of trial and error. As I did more courses I was able to refine the process and figure out what parts needed more study time and hands on training by watching the rate at which the students progressed through the program. Now fast forward 5 years and that course is dramatically different then that first one. We have now developed an online course that covers that theory and knowledge base before students even arrive. This gives us more time hands on with the horses and more practice time for students while they can be directly supervised.
The hardest part about training people to trim is that I have no control over their practices or techniques once they leave my course. I believe that working with horses in any capacity but especially hoof care requires a constant desire to learn. You must become a perpetual student of the horse in order to continue to evolve your learning and not become overconfident or complacent. My all time favorite quote is "he who thinks he knows the most, has the most to learn" (author unknown). I can't stress enough to students when they leave here that my short introductory course to barefoot trimming is simply a starting point. They must continue to evolve their education and build their knowledge base in order to stay relevant and do their best work for horses. I also offer them access to a Facebook group where they can converse with their peers and reach out to me for support and guidance along the way. The 6 day course is not the end of the road, students can attend again in the future for no additional cost and I have seen this second week bring their skills from basic trimming to significantly more advanced.
As I am always learning and attending as many clinics and workshops as I can I am constantly adding new things into my course and changing up the content to reflect new research and theories surrounding the hoof. I make a point to attend as many clinics as possible and to study as many trimming styles as well as traditional farrier research because I believe that no time learning is wasted.
This journey to work for horses, as anyone that has horses will tell you, is not lucrative. We put our blood sweat and tears into these animals but the experience of watching them overcome lameness or to be able to rehabilitate them is what keeps me grounded and keeps me going.
Hooves are made of fibrous structural proteins called keratin on the outside and soft tissue surrounding the coffin bone on the inside. Keratin is a protein chain built of amino acids, I briefly discussed this in my previous blog post. So it makes sense then that if we need to develop stronger hooves or rehabilitate hooves its these amino acids that we should look to balance first.
A horse that is deficient in proteins will usually have dry and brittle hooves. This is not to be confused with dry desert hooves, I am not talking about the moisture content on the outside of the hoof, but more specifically the texture of the hoof material when it is cut into. Dry or brittle hoof will have a hard and non elastic feel when it is rasped or nipped off. A healthy hoof will have a little bit if a spring to it when it is cut, it is more flexible due to the cellular makeup when those proteins are binding and forming the keratin.
I see these dry and brittle hooves in conjunction with horses that may have an underdeveloped top line and/or a poor hair coat. All of these symptoms can be due to a lack of amino acids or proteins. I am currently undergoing a series of supplement trials with several of my own horses as well as some client horses. I have seen big changes in the horses that had dry and brittle hooves with very little elasticity when we started to supplement more proteins.
These trials are purely for my own research, they are not scientific and are based purely on my observations of the hoof health and overall appearance of the horses.
Feed trial #1 is a group of horses that have been fed alfalfa pellets, biotin and a mineral supplement for the past 6 weeks. Nothing else has changed for the horses such as living environment or hay source. Their hooves have gone from very dry and rigid with a brittle feel when cut to much more elastic and resilient feel. These horses also tended to be a bit tender on hard ground with a thin sole and that is improving as well.
I am interested to see if the progress plateaus at some point, which would signal that perhaps the protein deficiency has been restored, or perhaps the absorption of the protein has diminished. Research has shown that it can take up to 2 years to replenish a protein deficiency in horses so this is a long term trial for me. We also have to take into account the supplementation of minerals to help bind these amino acids as well as the digestive system health of the horse which would affect the absorption rate of the supplemented proteins exponentially. Perhaps a horse could be fed the appropriate amount and varieties of amino acids but due to poor gut health could not absorb them. In this case feeding more proteins may well help with the deficiency, but instead restoring optimal gut health via pre and pro biotics may be more effective.
Feed trial #2 is a group of horses with the same dry and brittle feel to their hooves and they are receiving a daily hoof health supplement that is toted as an all in one solution that contains all of the needed proteins, minerals and vitamins for the horse. After only 4 weeks on this feed trial I am seeing incremental changes in the hooves, but the results are less improved as in feed trail #1, more time is needed to study this regimen.
Feed trial #3 is a group of horses that don't have any major outward issues with their hooves. They don't have the dry brittle hoof texture, and have a relatively healthy looking hair coat, however they do show a slight amount of muscle wastage in the top line. They have been fed a hay source high in alfalfa, and have been supplemented with a free choice mineral supplement for approximately 8 weeks. Results have varied among the horses but the ones with more muscle wastage have have improved slightly, while the ones with a lesser degree of muscle wastage have stayed the same. One area where this herd has improved is the incidence of minor thrush in the hoof. In spite of the wet weather due to the season change, these horses hooves appear to be more resistant to developing thrush and have overall healthier frogs then what I was previously seeing in their hooves.
I have several other trials going on with single horses or smaller groups of horses. For me it is very interesting to see the effects of various supplements and what they can do for horses. I am specifically trying to target the hooves, but because horses are so interconnected you really have to address the digestive system as well in order to be sure that what you are supplementing is being properly absorbed.
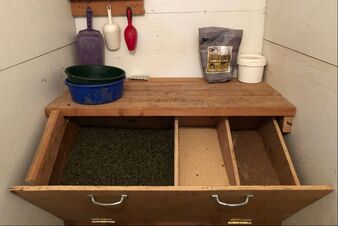
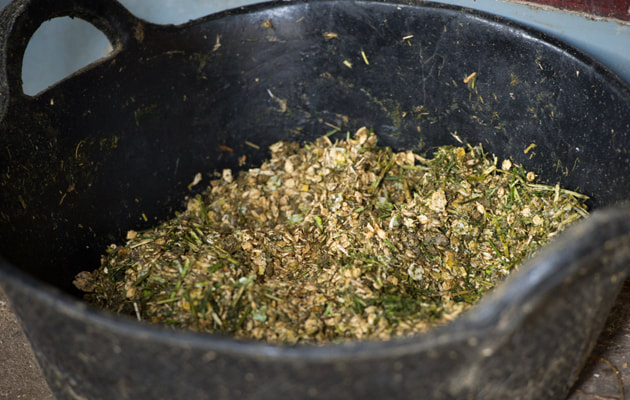
This is a picture of my feed room. I tend to favor high protein supplements such as alfalfa pellets, soy bean and coconut shreds.
Please take this information for what is is, simply my own thoughts and musings regarding hoof health and supplementation. There are many other things that can and sometimes should be supplemented, for instance omega fatty acids and vitamin e, however you should speak with your veterinarian or equine nutritionist to see what you should specifically be supplementing for your horse. One thing that stands out to me is a conversation I had with a veterinarian a few years back. She said that whatever you are supplementing your horse with should provide a result. Whether that is an improved appearance, health, attitude, emotional state or physical change, there should be some evidence that it is doing something. Otherwise you are likely just feeding something that is passing right through and wasting money you could have spent on something beneficial to your horse. Often you don't know if what you are doing is working until you stop feeding it, sometimes this is where you will see the change either for the good or for the bad. I'm not saying stop feeding supplements or that you must feed x,y and z. I'm just saying know what you are supplementing and why. You know your horse better then anyone else and you can discuss their hoof health with your hoof care provider or your veterinarian and make an informed decision about what supplements might be beneficial for them.
Let me start by prefacing this post with a disclaimer. I am not a nutrition expert, a vet or an employee of a feed company. I don't personally know your horse and its circumstances, so please take this information as just my opinion and don't make any drastic changes to your horse's feed regimen without consulting your veterinarian. What I can offer you is my years of experience and anecdotal evidence around various feeding concepts and how I have seen them impact horses, specifically in the areas of hoof health and function.
I believe in feeding horses naturally. That means lots of forage that is balanced in minerals and energy requirements. If you have the right hay/pasture combination then no supplements should be necessary for a healthy horse. This notion that is common among horse owners that all horses should have some type of grain (ie processed feed) in their diet needs to be better interpreted. If you have a compromised horse with health issues or hoof problems then you may need to add supplements to your forage to help. If you have a horse with extreme energy requirements such as a fast metabolism or a performance horse with a great energy output you may need to add more calories. Its how we add these things that becomes important. My preference would be to add more of the balanced forage as opposed to grain. It equates in humans to someone with a fast metabolism that may have trouble keeping weight on. The healthy option to maintain their weight wouldn't be to eat more fast food. It would be to add more of the healthy food they are eating to try and maintain their body condition and energy requirements. Its the same for our horses.
The most 3 most common issues I see regarding diet in my trimming practice are:
#1 - too many processed carbohydrates
#2 - mineral deficiency
#3 - protein deficiency
Processed commercial feeds are generally higher in carbohydrates and fillers then people realize. They are "fortified" with added vitamins and minerals, but most horse owners don't even know what those vitamins and minerals are or what they are added to the feed for. Most of those vitamins and minerals are already present in adequate quantities in your horses's pasture and forage and they aren't actually required to be supplemented. Often they are such negligent amounts that it doesn't harm your horse to consume them, but the added carbohydrates in the processed feed may be harming your horse. I have seen a lot of hoof, hair coat, digestive and behavior problems rectified by reducing the carbohydrate intake of the horse. Not reducing the overall fiber and forage intake, but removing processed feeds. Often horse owners feed a "complete feed" in the hopes that it is supplementing everything they think maybe lacking in their forage. While in theory this works, often the amount of that processed feed you would have to feed in order to have your horse receive all of those vitamins, minerals and nutrients far exceeded the amount of processed carbohydrates they should be eating. There are also times that these additives may throw off the balance of absorption of certain things and we have to be cautious not to upset this balance.
There is a time and a place to add supplementation. If your forage is lacking minerals due to overgrazing or mineral depletion of the soil then you may need to add them. You will not be able to tell this by just looking, you will need to run tests on your hay to make sure you are supplementing things that need to be supplemented and are not over supplementing your horse which can lead to mineral toxicity. Testing is easy if you buy your hay from the same source every year, but can be more complicated if you don't. Hay testing is relatively inexpensive ranging from $20 to $100 depending on the panels you want to run. But I assure you they are worth it in the long run. Supplementing minerals that aren't needed could cost your $50+ each month, and large vet bills down the road if you end up with a toxicity. A fastidious hay farmer will fertilize their soil when needed and therefore balance the mineral content of their hay so that you may not have to supplement minerals. It can be worthwhile to speak to hay suppliers about their fertilization practices and the mineral content of their hay before purchasing.
Protein deficiency is something that not a lot of horse owners understand adequately. Proteins are in every part of your horse and each protein is made of smaller parts that when linked together make up an individual protein with a specific function. Proteins are broken down in the digestive system into smaller parts that form amino acids. Horses require 20 different amino acids to come together in various combinations in order to make up the protein chains that build cells. Most horses are confined to the same overgrazed pasture and same hay source that may not provide all of these amino acids. Some amino acids can be produced from other amino acids, but there are a few that cannot be. These are called limiting amino acids and without them the horse can't form the protein chains needed to adequately build specific cells. So what happens is the horse reabsorbs these proteins from other already produced cells in the body. Because the priority is organ function and cell creation the areas that suffer first and have to recycle their amino acids more frequently are the hair coat, top line muscles, connective tissues and hoof cells. This creates a protein deficiency that has a systemic effect on the horse and can take years to correct.
Supplementing protein can be difficult because of those 20 amino acids. You have to be sure to supplement protein sources that contain the three limiting amino acids or the re-absorption of those amino acids from other areas will continue. High quality protein sources available are alfalfa pellets/cubes which are approximate 17% protein as well as soybean meal which is on average 40% protein. To add context the average protein content of grass hay is anywhere from 8-14%.
This information is just the tip of the iceberg when it comes to equine nutrition and you must understand the complete picture before making changes to your horse's feed regimen. Talk to your vet or equine nutritionist and formulate a plan specific to their needs, energy requirements and specifically balanced to your hay or pasture. Equine diet and nutrition has a whole horse effect and if our focus is healthy hooves we have to take the diet into account. The diet builds the cells that make up the hoof and it also has to be balanced within the horse.
Up until this point I have very purposefully avoided writing about the subject of equine nutrition. The equine industry is full of fancy marketing tactics by feed manufacturers and it seems a lot of people have been brainwashed into thinking that they must feed their horse a specific bagged "grain" in order for their horse to be healthy and thrive. A question I hear often in my trimming practice from horse owners is what type grains they should be feeding their horse. My answer is always why do you need to feed grain? Its sort of a loaded question, some horses have high nutritional requirements and can benefit from added grains, but others don't need them at all so its never a cut and dry answer.
By now if you have read my writings or followed me on social media you should know that I like to encompass a holistic approach when it comes to my horses. This naturally carries through for me when it comes to feeding them. I prefer a forage based diet with as little processed food as possible. Horses by nature are grazers, they should spend 16 or so hours a day browsing around for food a bite here and a bite there - a constant stream of forage into the digestive system. But what we need to understand about that is that they are not grazers in the sense that they should be grazing lush grass pastures for 16 hours a day, mouthful after mouthful of lush sugar laden green grass.
The equine digestive system requires a delicate balance. Too many carbohydrates (sugars) and you can end up with systemic issues such as insulin disregulation and laminitis. Too little forage and you can cause irritation in the stomach and create ulcers and imbalances with the healthy digestive bacteria. Too little protein and you will see muscle wastage and protein deficiency, too much protein and you could cause damage to the horse's kidneys and liver. By now you might be able to see why I have avoided writing about nutrition.
What happens in domestication is that we commonly overgraze our pastures, either by having too small of a space of the number of horses we have or by not rotating the horses in order to give the grass a break. This cycle usually sees the pastures with tall dense green grass in the springtime and early summer and then as the summers goes on this grass becomes overgrazed creating high stress levels in the grass and root systems, even worse then the tall lush grass of spring. The horses often favor this short grass because it is higher in sugar and more palatable. If you have ever walked through a horse pasture you will have seen clumps of tall grass that the horses will avoid, instead they tend to prefer the very short grass with the root systems exposed. This is because the tall grass, still full of carbohydrates, is usually significantly less carb laden then the short grass and exposed root.
Horses don't always know what food is good for them as they exist on a very primitive level when it comes to eating in comparison to humans. Their brains are telling them that winter is coming and they need to build has much body fat as possible to protect themselves from the harsh cold weather. Their brain doesn't know that they will be wearing three rugs and fed warm mash twice a day as our human brain does. Horses in nature have a very natural cycle of weight gain and loss throughout the year. They build up body fat all spring, summer and fall in order to make it through the harsher winter foraging beneath the snow. This is how the ancestors of our domestic horse are programmed and this programming has been passed down to our domestic horses. They don't understand that they are now living in Florida and won't require those extra calories, they just exist as they are designed to, using those biological instincts to guide them.
So it is then up to us as the caretakers for our horses to provide them with the best possible diet suited to their individual needs. So what does that mean? To me it means keep things simple. Natural is simple for me. I feed my horses forage, good quality hay low in sugar, higher in protein with a balanced mineral makeup and in quantities that keep their body condition in an optimal state for each individual horse. It might sound primitive but if one of my horse starts to look underweight I add more forage, if the are looking overweight I decrease forage. There is no preset percentage of body weight feed ratio that I follow, I visually interpret the results of my feeding program and adjust accordingly. This works well for me for a horse with no health complications who may be in mild to moderate work schedule. Where things can start to get complicated is the horses with compromised health, horses who are performance athletes, old horses, young horses and injured horses. It is also difficult if your hay is not balanced in mineral makeup or may be high in sugar and lacking protein or vice versa. These are challenges we all face and this is where feed companies have found their market.
So what can we do to make up for a deficit in our hay? To help our aging horse or our compromised horse? Stay tuned for my next blog post to answer those questions and more!
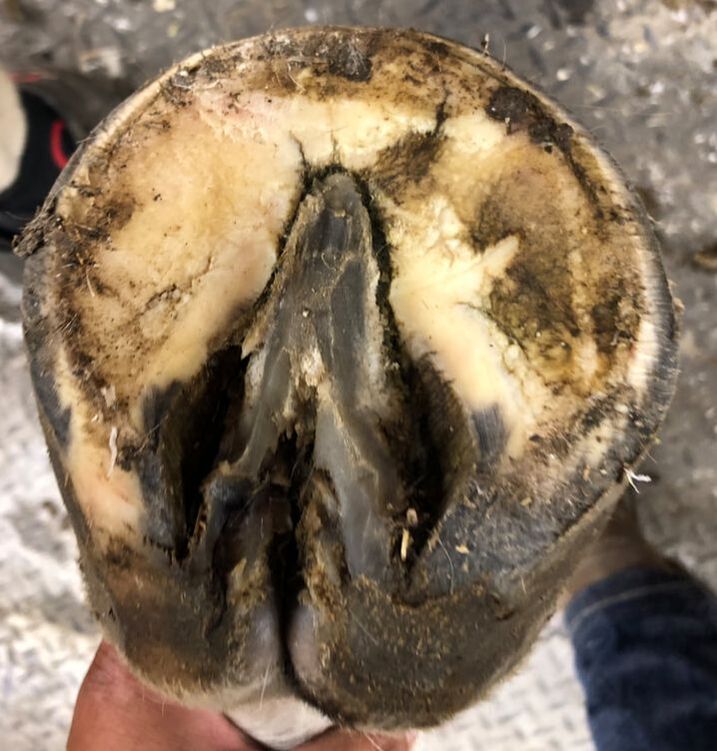 | 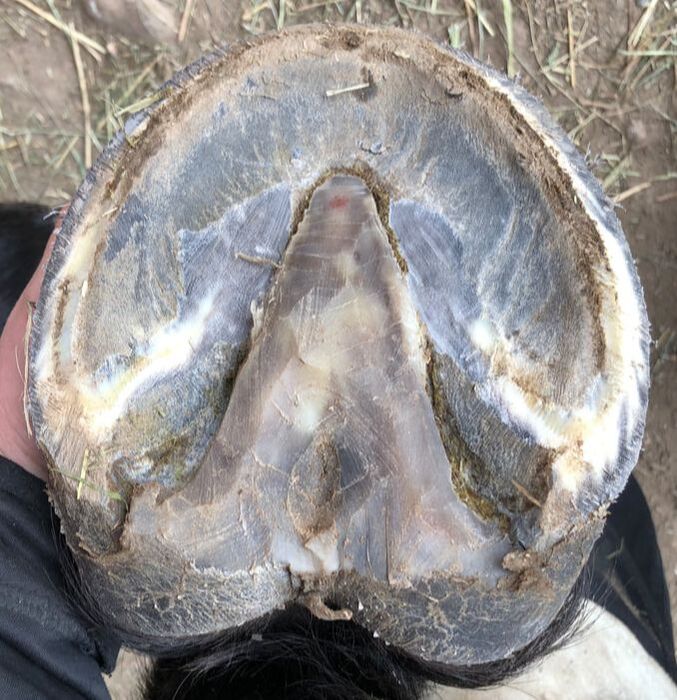 |
Thrush is something that at one time or another all horse owners will likely have to deal with. It is not a product of neglectful horse care, nor is it a product of unsanitary living environment etc. Thrush is a combination of bacteria and fungus that can eat away at the frog tissue in the hoof. These bacteria and fungus are more prominent in wet conditions and thrive in moist ground, but can also be a problem in dry conditions. In the image above you will see the healthy frog on the right, the thrush infected frog on the left. You will notice that the central sulcus, the area at the rear of the frog in the middle, in the healthy hoof is just a small indent, but in the affected hoof it is a deep crack. This is the first area that thrush usually starts to affect. What happens is the the thrush eats away at the healthy tissue and creates a "home" for itself within the sulcus of the frog. The deeper the crack, the better the hiding spot for the thrush to thrive and eat more healthy tissue. It is a vicious cycle and can be extremely hard to beat once it gets to this advanced stage.
Minor surface thrush is much easier to deal with. Some ratty tags on the frog, or a small infection of the central sulcus can usually be treated with diligent hoof picking and 2-3 times a week topical treatments with Artimud and/or HoofStuff. More severe thrush can take weeks or even months to clear up and can require soaking, booting and even diet/nutrition changes.
So why is thrush an issue? At the start with a minor case, thrush doesn't really alter the horse in any way. If we catch it early enough and treat it then it is a non issue. If thrush persists and manages to eat into the frog tissue deeper it can cause the horse to feel some sensitivity when loading the back of their hoof and can cause them to land flat or toe first as opposed to heel first as they are intended to land. Horses land heel first in order to use the frog and its underlying structure, the digital cushion, to absorb impact and dissipate energy vibrations. When the horse alters its movement and doesn't land heel first that impact energy travels up the leg into the joints, shoulders/hip and back and causes excess strain on the body. This can create a cascade effect that can significantly affect the performance of the horse and in serious cases can even lead to lameness.
When the thrush eats through the frog and into the sensitive digital cushion it is extremely painful for the horse. The hoof and its outside structures are designed to protect, and are insensitive structures, meaning they do not have nerves and blood supply directly within them. The nerve receptors and blood supply are located within the sensitive structures: the digital cushion, solar corium and lamina. So this means that a minor surface infection of the frog really won't cause much pain, however once the thrush eats into the digital cushion it is in fact an open wound of the horse, and is painful when impacting the ground. The horse then alters their movement to avoid loading the frog as much as possible. This is an issue because of the previously mentioned strain on the body, but also because healthy frog tissue is generated because of positive impact forces, and without the horse loading the frog it won't receive these forces. This creates a long term problem as the frog and digital cushion will atrophy over time due to lack of stimulation and will alter the shape of the hoof capsule. You then have a significant reduction of impact energy dissipation and a horse that is absorbing that impact in their joints, therefore more prone to develop arthritis and other joint related conditions.
The pictures below show you the severity of a thrush infection once it gets into the digital cushion. These cadavers have the outside structures removed and the one on the left has an infection so deep that a hoof pick can be inserted into the crack approx 1/2 an inch. This is a deep open wound for the horse and extremely painful. The cadaver on the right shows a healthy digital cushion with a normal central sulcus without infection.
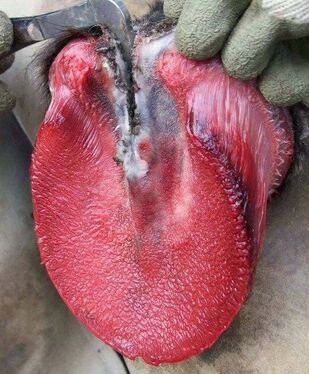 Photo credit to Kate Simmer, via Facebook | 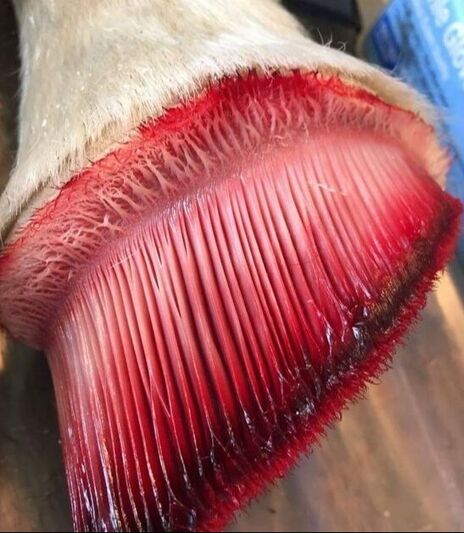 |
So what can we do about it? For minor infections treating topically is easy. Your local tack store will have several products available that are designed to kill the harmful bacteria and fungus that cause thrush. My personal word of of caution would be to read the ingredients label on those products. What you want is something that will kill the harmful bacteria and fungus, but not the healthy tissue. A lot of commercially made thrush products have ingredients like formaldehyde, formalin, turpentine etc. These substances are toxic to healthy tissues and will indeed kill the thrush but also the regenerating frog tissue. My favorite thrush products are made by Red Horse and are Artimud and HoofStuff.
Think about a deep thrush infection like an open wound on your own skin. Use products that will keep it clean but also encourage healthy growth. Products such as antibacterial wound scrubs used in human medicine, as well as barrier creams and ointments. My personal method for treating for this type of infection is as follows:
- Thoroughly clean the hoof - I use Sole Cleanse to get into and around the crevices in the frog (be careful with a deep infection, it will hurt your horse to scrub inside there, instead use a syringe to flush the area with your cleaning solution). You can also soak in products such as White Lightning or Cleantrax.
- Dry the hoof and apply HoofStuff in the central sulcus of the frog very gently with your hoof pick. Then apply Artimud to the entire frog and collateral grooves. Remember less is more, you do not need to overfill the grooves.
- Prepare your hoof boot of choice. Boots will help to keep the frog clean and dry and make sure your horse can't stand with their feet in their urine or manure which will further exasperate the infection. I use my Cavallo Trek boots, with a 1/2 inch thick felt pad inside, topped with GoldBond Medicated Foot Powder. Put the clean and dry hoof, coated in the zinc oxide cream into the boot. Note: to make felt boot pads I buy a 1/2 inch thick felt saddle pad for approx $40 and cut several boot pads out of this pad. It is far more economical then buying individual boot pads and they are machine washable and can be used a few times before they wear out.
- Repeat this process every second day. Continue this regimen until the infection has closed and the frog is sufficiently regenerated. For some horses long term boots can rub or irritate their heel bulbs or pasterns. Make sure you have the right fit of boot and style that can accommodate a felt pad, and I also use the Cavallo Pastern Wraps when needed.
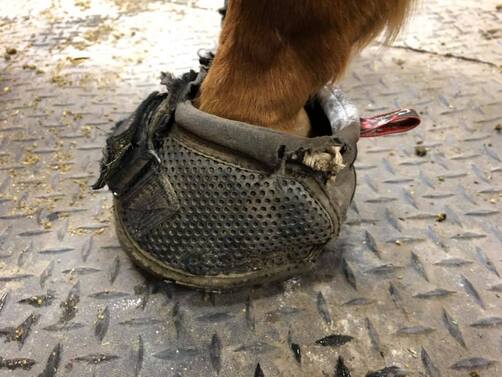
Here you can see my horse wearing a very well used Cavallo Trek boot, packed with the felt pad and Gold Bond foot powder. These Treks are 3 years old and still work great as rehab and riding boots!
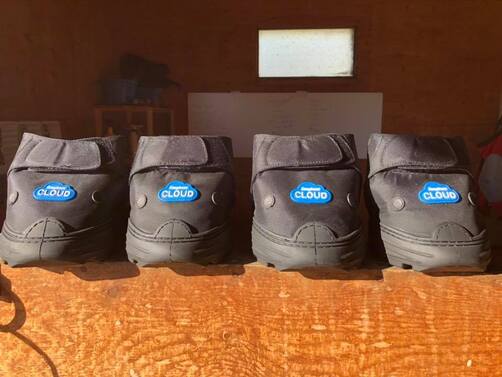
Easyboot Cloud therapy boots are also a great rehab boot. I sometimes use these if I need more protection for the hoof and a thicker padding. These are not suitable for riding so it makes them strictly a turnout/therapy boot. If you are looking for Cloud boots contact me as I can special order them.
When it comes to rehabilitating horses, or for me even just owning horses, I approach it with the whole horse in mind. For me my horses are companion animals, riding animals, and animals that I use to facilitate my business. They are also living, breathing beings with their own thoughts, feelings and needs. They make friends, have family groups and form attachments to certain horses, animals and people. My main area of focus in my business is hoof care, but in order to achieve optimal hoof health there are many other areas that must be working properly in order for the hooves to be healthy.
DIET
Let’s start with the diet. There are many conflicting opinions on the optimal diet for our horses. I have taken several equine nutrition courses, been to many seminars and done plenty of research. What I have found is that individual horses needs vary so a one size fits all approach doesn’t work. This post isn’t about nutrition specifically so I will try to keep it short. Up until recently I had a specific combination of feeds and minerals that I fed my herd of 10 on a daily basis. I was feeding each feed or mineral for a specific reason that I had predetermined that the horses needed. I was feeding those minerals because of what I had learned about minerals and hoof health. How did I come up with the theory that they needed them? Well I had read, researched or had been told by a trusted source that they needed them. I had never seen any reason in my horses’ outward appearance, behaviour or apparent health that made me think there was a deficiency, but I assumed like most people do that they should be supplemented with something and therefore I built my list of supplements and off I went to the feed store. I fed these things for years until just this past spring when I heard something that interrupted my thought pattern. I had scheduled an osteopathic treatment for two of my horses with Dr. Laura Taylor and it was while in deep discussion with her about equine diets and nutrition that she said something that has stuck with me ever since. She said “if you are feeding or supplementing your horse with something, you should see some type of result”. Weather those results are physical, such as seeing an improvement in their hair coat or outward appearance, emotional, such as seeing less anxiety or behavioural problems, or internal, such as something affecting the organ systems in the body or the musculoskeletal system causing stiffness or even lameness. The point is you should see some type of result from what you are feeding, or you should see a result of not feeding it... This caused me to rethink my horses diets and cut out everything but pasture and hay for three months. What I found was that there was no change in them. Their hair coats were still beautiful and shiny, their hooves were still brilliant and they were still emotionally sound and happy. The moral of the story for me was to keep it simple. And I’m not saying all horses don’t need supplements, but what horse owners need to do is understand what they are feeding and to make sure it is necessary for your horse before blindly feeding something just because someone else does, someone told you to, or because of some fancy packaging. I have now started to include some new supplementation to the hay and pasture diet of my herd, more about this in an upcoming BLOG that will be dedicated to nutrition
Let’s start with the diet. There are many conflicting opinions on the optimal diet for our horses. I have taken several equine nutrition courses, been to many seminars and done plenty of research. What I have found is that individual horses needs vary so a one size fits all approach doesn’t work. This post isn’t about nutrition specifically so I will try to keep it short. Up until recently I had a specific combination of feeds and minerals that I fed my herd of 10 on a daily basis. I was feeding each feed or mineral for a specific reason that I had predetermined that the horses needed. I was feeding those minerals because of what I had learned about minerals and hoof health. How did I come up with the theory that they needed them? Well I had read, researched or had been told by a trusted source that they needed them. I had never seen any reason in my horses’ outward appearance, behaviour or apparent health that made me think there was a deficiency, but I assumed like most people do that they should be supplemented with something and therefore I built my list of supplements and off I went to the feed store. I fed these things for years until just this past spring when I heard something that interrupted my thought pattern. I had scheduled an osteopathic treatment for two of my horses with Dr. Laura Taylor and it was while in deep discussion with her about equine diets and nutrition that she said something that has stuck with me ever since. She said “if you are feeding or supplementing your horse with something, you should see some type of result”. Weather those results are physical, such as seeing an improvement in their hair coat or outward appearance, emotional, such as seeing less anxiety or behavioural problems, or internal, such as something affecting the organ systems in the body or the musculoskeletal system causing stiffness or even lameness. The point is you should see some type of result from what you are feeding, or you should see a result of not feeding it... This caused me to rethink my horses diets and cut out everything but pasture and hay for three months. What I found was that there was no change in them. Their hair coats were still beautiful and shiny, their hooves were still brilliant and they were still emotionally sound and happy. The moral of the story for me was to keep it simple. And I’m not saying all horses don’t need supplements, but what horse owners need to do is understand what they are feeding and to make sure it is necessary for your horse before blindly feeding something just because someone else does, someone told you to, or because of some fancy packaging. I have now started to include some new supplementation to the hay and pasture diet of my herd, more about this in an upcoming BLOG that will be dedicated to nutrition
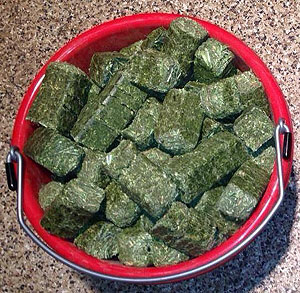
MOVEMENT = LIVING ENVIRONMENT
After looking at the diet I also want to address the horse’s living environment. Does he stand around in a stall all day, a small paddock, or a pasture or larger open area? Is he alone or kept with others? What those things mean to me is does the horse get enough movement to fulfill his physical and mental needs? Does he have herd mates to fulfill his social and emotional needs? Does his paddock have an enough varied terrain to adequately stimulate his hooves? This is maybe the most important part to me. My horses live in a herd, on a track based paddock system. They have access to pasture when needed and are constantly on the move. I can regulate their feed and movement as required. None of my horses get “hot” because they are standing around all day, and they don’t get bored because their social and emotional needs are fulfilled. None of them need a “job” or need to be ridden in order to keep their cool. They live like horses, and yet I can ride and play with them as needed. I have very few instances of cribbing or pacing or any other bad habits. Those are byproducts of emotional stress that doesn’t exist in my herd. Making sure the horse’s living environment is conducive to a happy and healthy horse is important because then they are able to keep physically fit and engaged which will help with the healthy hooves we want to grow
After looking at the diet I also want to address the horse’s living environment. Does he stand around in a stall all day, a small paddock, or a pasture or larger open area? Is he alone or kept with others? What those things mean to me is does the horse get enough movement to fulfill his physical and mental needs? Does he have herd mates to fulfill his social and emotional needs? Does his paddock have an enough varied terrain to adequately stimulate his hooves? This is maybe the most important part to me. My horses live in a herd, on a track based paddock system. They have access to pasture when needed and are constantly on the move. I can regulate their feed and movement as required. None of my horses get “hot” because they are standing around all day, and they don’t get bored because their social and emotional needs are fulfilled. None of them need a “job” or need to be ridden in order to keep their cool. They live like horses, and yet I can ride and play with them as needed. I have very few instances of cribbing or pacing or any other bad habits. Those are byproducts of emotional stress that doesn’t exist in my herd. Making sure the horse’s living environment is conducive to a happy and healthy horse is important because then they are able to keep physically fit and engaged which will help with the healthy hooves we want to grow
DENTAL HEATH = BALANCE
Another huge factor is teeth. I recently went to Florida to further my knowledge and become a graduate of the Horsemanship Dentistry School. This was so important for me as I have always known there was a connection between what was happening in the mouth and the soundness in the body but I needed more information. What I learned was so mind blowing. An imbalance in the teeth will create an imbalance in the jaw that would translate to an imbalance in the neck, shoulders and feet. An imbalance on the front end will affect the hind end and so on. It becomes a cascade effect, and the best part is when I am able to feel an imbalance in the mouth, correct it and see a direct improvement in how the horse moves or behaves. Horses are so innately in tune with themselves that even just a slight dental problem can have a big effect. The dentistry school I went to teaches manual balancing without the use of sedation so that you can watch the horse respond to the changes you make. I have never quite done anything else as intimate and rewarding with my horses as putting my hand inside their unrestricted mouth. With no speculum to protect me, and no sedation to alter their state of mind, I can remove any sharp points inside their mouths and watch them lick and chew and feel the area with their tongue. That is usually followed by them pressing their head into my chest with thanks. No joke, this just gets my heart pumping.
Another huge factor is teeth. I recently went to Florida to further my knowledge and become a graduate of the Horsemanship Dentistry School. This was so important for me as I have always known there was a connection between what was happening in the mouth and the soundness in the body but I needed more information. What I learned was so mind blowing. An imbalance in the teeth will create an imbalance in the jaw that would translate to an imbalance in the neck, shoulders and feet. An imbalance on the front end will affect the hind end and so on. It becomes a cascade effect, and the best part is when I am able to feel an imbalance in the mouth, correct it and see a direct improvement in how the horse moves or behaves. Horses are so innately in tune with themselves that even just a slight dental problem can have a big effect. The dentistry school I went to teaches manual balancing without the use of sedation so that you can watch the horse respond to the changes you make. I have never quite done anything else as intimate and rewarding with my horses as putting my hand inside their unrestricted mouth. With no speculum to protect me, and no sedation to alter their state of mind, I can remove any sharp points inside their mouths and watch them lick and chew and feel the area with their tongue. That is usually followed by them pressing their head into my chest with thanks. No joke, this just gets my heart pumping.
EXERCISE = MUSCLE
The last thing I will touch on in our whole horse approach to health is riding and the subsequent muscle development. Riding can play a huge part in the health of your horse’s hooves. For instance, a balanced horse that is ridden round (not over bent) will be travelling in balance from the front end to the hind end and engaging their core muscles and therefore loading their hooves optimally. A horse ridden hollow or unbalanced will create unbalanced forces on the hooves and therefore may not wear evenly. A horse ridden very over bent will travel with too much weight on the front or hind end and not travel in a balanced manner. How the horse is conditioned to riding will also affect how he will move in the pasture or paddock. Wild horses are conditioned to move 20-40 miles per day on varied terrain and tend to build well balanced bodies and hooves. When we keep horse in domestication we inhibit their ability to move freely and they don’t always understand how to move properly because of this. We must teach them how to carry the weight of a rider and still move in balance and harmony.
The last thing I will touch on in our whole horse approach to health is riding and the subsequent muscle development. Riding can play a huge part in the health of your horse’s hooves. For instance, a balanced horse that is ridden round (not over bent) will be travelling in balance from the front end to the hind end and engaging their core muscles and therefore loading their hooves optimally. A horse ridden hollow or unbalanced will create unbalanced forces on the hooves and therefore may not wear evenly. A horse ridden very over bent will travel with too much weight on the front or hind end and not travel in a balanced manner. How the horse is conditioned to riding will also affect how he will move in the pasture or paddock. Wild horses are conditioned to move 20-40 miles per day on varied terrain and tend to build well balanced bodies and hooves. When we keep horse in domestication we inhibit their ability to move freely and they don’t always understand how to move properly because of this. We must teach them how to carry the weight of a rider and still move in balance and harmony.
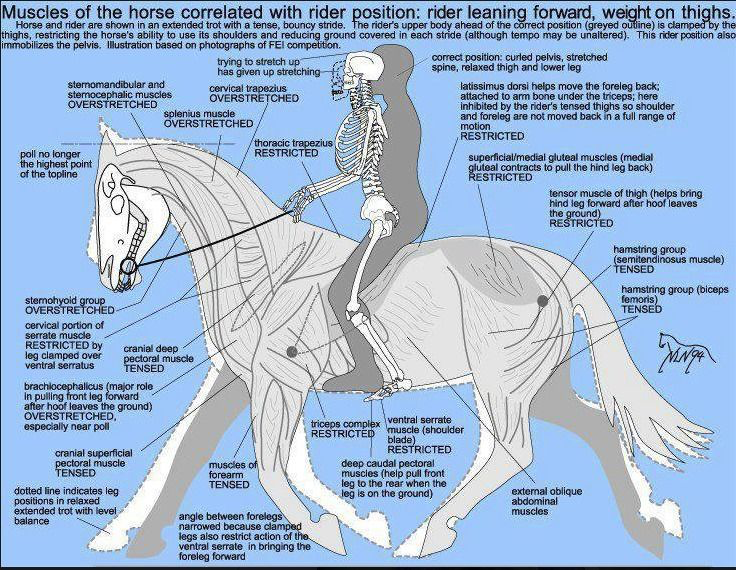
HEALTHY HOOVES = HEALTHY HORSES
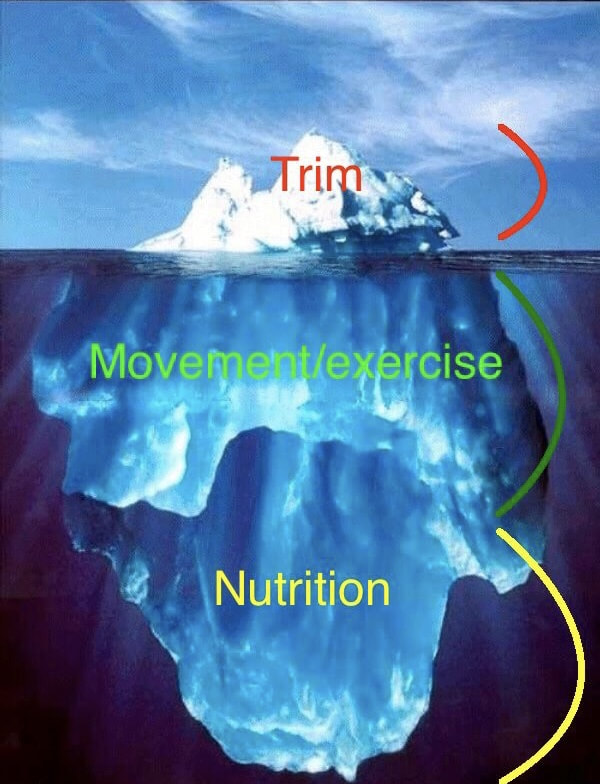
There are many things to consider when determining how long to go between trims. In this geographic area the standard trimming/shoeing cycle is approximately 6-8 weeks. My own scheduling is usually based around a 4-6 week cycle, though I have the odd horse or group of horses that go a little longer.
What I want to discuss in this blog is a much shorter trimming cycle that is favoured among some very successful and highly respected farriers/trimmers that I follow. What I am seeing and learning from them is that a shorter cycle is far better for the horse, and the overall health of the hooves and therefore the body and mind (My whole horse approach to health will be featured in an upcoming article) of the horse.
First lets think about the ultimate goal we have in trimming our horses hooves. For me it is to mimic the wear patterns that are demonstrated by the wild horses of the US Great Basin and other dry desert dwelling feral equines. These equines are clinically sounder then our domestic horses and have virtually no instances of founder, navicular disease and many other hoof pathologies we see so commonly in our domestic horses.
So if we can apply that principle to our trimming, our mandate would be to trim in order to mimic natural wear over varied terrain. So then the correct trim schedule would have to be based on each horse’s individual hoof wear. Because the hoof is in a perpetual state of growth, this means that immediately after trimming the hoof is already replacing that (worn) material that was removed. The goal then should be to allow the hoof to grow to the optimal length and thickness required for that individual horse. It should then be trimmed again just before it grows past optimal to a leveraging state. If it is allowed to grow too long the forces during impact and movement will start to distort the hoof. When trimming we will then have to perform what is called a rehab trim as opposed to a maintenance trim. A maintenance trim means we are just trimming excess length, and that excess has not caused the start of any breakdown or distortion of the hoof. A rehab trim means that we are correcting pathologies or distortion usually caused by excess length.
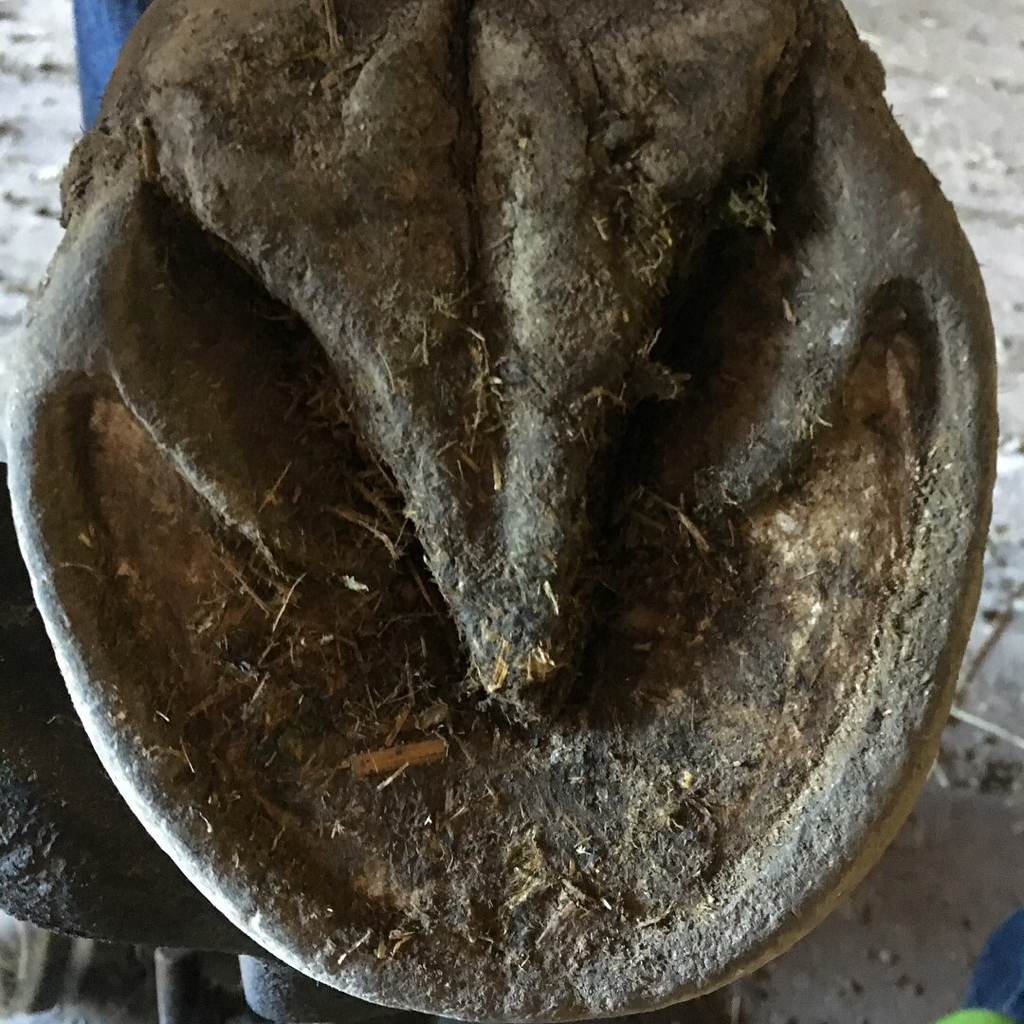 | 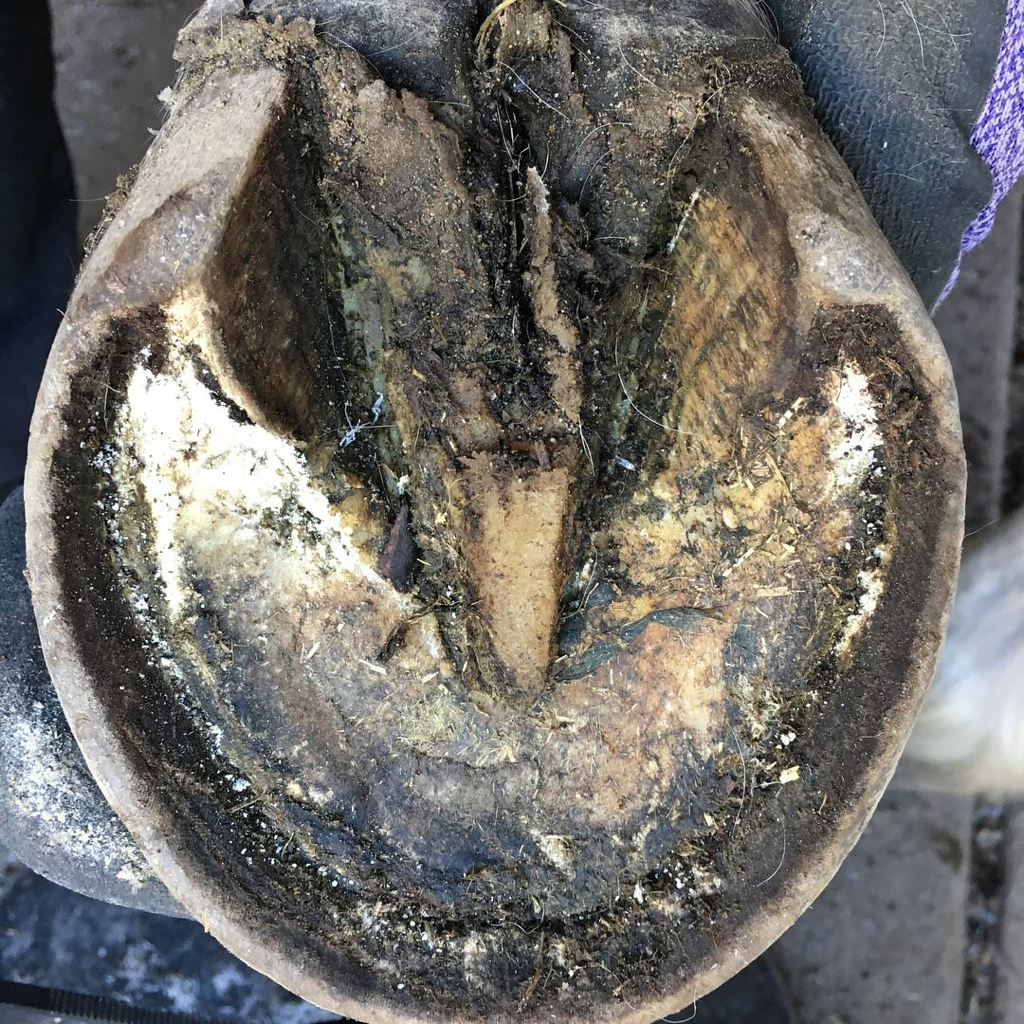 |
The hoof on the left shows a hoof that has grown excess length but is still balanced and not distorted. The overall length needs to come down and the break-over needs a new mustang roll, but otherwise this hoof is balanced, a maintenance trim. The hoof on the right is much longer, and has grown out of balance. The heels have moved forward and the toe is stretching forward. The frog is small and narrow and appears diseased in the central sulcus. Not an extremely distorted hoof but a rehab trim, not a maintenance trim.
The shorter trim cycle will prevent distortion and instead more closely mimic natural wear. For most horses the trimming cycle that these farriers/trimmers are finding works best is 2-4 weeks, 3 weeks being the average correct cycle for most horses. It is important to understand that because these trims are closer together there will be less material to remove. On a 3 week trim cycle there would be little need for nippers, it would really just be a rasp to maintain balance and remove the excess and possibly some knife work if the bars or frog needed addressing.
Where this interests me is with a select few horses I trim that are sensitive on hard or rocky ground immediately after a trim for about 3-5 days. Not sensitive in their paddocks or living environments, but sensitive being ridden on unforgiving ground where they otherwise would have been fine. What those horses need is for me to leave a little more material at the trim, but because I won’t be trimming them again for 4-6 weeks if I leave that extra material we are at a point of distortion before the next trim and then we are back to rehab trims as opposed to maintenance trims. However if I could trim less, and then trim the horse again in 3 weeks there would be less instances of sensitivity after the trim and less instances where the hoof gets to that distortion point before the next trim..
This is easy for me to process, however it becomes a challenge when trying to help horse owners to understand that trimming less more often is in the best interest of their horse. For the horse owner it means they are paying for trims twice as often, seeing much less of a difference in the before and after of the trims, and they are having to schedule me twice as often, taking up their valuable time.
My goal is to make this process easy and beneficial for everyone. I have started a pilot project with a few clients where I am trimming their horses every 3 weeks, and evaluating the horses’s comfort levels before the trim, immediately after and at the end of the 3 week cycle. I am also looking for any hoof distortion (if present) in order to determine the optimal length of cycle for each specific horse. I am working on a price structure that includes a reduced cost for horses that are on a maintenance trim schedule vs those that are in a constant cycle of rehab trims. This would make trimming at these shorter intervals more cost effective and because there is less material to be removed the trims would take less time. Ultimately the biggest advantage of the shorter cycle is for the horse. The closer we can mimic the natural wear pattern of the wild horse, the closer we can come to achieving the soundness seen in those wild herds and the virtually non existent hoof pathology that we so commonly see in our domestic horses.
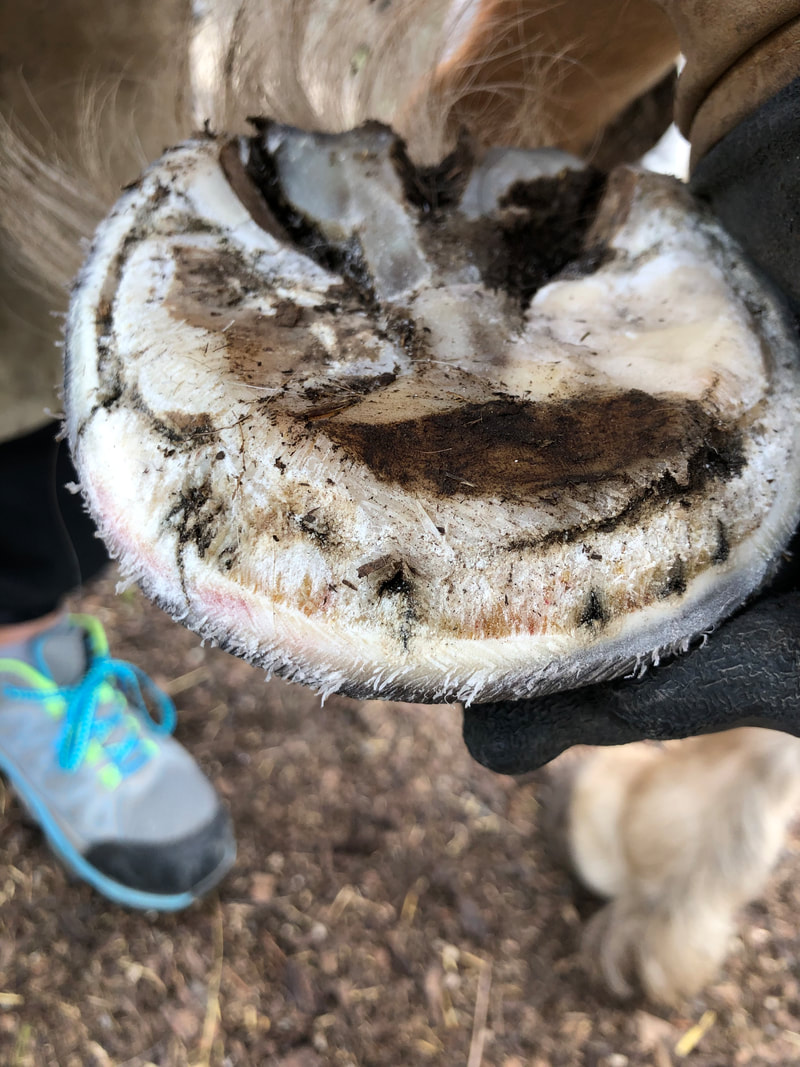
The photo above shows Ruby when she arrived in late March, the video below was shot July 15, 2018.
Expectations – Having realistic expectations is very important when transitioning your horse from shod to barefoot. Expecting your horse to perform the same way barefoot as they have in shoes is unrealistic. It takes time to strengthen and built hoof health and often times the shoeing process over many years has caused much damage within hoof. It is very much the same as asking a seasoned marathon runner to compete without their running shoes. It would be uncomfortable for them to feel the hard or rocky ground under their sensitive feet for the first few times. However, given enough time the marathon runner could build adequate callous so that he could perform barefoot. Taking horses barefoot should be about the long term health of the horse, not the rider’s short term performance goals. This being said, we must still make sure that our horses are comfortable when transitioning by providing them with hoof boots when needed and correct and frequent natural trims.
Time - A hoof that has been in shoes for extended periods will take time to heal internally as well as externally. Perpetual shoeing cycles can cause contraction and atrophy of the internal energy dispersing structures of the hoof. A horse that is shod is peripherally loading the hoof, which means that only the outside rim of the hoof is impacting the ground. This causes the frog and digital cushion (a structure paramount to a healthy barefoot hoof) to atrophy and weaken. However the good news is that the digital cushion has tissue similar to stem cells within it, and given the right opportunity (ie a balanced natural trim with proper stimulation) it can regenerate. The other problem with shoes is the lack of flexibility within the hoof. A metal horse shoe cannot expand and contract like a natural hoof does so there is less flexion and movement within the hoof. Less flexion and movement results in decreased blood flow and energy dissipation leading to further tissue damage. Upon pulling the shoes and providing a natural trim circulation and flexion are immediately restored, often resulting in temporary minor discomfort for the horse as circulation is increased and blood flow is restored back to a normal state.
Time - A hoof that has been in shoes for extended periods will take time to heal internally as well as externally. Perpetual shoeing cycles can cause contraction and atrophy of the internal energy dispersing structures of the hoof. A horse that is shod is peripherally loading the hoof, which means that only the outside rim of the hoof is impacting the ground. This causes the frog and digital cushion (a structure paramount to a healthy barefoot hoof) to atrophy and weaken. However the good news is that the digital cushion has tissue similar to stem cells within it, and given the right opportunity (ie a balanced natural trim with proper stimulation) it can regenerate. The other problem with shoes is the lack of flexibility within the hoof. A metal horse shoe cannot expand and contract like a natural hoof does so there is less flexion and movement within the hoof. Less flexion and movement results in decreased blood flow and energy dissipation leading to further tissue damage. Upon pulling the shoes and providing a natural trim circulation and flexion are immediately restored, often resulting in temporary minor discomfort for the horse as circulation is increased and blood flow is restored back to a normal state.
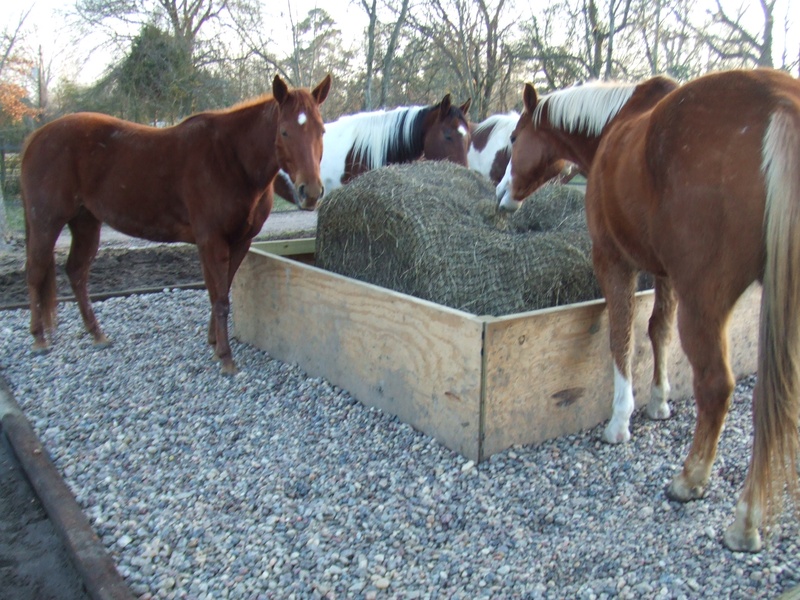
Environment – A barefoot horse’s living environment plays a large role in strengthening their hooves. A horse that lives on soft pasture will have a hard time building the callous needed to ride on a rocky trail without some form of hoof protection. Whereas a horse that lives on hard rocky ground will have no trouble travelling on a rocky trail as his hooves would have already been conditioned to it. Even if all you have for your horse is soft pasture or dirt, adding some river rock around water troughs or in shelters or a favorite hangout spot can be a big help. Exposure to varying surfaces is important in conditioning the hoof and building strength.
Deciding to take your horse barefoot can be a complex decision. While it is greatly beneficial to them to restore natural hoof function, you must make sure you are ready to face the challenges involved with the transition. I suggest you speak with your hoof care provider about the factors mentioned above as well as discuss the overall health of your horses’ hooves and the expected length of the transition period.
Deciding to take your horse barefoot can be a complex decision. While it is greatly beneficial to them to restore natural hoof function, you must make sure you are ready to face the challenges involved with the transition. I suggest you speak with your hoof care provider about the factors mentioned above as well as discuss the overall health of your horses’ hooves and the expected length of the transition period.
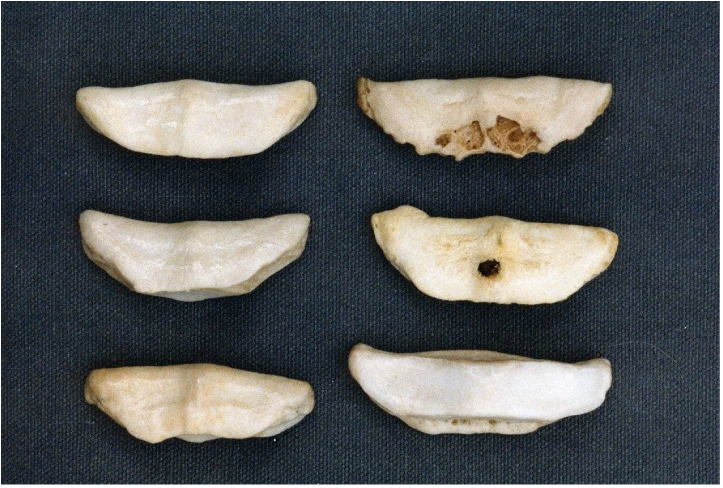 Healthy navicular bones and navicular bones with permanent damage
 Published in Saddle Up Magazine September 2015
Most horse owners cringe at hearing the words Navicular Syndrome. In the past it has often meant expensive corrective shoeing and just trying to keep your horse sound for one more season, inevitably resulting in putting them down. Unfortunately Navicular Syndrome is one of the hardest subjects for a farrier/trimmer to research. It seems that every old text contradicts the next, and every person you talk to has a different understanding of the condition. The good news is that tons of new research is being done, and hopefully the equine world will soon have a better understanding that the best way to treat Navicular Syndrome is to prevent it in the first place, and that it is easy to do so.
One of the doctors at the forefront of Navicular research is Dr. Robert Bowker of Michigan State University. I had the pleasure of meeting Dr. Bowker at the 2015 Equine Education Summit hosted by Horse Council BC this past spring. Dr. Bowker states that he has identified a heel first landing as the most important element of hoof function and more importantly hoof development. He has determined that as the hoof impacts the ground heel first, the hoof expands both laterally and from the back to the front, and the concave sole descends lower to the ground, thus dramatically increasing the volume of the hoof capsule. This sudden increase in volume creates a vacuum, which pulls blood into the hoof capsule. This pull of blood not only nourishes the living tissues in the hoof, but acts as a very important hydraulic shock absorber.
It has been documented over the years that some horses with navicular bone changes are perfectly sound, while others without bone damage can show severe lameness in the rear of the hoof. This is confusing though as it has long been taught in the veterinary and farrier communities that the bone damage happened first and the pain associated with Navicular Syndrome was caused by the deep digital flexor tendon sliding over the rough surface of the damaged navicular bone.
Dr. James R. Rooney of the American College of Veterinarian Pathologists specializes in post mortem studies of horses. In thousands of dead horses he has examined, Dr. Rooney found that the fibrocartilages surrounding the flexor tendon and navicular bone were always damaged if bone deterioration was present. He has not found one single case where the bone was damaged and the fibrocartilage was not. He has however found cases where the bone was not yet deteriorated and yet the fibrocartilage had started to break down. He has learned that the order in which damage occurs is: first the fibrocartilages surrounding the navicular bone, second the fibrocartilages surrounding the deep digital flexor tendon, third the flexor tendon itself, and finally the navicular bone itself is damaged by the rough surface of the damaged flexor tendon. Simulating a toe first landing with cadaver horse legs in test machines, Dr. Rooney was able to simulate this exact process of deterioration, proving the order in which tissues were damaged leading to Navicular Syndrome.
The main structure in the front half of the hoof is the coffin bone. The sole and hoof wall are attached to it via the lamina. The digital cushion and the lateral cartilages form the rear half of the hoof. It is the rear half of the hoof that is responsible for dissipating the impact energy of movement. The front of the hoof has no impact absorbing structures, they are all fairly rigid. The digital cushion at birth is made up of primarily fat and is filled with nerves. As the foal moves the pressure and release of the frog causes fibrocartilage to grow from the front of the digital cushion and spread toward the back. By the time the horse has grown to an adult the digital cushion should have transformed into a mass of fibrocartilage. This fibrocartilage is responsible for protecting and cushioning the nerves as well as dissipating the energy of a heel first landing. The lateral cartilages at birth are tiny, less than 1/16th of an inch thick, and don’t extend to the underside of the frog and digital cushion yet. As the foal grows, with movement, flexion, and the expansion and contraction of the hoof mechanism the lateral cartilages grow. They should eventually extend to create a floor underneath the frog and digital cushion and should have developed to about an inch thick.
So why are most horse’s uncomfortable landing heel first? Because in domestication we tend to keep our foals on soft ground. Deeply bedding the stalls that restricts their movement, and keeping them on soft terrain when they are turned out. The soft ground inhibits the flexion, expansion and contract and negates the hoof mechanism as it was designed to work. This results in very commonly, adult horses with lateral cartilages as thin as 1/8th of an inch thick instead of the inch they should be, and with digital cushions that are underdeveloped, thin and weak.
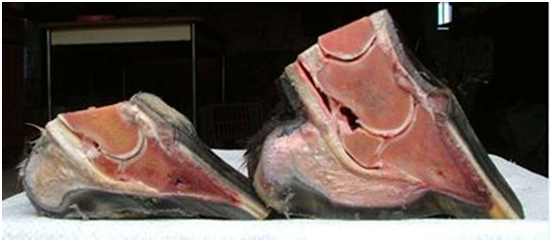
On the left an atrophied and weak digital cushion, on the right a healthy digital cushion
Dr. Bowker has also found that bone loss associated with Navicular Syndrome can also be attributed to a lack of natural pressure in the navicular region of the hoof. He specifically blames peripheral loading i.e. shoeing the hoof to remove sole pressure or allowing the hoof wall to grow too long so that the sole, frog, and bars of the hoof cannot share in the weight baring pressures of movement as they were designed.
When we learn the science behind Navicular Syndrome, and when this information becomes mainstream, only then can we start to prevent these changes from happening. While we cannot heal the bone deterioration once it has happened, we can bring strength back to the digital cushion and lateral cartilages. We must first bring them back into work, by removing the peripheral loading devices, keeping a low heel and allowing the digital cushion to strengthen again. The digital cushion is filled with myoxoid tissue which is similar to stem cell tissue and Dr. Deborah Taylor of Auburn University has published that the digital cushion can regenerate if given the opportunity. And as discussed previously, horses with bone deterioration to the navicular bone can be made comfortable if the rest of the hoof is allowed to strengthen to support it.
If your horse is suffering from Navicular Syndrome or you want to learn more I would direct you to study the research of Dr. Robert Bowker, Dr. James R. Rooney and Dr. Deborah Taylor. They are leading the research right now, and are coming up with amazing information that is helping horses that would have previously been put down.
Published in Saddle Up Magazine August 2015
In last month’s article I discussed the difference between Laminitis and Founder. I explained that laminitis by definition is inflammation of the lamina in the hoof. The lamina affected are the sensitive lamina (surrounding the front and sides of the coffin bone) as well as the solar corium (the underside of the coffin bone). I also discussed that low grade laminitis left untreated, or during acute laminitis, the coffin bone can rotate within the hoof capsule becoming foundered. Founder is simply the rotation of the coffin bone. There is no almost or partly foundered. Either the bone is rotated or it is not. However, the severity of the rotation can vary. This is dependent of the overall health of the hoof prior to the laminitis, the length and severity of the laminitic episode as well as the current trimming/shoeing protocol. In this issue I want to show you what a foundered hoof looks like both inside and out.
In order to demonstrate a foundered hoof, I will first show you a healthy one. The hoof wall is well connected all the way from the coronary band to the ground, it is not flared, pulled forward, or separated.
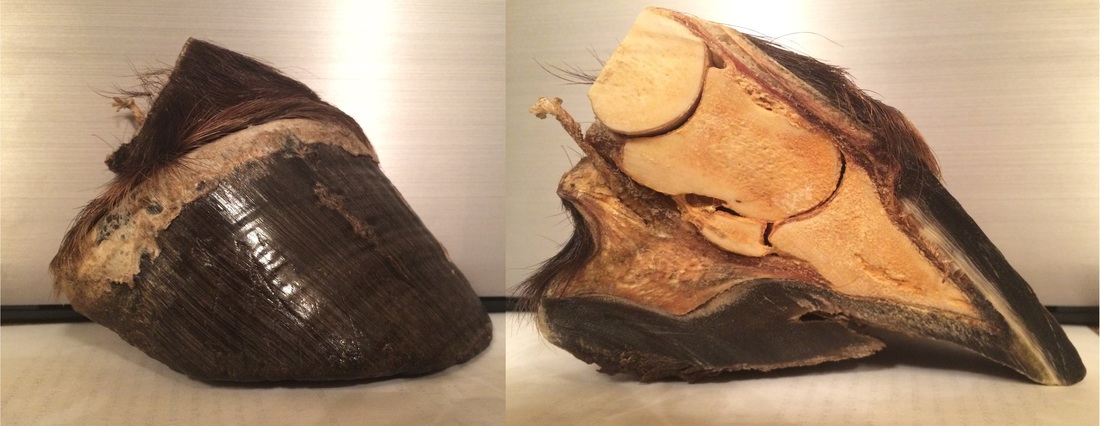
In a foundered hoof the wall at the coronary band will start out at a healthy angle, even if it’s just for a 1/4 of an inch. As it descends it will abruptly change angle and flare forward. The lamina will be stretched or separated and the hoof wall will be flared. There are occasions where a wall can simply flare and not be foundered, in these cases the angle change is less abrupt and usually there will be more than one deviation.
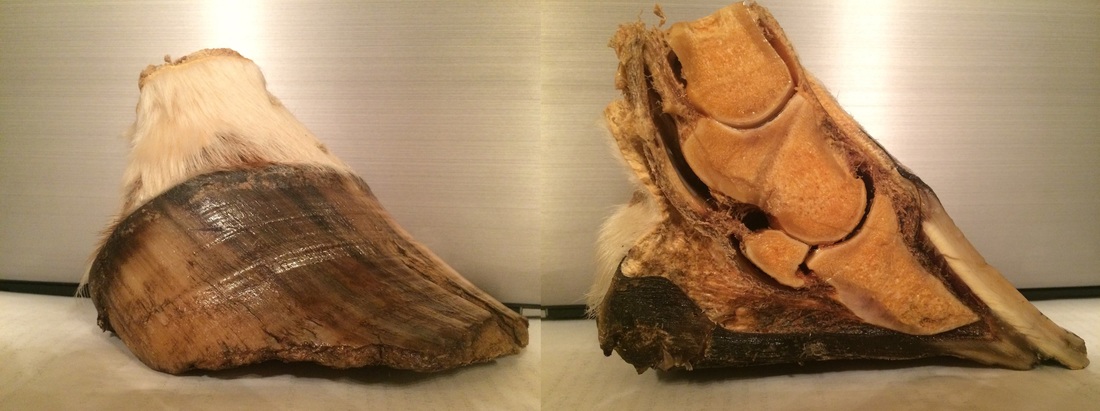
While it is extremely important to seek veterinary attention in the event of a laminitic event, it is also important to have your veterinarian x-ray your foundered horse and work closely with your farrier/trimmer in order to determine the severity of the rotation and how to correctly trim the hoof to alleviate pain and allow a healthy hoof to grow in. Founder is very serious but often times can be repaired. You must first understand how and why your horse developed the laminitis that lead to the founder, and remove all future triggers. This usually means working closely with your veterinarian to determine blood glucose levels, hormone levels and ruling out other various disease that can facilitate laminitis. Second you must have a competent trimmer/farrier that understands the condition of the hoof and can trim to alleviate the rotation and grow in a healthy well connected hoof wall from the coronary band down. This rehabilitation process can take 6-12 months depending on the severity and how fast the individual horse’s hoof grows. Often the horse can return to light work well before rehab is complete, but it is dependent on the individual case and I would strongly recommend to consult your veterinarian and farrier/trimmer first.
Laminitis or Founder, Two terms that are often used interchangeably, but do you know the difference?
7/7/2015
Published in Saddle Up Magazine July 2015
The terms Laminitis and Founder are often used interchangeably by vets, farriers, trimmers and horse owners alike, however in my opinion they have two very different meanings. Laminitis is the inflammation of the sensitive lamina surrounding the coffin bone. This includes the sensitive lamina, found along the front and sides of the coffin bone, as well as the solar corium which is found on the bottom of the coffin bone. The sensitive lamina is the vasculature covering the coffin bone and it has nerves and a blood supply. The insensitive lamina is located on the inside of the hoof wall and has no blood supply or nerves and is semi-rigid in structure. The sensitive and insensitive lamina interlock like Velcro. This connection of the lamina supports the coffin bone’s position within the hoof.
The terms Laminitis and Founder are often used interchangeably by vets, farriers, trimmers and horse owners alike, however in my opinion they have two very different meanings. Laminitis is the inflammation of the sensitive lamina surrounding the coffin bone. This includes the sensitive lamina, found along the front and sides of the coffin bone, as well as the solar corium which is found on the bottom of the coffin bone. The sensitive lamina is the vasculature covering the coffin bone and it has nerves and a blood supply. The insensitive lamina is located on the inside of the hoof wall and has no blood supply or nerves and is semi-rigid in structure. The sensitive and insensitive lamina interlock like Velcro. This connection of the lamina supports the coffin bone’s position within the hoof.
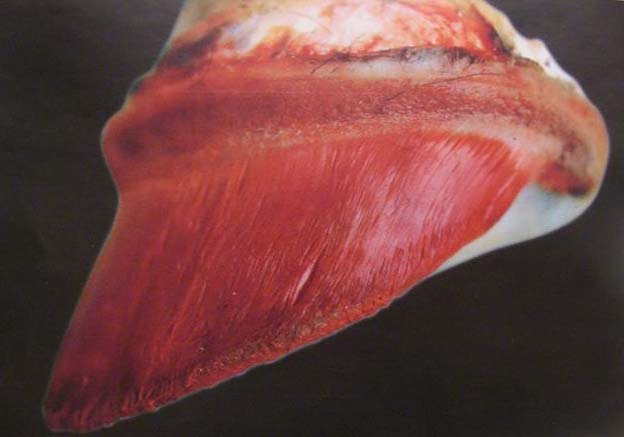
The sensitive lamina surrounding the coffin bone after the wall is removed.
There are two kinds of Laminitis, Acute and Chronic (Founder). Acute Laminitis is when the sensitive lamina becomes inflamed and the blood vessels swell. This causes pain because they are interlocked between the leaflets of the insensitive lamina that are semi-rigid and this connection doesn’t leave room for swelling. The solar corium can also become inflamed during the acute phase and cause bruising and eventually abscessing. A horse with acute laminitis will be extremely tender in their hooves, reluctant to move forward and often adopts a rocked back stance. Acute laminitis will usually last 2-5 days, and must be diagnosed by your veterinarian, who will also likely provide short term anti-inflammatories and care instructions. They should also work in conjunction with your farrier/trimmer to try and alleviate hoof pain and prevent further damaging the hoof. You must figure out what triggered the laminitic attack in the first place in order to prevent it from happening again. There are many causes for acute laminitis, some of the common ones are: carbohydrate overload (excess grain, green grass), hormonal changes (mares cycling in the spring), excess concussive forces (increased work on hard ground), over trimming, adverse reaction to medications, systemic infections, and stress.
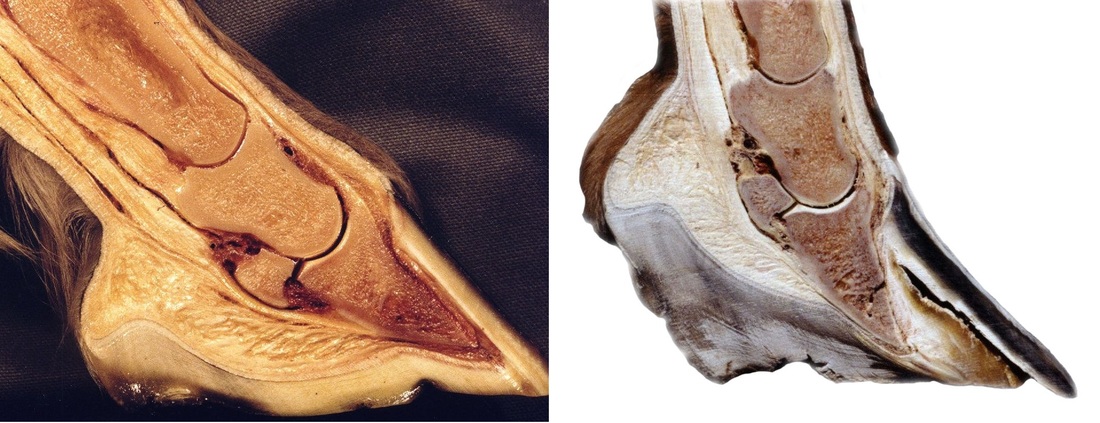
Comparison of hoof wall attachment. Left: healthy Right: foundered
Chronic Laminitis or Founder as it is typically called, is the rotation and or sinking of the coffin bone within the hoof capsule. A horse can have acute laminitis and not founder if the triggers are removed quickly enough and the lamina heals. However, if the cause for the laminitis is not removed and the hooves are not properly trimmed and protected the horse can continue to suffer damage to the sensitive lamina which eventually lets go of the connection with the insensitive lamina, allowing the coffin bone to rotate and sink within the capsule. Whether it rotates one degree or ten, any rotation or sinking at all is classified as founder. Once the lamina separate they cannot be immediately reattached, but the connection can be regrown down from the coronary band as new hoof wall grows in. You will have to work closely with your farrier/trimmer in order to allow the hoof wall to grow in well-connected again, and often a shortened trimming cycle is necessary. It is a long process to rehabilitate a foundered hoof but it is possible.
Founder is very common, and many horses live and even compete on foundered hooves without their owners knowing it. It’s not until these “timebomb” hooves eventually cause lameness that owners become aware. This is why education and knowledge become so important to the horse owner. Learn to understand what you are looking at when examining your horse’s hooves and how to evaluate their hoof health to prevent and avoid these types of problems in the long run.
Founder is very common, and many horses live and even compete on foundered hooves without their owners knowing it. It’s not until these “timebomb” hooves eventually cause lameness that owners become aware. This is why education and knowledge become so important to the horse owner. Learn to understand what you are looking at when examining your horse’s hooves and how to evaluate their hoof health to prevent and avoid these types of problems in the long run.
The typical rocked back stance of a horse with acute laminitis
Published in Saddle Up Magazine June 2015
Time is precious and a healthy relationship with your hoofcare provider is crucial to your horse’s wellbeing. Here are a few tips of what you should expect from your provider and what he/she is hoping to see from you.
Be on time. This works both ways as everyone’s time is valuable. If your appointment is scheduled for 1pm, arrive early to prepare your horse and his surroundings for the visit. Do not arrive at 12:59pm just ahead of the trimmer and rush to halter the horse and scramble to get him ready. Instead have your horse haltered and waiting calmly, perhaps lunged if they are in a particularly anxious mood or have trouble standing still. A trimmers schedule can change throughout the day, so please allow them a little bit of leeway. Perhaps a 15 minute window surrounding the appointment time. Anything more than that and they should call to touch base and see if your schedule is flexible. If you or your trimmer are unable to make the appointment at least 24 hours notice is necessary, 48-36 hours is better, but the situation might not always allow.
Be prepared. Having the feet picked out is a nice treat and even having the horse lightly groomed should impress your trimmer. I am not stating that your horse be groomed as if they were to beshown immediately following the trim, simply if the legs and hooves are muddy, perhaps curry them off. Your provider likely has several other horses to see after you and would like to stay as presentable as possible. Have your horse on a clean, flat dry surface if possible. A barn isle way, a stall mat, or even just a flat packed dirt area or driveway. Being able to assess the hoof while on the ground is a key component formulating a trimming plan and will make your provider’s job easier. Trying to see hooves in tall grass or mud can be difficult. Your trimmer should also arrive prepared with all of the tools required, and ready to work.
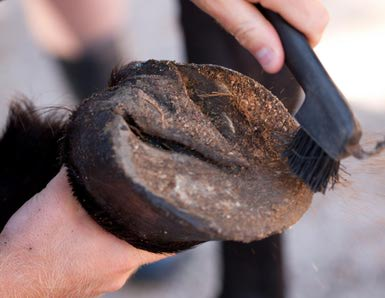
Stay in the moment. Be aware of your horses’ behaviour while being trimmed. Being firm and fair with your horse is important in keeping your trimmer safe while they are doing their job. Do talk to your trimmer, but also pay attention while holding your horse so that you can alert the trimmer to a potential spooking hazard or you can let them know if your horse is uncomfortable in a specific position. A horse that is moving around and distracted can be hard to trim, so keeping them focussed on the task at hand is important. If you are unsure how to handle the horse in a given situation, ask your trimmer how they would like you to handle the horse while they are working underneath him.
Communication is key. Expressing any concerns or questions you have regarding the trim is very important. An open line of communication will ensure you are both working in the best interests of the horse. Your trimmer should be open to answer your questions, and also explain how or why they are doing things the way they are if you ask them to. The answer of “because that’s how it’s done”, is not acceptable.
Payment is due when services are rendered. If you are hoping to pay at a later date or with a postdated check, please consider asking your trimmer if this is appropriate prior to the appointment. With technology today a lot of mobile services are set up to take credit or debit on the spot. However not all have these devices so please check at the time you book your appointment if that is how you intend to pay. Your trimmer should also be prepared to write you a receipt should you require one, and the amount owing should not be more than quoted to you when the appointment was booked unless it was discussed before or during the trim. This occasionally happens if the condition of the hooves require something extra that the trimmer couldn’t anticipate prior to the appointment.
Published in Saddle Up Magazine in two parts, April 2015 and May 2015
Nature seems to have a way when it comes to getting things right. The mathematical simplicity that exists when you break a hoof down into sections is quite amazing. At the Okanagan School of Natural Hoof Care we teach a trimming method called the Hoof Print Trim. This method was created by Cheryl Henderson, founder of the Oregon School of Natural Hoof Care. The Oregon School was the first of its kind in North America. A center devoted to the practice of Natural Hoof Care and a better life for our equines. Cheryl Henderson has spent many decades developing and researching her method and has proven it again and again with thousands of dissections and case studies. Our program teaches this method and also relies on the ability to “read” the hoof and each horse’s specific conformation to adapt the trim to their needs. This system allows us to teach the fundamentals of trimming in a short time frame.
The formula of a healthy hoof is as follows: the width at the fulcrum (widest point on the bottom of the hoof) equals the length heel to toe. This means that the hoof should be a perfect circle, hind hooves abide by this measurement also but the hoof tends to be more spade shaped. The frog should equal 2/3 of the solar view of the hoof from the back to the front, the remaining sole to the dorsal (front) hoof wall is the other 1/3. The hairline should be at a relaxed 30 degree angle to the ground. All hooved animals have a naturally occurring 30 degree hairline that only becomes distorted through genetic defect, altered living environments and lack of movement, or human trimming error. These formulas have been proven again and again through the study of wild horses’ hooves and as well through countless dissections and case studies. Even the most distorted hoof shapes follow these parameters and can often be brought back into balance in just a few trims depending on the severity of the distortion. This does not mean however that we just measure and cut. These guidelines must be paired with our “reading” of the hooves’ clues to help us determine each horses’ needs. For instance some horses have club feet, therefore this physical deformity will impact the heel height and the angle of the hairline. This is where reading the hoof and determining the best approach for each specific horse is extremely important. A deformity like club foot can sometimes be corrected or improved, but many times is just something you have to work with and adapt your trim around.
The formula of a healthy hoof is as follows: the width at the fulcrum (widest point on the bottom of the hoof) equals the length heel to toe. This means that the hoof should be a perfect circle, hind hooves abide by this measurement also but the hoof tends to be more spade shaped. The frog should equal 2/3 of the solar view of the hoof from the back to the front, the remaining sole to the dorsal (front) hoof wall is the other 1/3. The hairline should be at a relaxed 30 degree angle to the ground. All hooved animals have a naturally occurring 30 degree hairline that only becomes distorted through genetic defect, altered living environments and lack of movement, or human trimming error. These formulas have been proven again and again through the study of wild horses’ hooves and as well through countless dissections and case studies. Even the most distorted hoof shapes follow these parameters and can often be brought back into balance in just a few trims depending on the severity of the distortion. This does not mean however that we just measure and cut. These guidelines must be paired with our “reading” of the hooves’ clues to help us determine each horses’ needs. For instance some horses have club feet, therefore this physical deformity will impact the heel height and the angle of the hairline. This is where reading the hoof and determining the best approach for each specific horse is extremely important. A deformity like club foot can sometimes be corrected or improved, but many times is just something you have to work with and adapt your trim around.
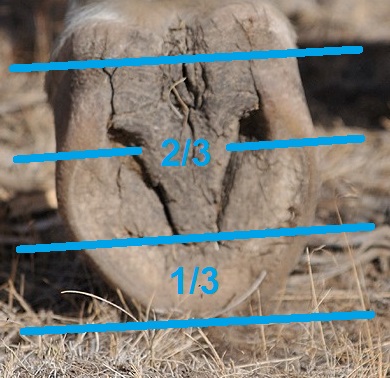
Showing the 2/3 to 1/3 balance of the hoof
The Hoof Print Trim is a great starting point for those learning to trim because you can measure and draw where the healthy hoof should be and then train your eyes to “read” the hoof and evaluate using both sets of clues where you should trim. This method starts with evaluating the baseline. The baseline is the rearmost part of the hoof, where we will trim our heel height down to as well as where we take our measurement from heel to toe after establishing the width at the fulcrum. To find our baseline we measure from the back of the heel bulbs at the hairline to the collateral groove exit. On most average sized horses this measurement equals 1 ¼ inches. It varies for ponies or smaller horses and the taller horses and drafts but this is just an average, and again not a measurement we would simply just cut without “reading” into the rest of the hoof first and accounting for and deformities or pathologies etc. After establishing the correct baseline by evaluating the frog health, the periople wear marks, the heel surface, and sole thickness in switchback at the rear of the hoof, we can measure our fulcrum to establish our toe length.
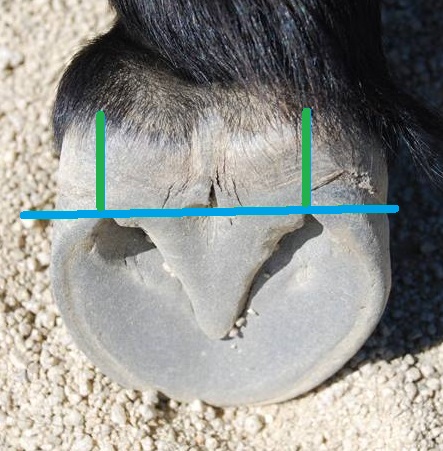
Establishing the baseline
The fulcrum is simply the widest part on the bottom of the hoof. It is almost always about ¾ inch behind the apex of the frog occurring at the mid-point of where the coffin bone sits inside the hoof and is not usually distorted by flaring or stretched lamina. We measure the fulcrum from the golden line on one side to the golden line on the other side, not from wall to wall. If the measurement was 4 ½ inches, we would then measure from our baseline forward 4 ½ inches and mark where our golden line should be at the toe. In a balanced hoof that has been trimmed regularly and correctly, this mark will line up with the golden line at the toe. I just want to reiterate that this is also not a cut line, we still have to add our wall thickness to determine where the cut line will be. We also must “read” the hooves’ wear patterns and toe callous before deciding where to cut. Now that we have determined the circumference of the hoof we can establish the 2/3 to 1/3 balance. The baseline to the apex of the frog should be 2/3 of the overall hoof length. Frogs can get stretched forward into the sole’s 1/3 and occasionally need to be trimmed back. This measurement will determine if the frog has migrated forward. However all of our measurements to this point would be inaccurate if we had measured our baseline wrong, so caution must be taken to measure correctly and confirm we are right by reading” the clues and wear marks in the hoof.
After establishing the baseline and the heel height we must determine the length of the toe. We do not use the white line as a determining factor as it can stretch and migrate forward giving a false location for the toe length. In order to determine the proper length we measure the fulcrum width from white line to white line on either side of the hoof. A front hoof should be the same width as length. So if the fulcrum is 4 ½ inches from white line to white line then our measurement from the baseline at the rear of the hoof to the toe would be 4 ½ inches. This is not a cut line though, we still have to add the thickness of the hoof wall to this measurement. A lot of times in a run forward hoof the white line can stretch forward and this measurement can seem extreme. However even though the wall flares forward and the white line stretches, the internal structures do not move or migrate. The coffin bone can rotate and sink lower in the hoof capsule in a laminitic or foundered horse, but even in those cases the geometrical mapping will establish the location of the coffin bone before we start to trim and we can work to bring balance back to the hoof.
After establishing the baseline and the heel height we must determine the length of the toe. We do not use the white line as a determining factor as it can stretch and migrate forward giving a false location for the toe length. In order to determine the proper length we measure the fulcrum width from white line to white line on either side of the hoof. A front hoof should be the same width as length. So if the fulcrum is 4 ½ inches from white line to white line then our measurement from the baseline at the rear of the hoof to the toe would be 4 ½ inches. This is not a cut line though, we still have to add the thickness of the hoof wall to this measurement. A lot of times in a run forward hoof the white line can stretch forward and this measurement can seem extreme. However even though the wall flares forward and the white line stretches, the internal structures do not move or migrate. The coffin bone can rotate and sink lower in the hoof capsule in a laminitic or foundered horse, but even in those cases the geometrical mapping will establish the location of the coffin bone before we start to trim and we can work to bring balance back to the hoof.
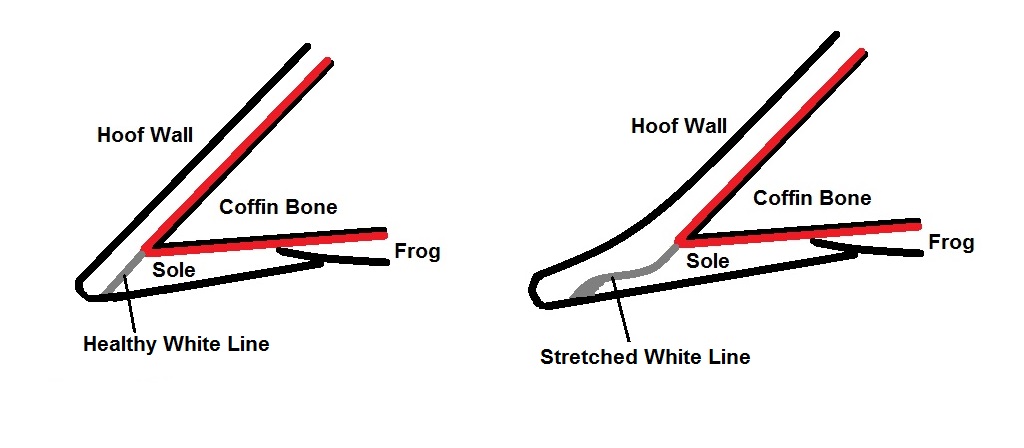
Another factor we have to consider when aligning the bones of the hoof and lower limb is the hairline angle. All hooved animals in nature have a 30 degree hairline in their natural environment (barring rare genetic defects) and the horse is only an exception when trimmed and managed ineffectively. Studies of wild horses in the US Great Basin have shown that when allowed to naturally wear their hooves in their wild environment they almost always have a 30 degree hairline. The few horses with this exception have a genetic defect of a club foot. A club foot is a coffin bone with a steeper dorsal angle and therefore creates a hoof with a steeper dorsal hoof wall angle and a higher heel. Both of these pathologies will affect the hairline angle.
After evaluating the baseline, the fulcrum, the toe length and the hairline angle, we finish our trim by defining and trimming the bars and putting the mustang roll on the front of the hoof. The bars function is for support in the rear of the hoof and it is important that they are not over trimmed, however they must also not be left to grow over the sole as they can cause bruising and abscessing. A mustang roll is a rounding of the hoof wall at the toe to remove any leveraging forces on the hoof wall and to create a smoother breakover. The mustang roll is one of the defining differences between a barefoot trim and a traditional farrier trim.
After evaluating the baseline, the fulcrum, the toe length and the hairline angle, we finish our trim by defining and trimming the bars and putting the mustang roll on the front of the hoof. The bars function is for support in the rear of the hoof and it is important that they are not over trimmed, however they must also not be left to grow over the sole as they can cause bruising and abscessing. A mustang roll is a rounding of the hoof wall at the toe to remove any leveraging forces on the hoof wall and to create a smoother breakover. The mustang roll is one of the defining differences between a barefoot trim and a traditional farrier trim.
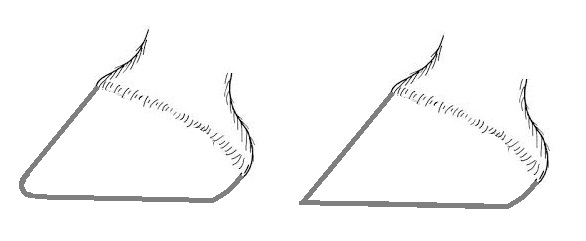
On the left a natural trim with a mustang roll, on the right a traditional pasture trim.
Author
Kristi Luehr is a barefoot trimmer/farrier, author, and founder of the Okanagan School of Natural Hoof Care. She is certified by the Canadian Farrier School as well as the Oregon School of Natural Hoof Care, and also has certification in equine massage and dentistry. Her focus is to educate owners about hoof anatomy, function and proper barefoot trimming that supports and grows healthy and functional hooves specific to each horse's individual needs. She is the author of three online courses specific to hoof care and is always striving to create more educational content for students to learn from.
Archives
May 2024
April 2024
March 2024
February 2024
January 2024
December 2023
November 2023
October 2023
September 2022
April 2022
February 2022
August 2021
May 2021
April 2021
March 2021
February 2021
January 2021
December 2020
December 2019
November 2019
October 2019
August 2018
July 2018
October 2015
July 2015
April 2015
March 2015
February 2015
October 2014
 RSS Feed
© COPYRIGHT OKSNHC 2024. ALL RIGHTS RESERVED.